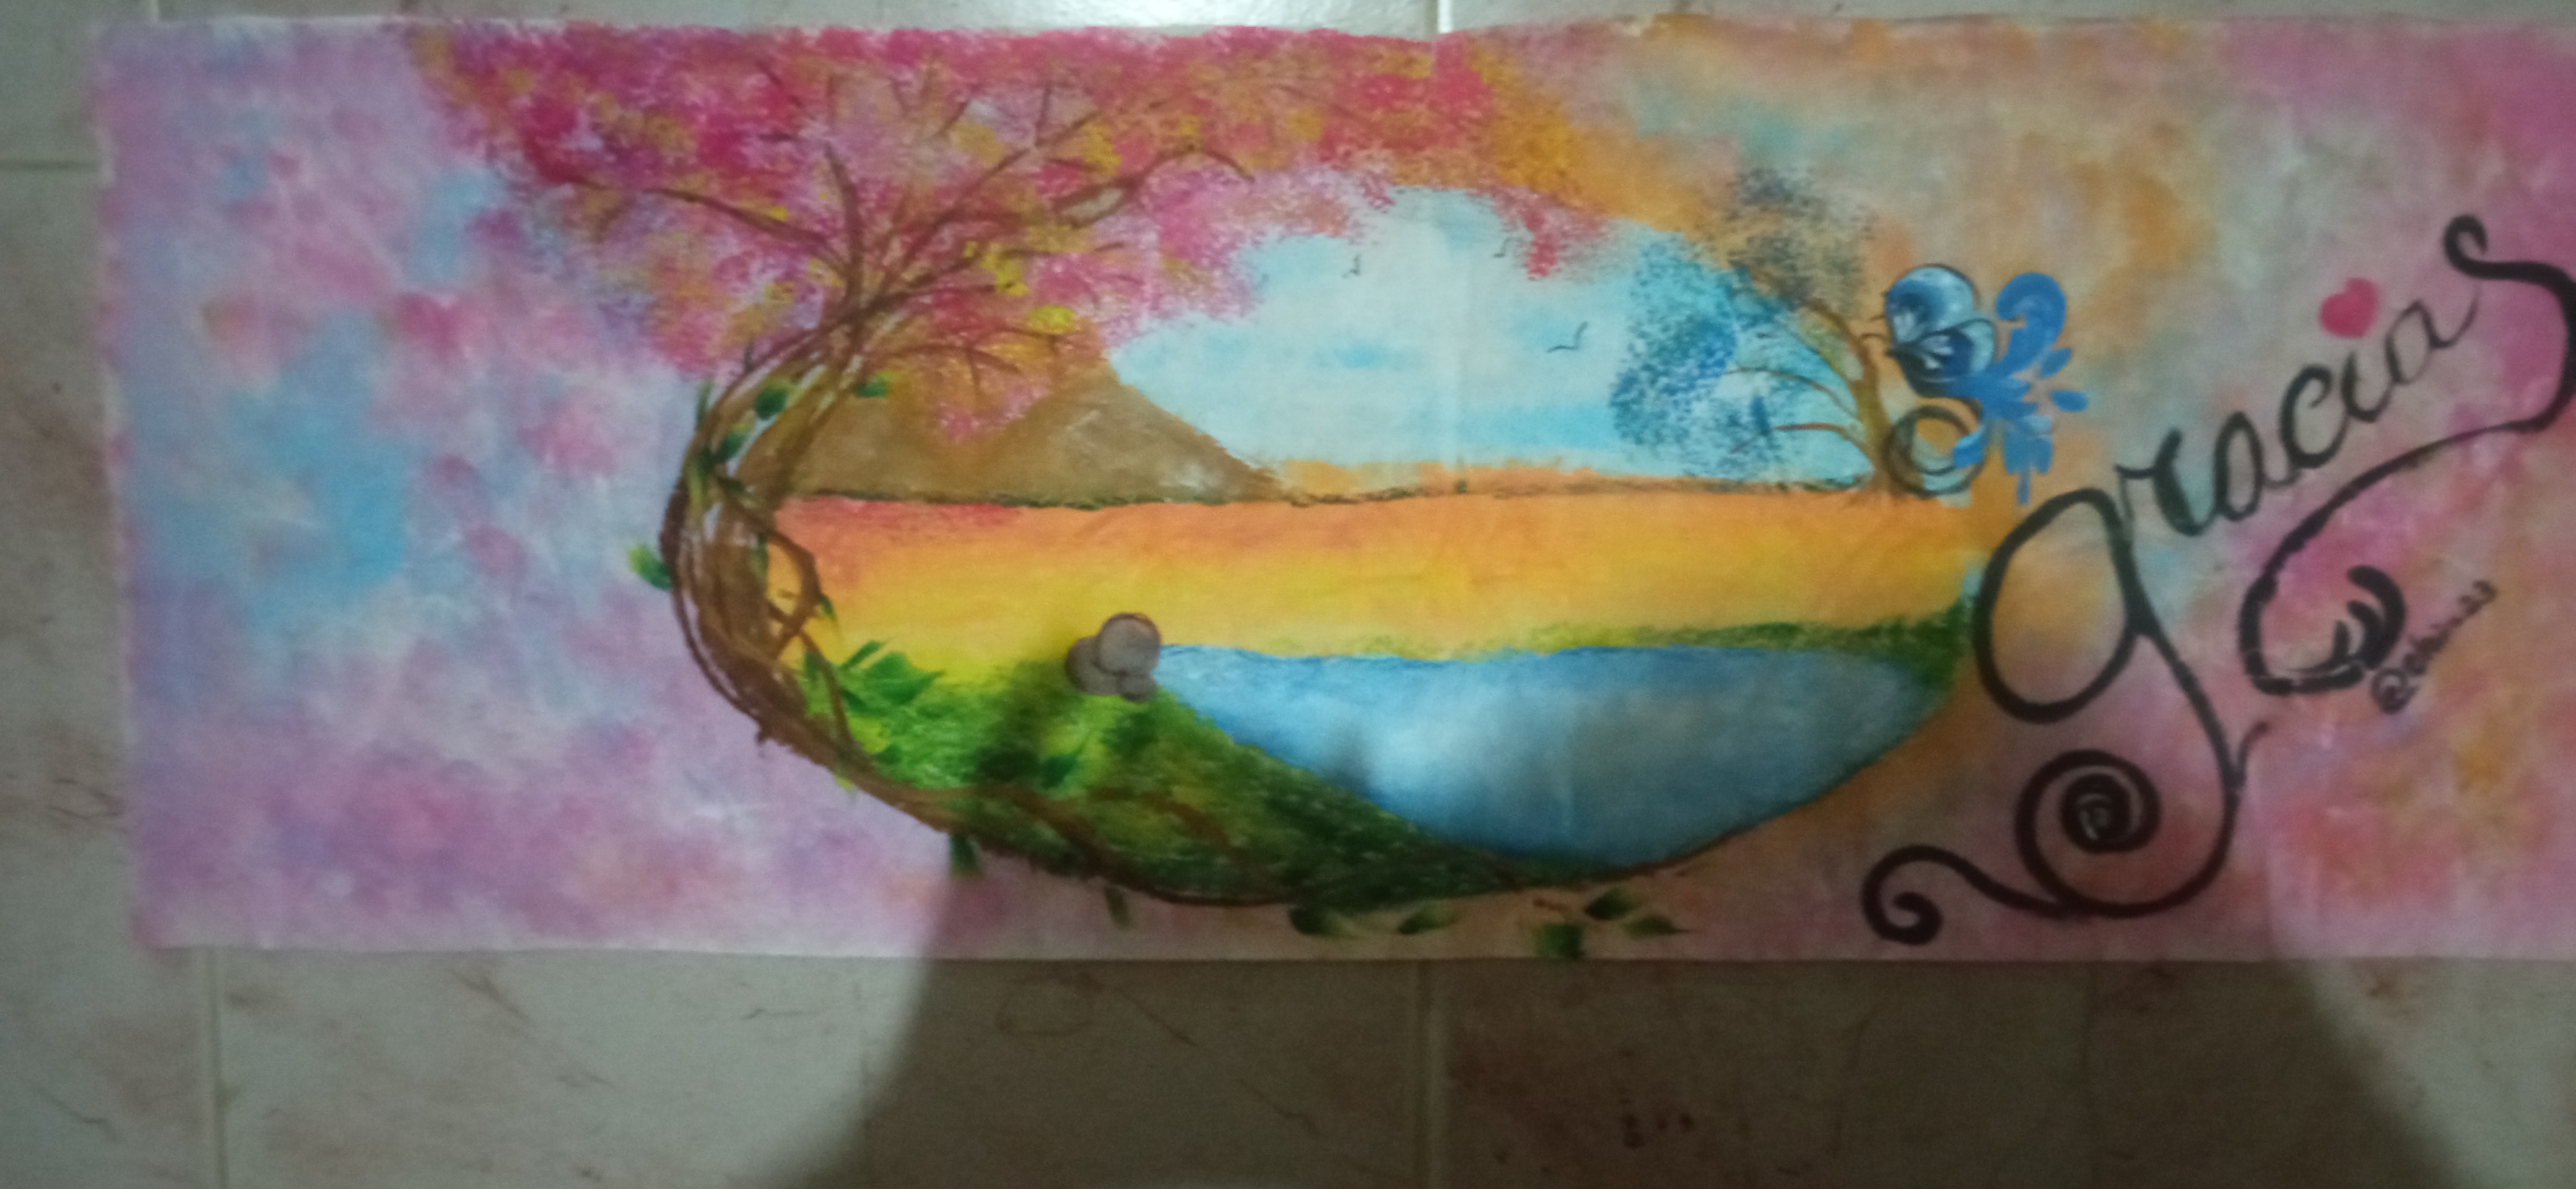
(ESP-ENG)Un paisaje para agradecer su atención🖼️A landscape to thank you for your attention.
Dear creative, intellectual, ingenious and innovative friends of Hive!!! first of all, I send you my best regards. Wishing you that this wonderful day will be profitable and full of blessings. In this opportunity I want to share with you a small but very significant thank you for your invaluable support and comments, you will be seeing this small thank you in my publications continuously. I hope you like it, I made it with love and affection for all of you.
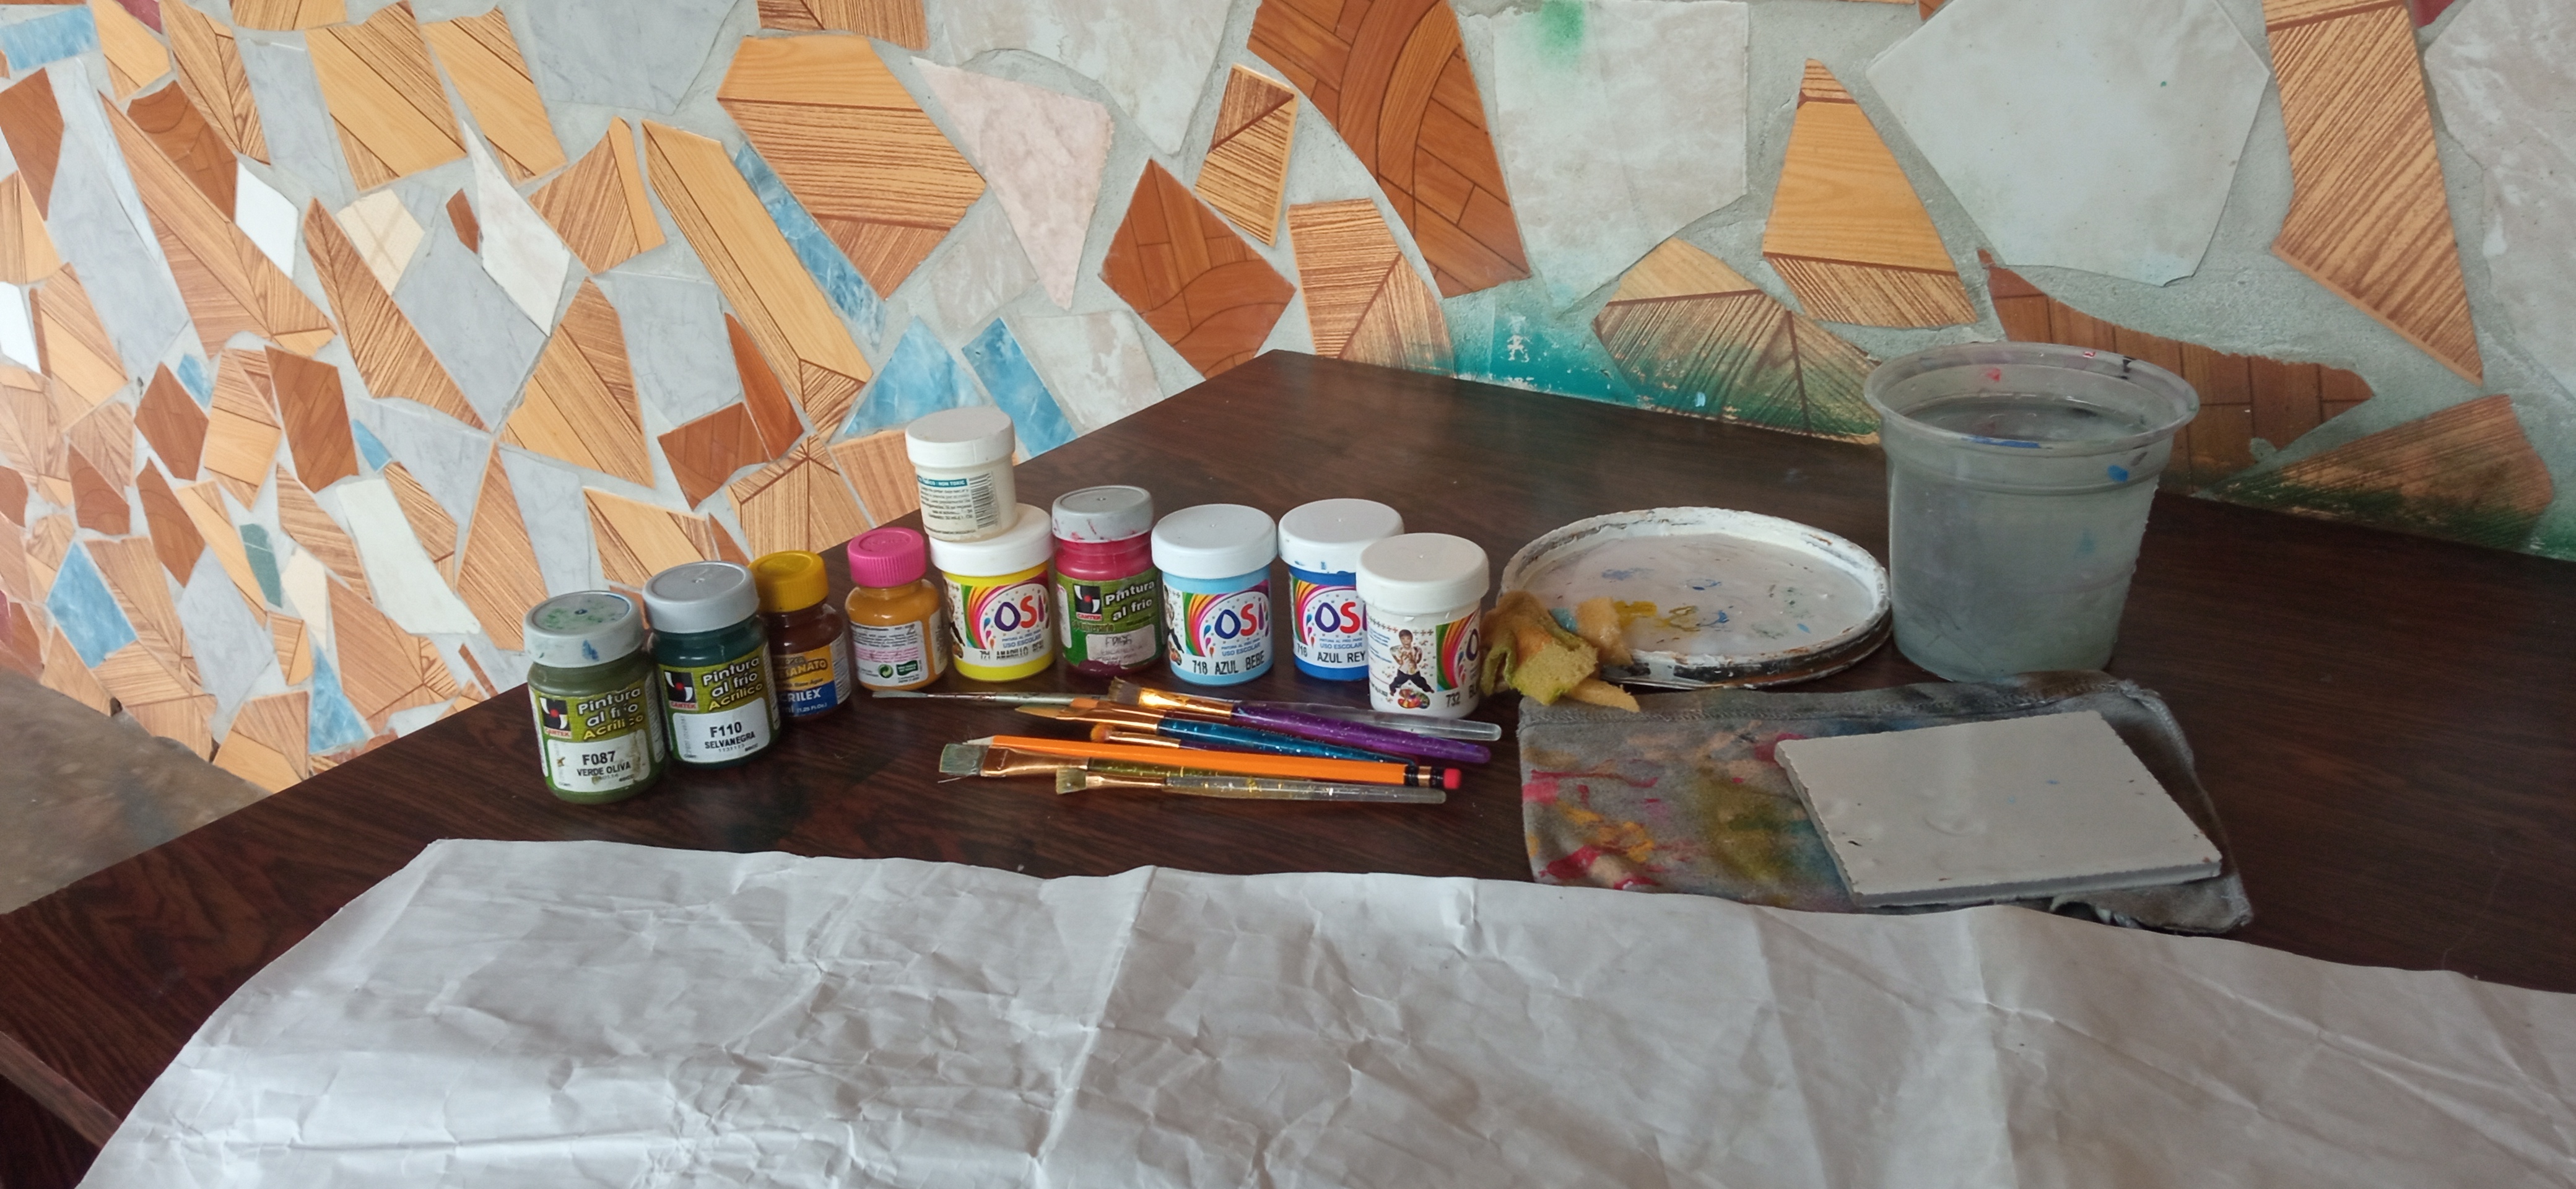
Materiales:
- Pinceles de cerda
suaves:Plano 5/8,
Redondo 5,linner 1. - Pinceles viejos,
desgastados y duros. - Un trozo de esponja.
- Pañito.
- Potecito con agua.
- Una pieza de ceramica.
- Un rectángulo de bolsa de harina pan de
color blanco. - Tapa de lata de pintura.
- Lápiz de grafito.
- Pinturas acrílicas:Blanco, verde oscuro
Verde oliva,magenta,
amarillo ocre,marrón chocolate,negro.
Materials:
- Soft bristle brushes:Flat 5/8,
Round 5,linner 1. - Old worn and hard brushes.
- A piece of sponge.
- Small cloth.
- Small pot with water.
- A piece of ceramic.
- A rectangle of bread flour bag of white color.
white color. - Paint can lid.
- Graphite pencil.
- Acrylic paints: white, dark green, olive green, magenta, magenta, dark green.
Olive green, magenta,
yellow ochre, chocolate brown, black.

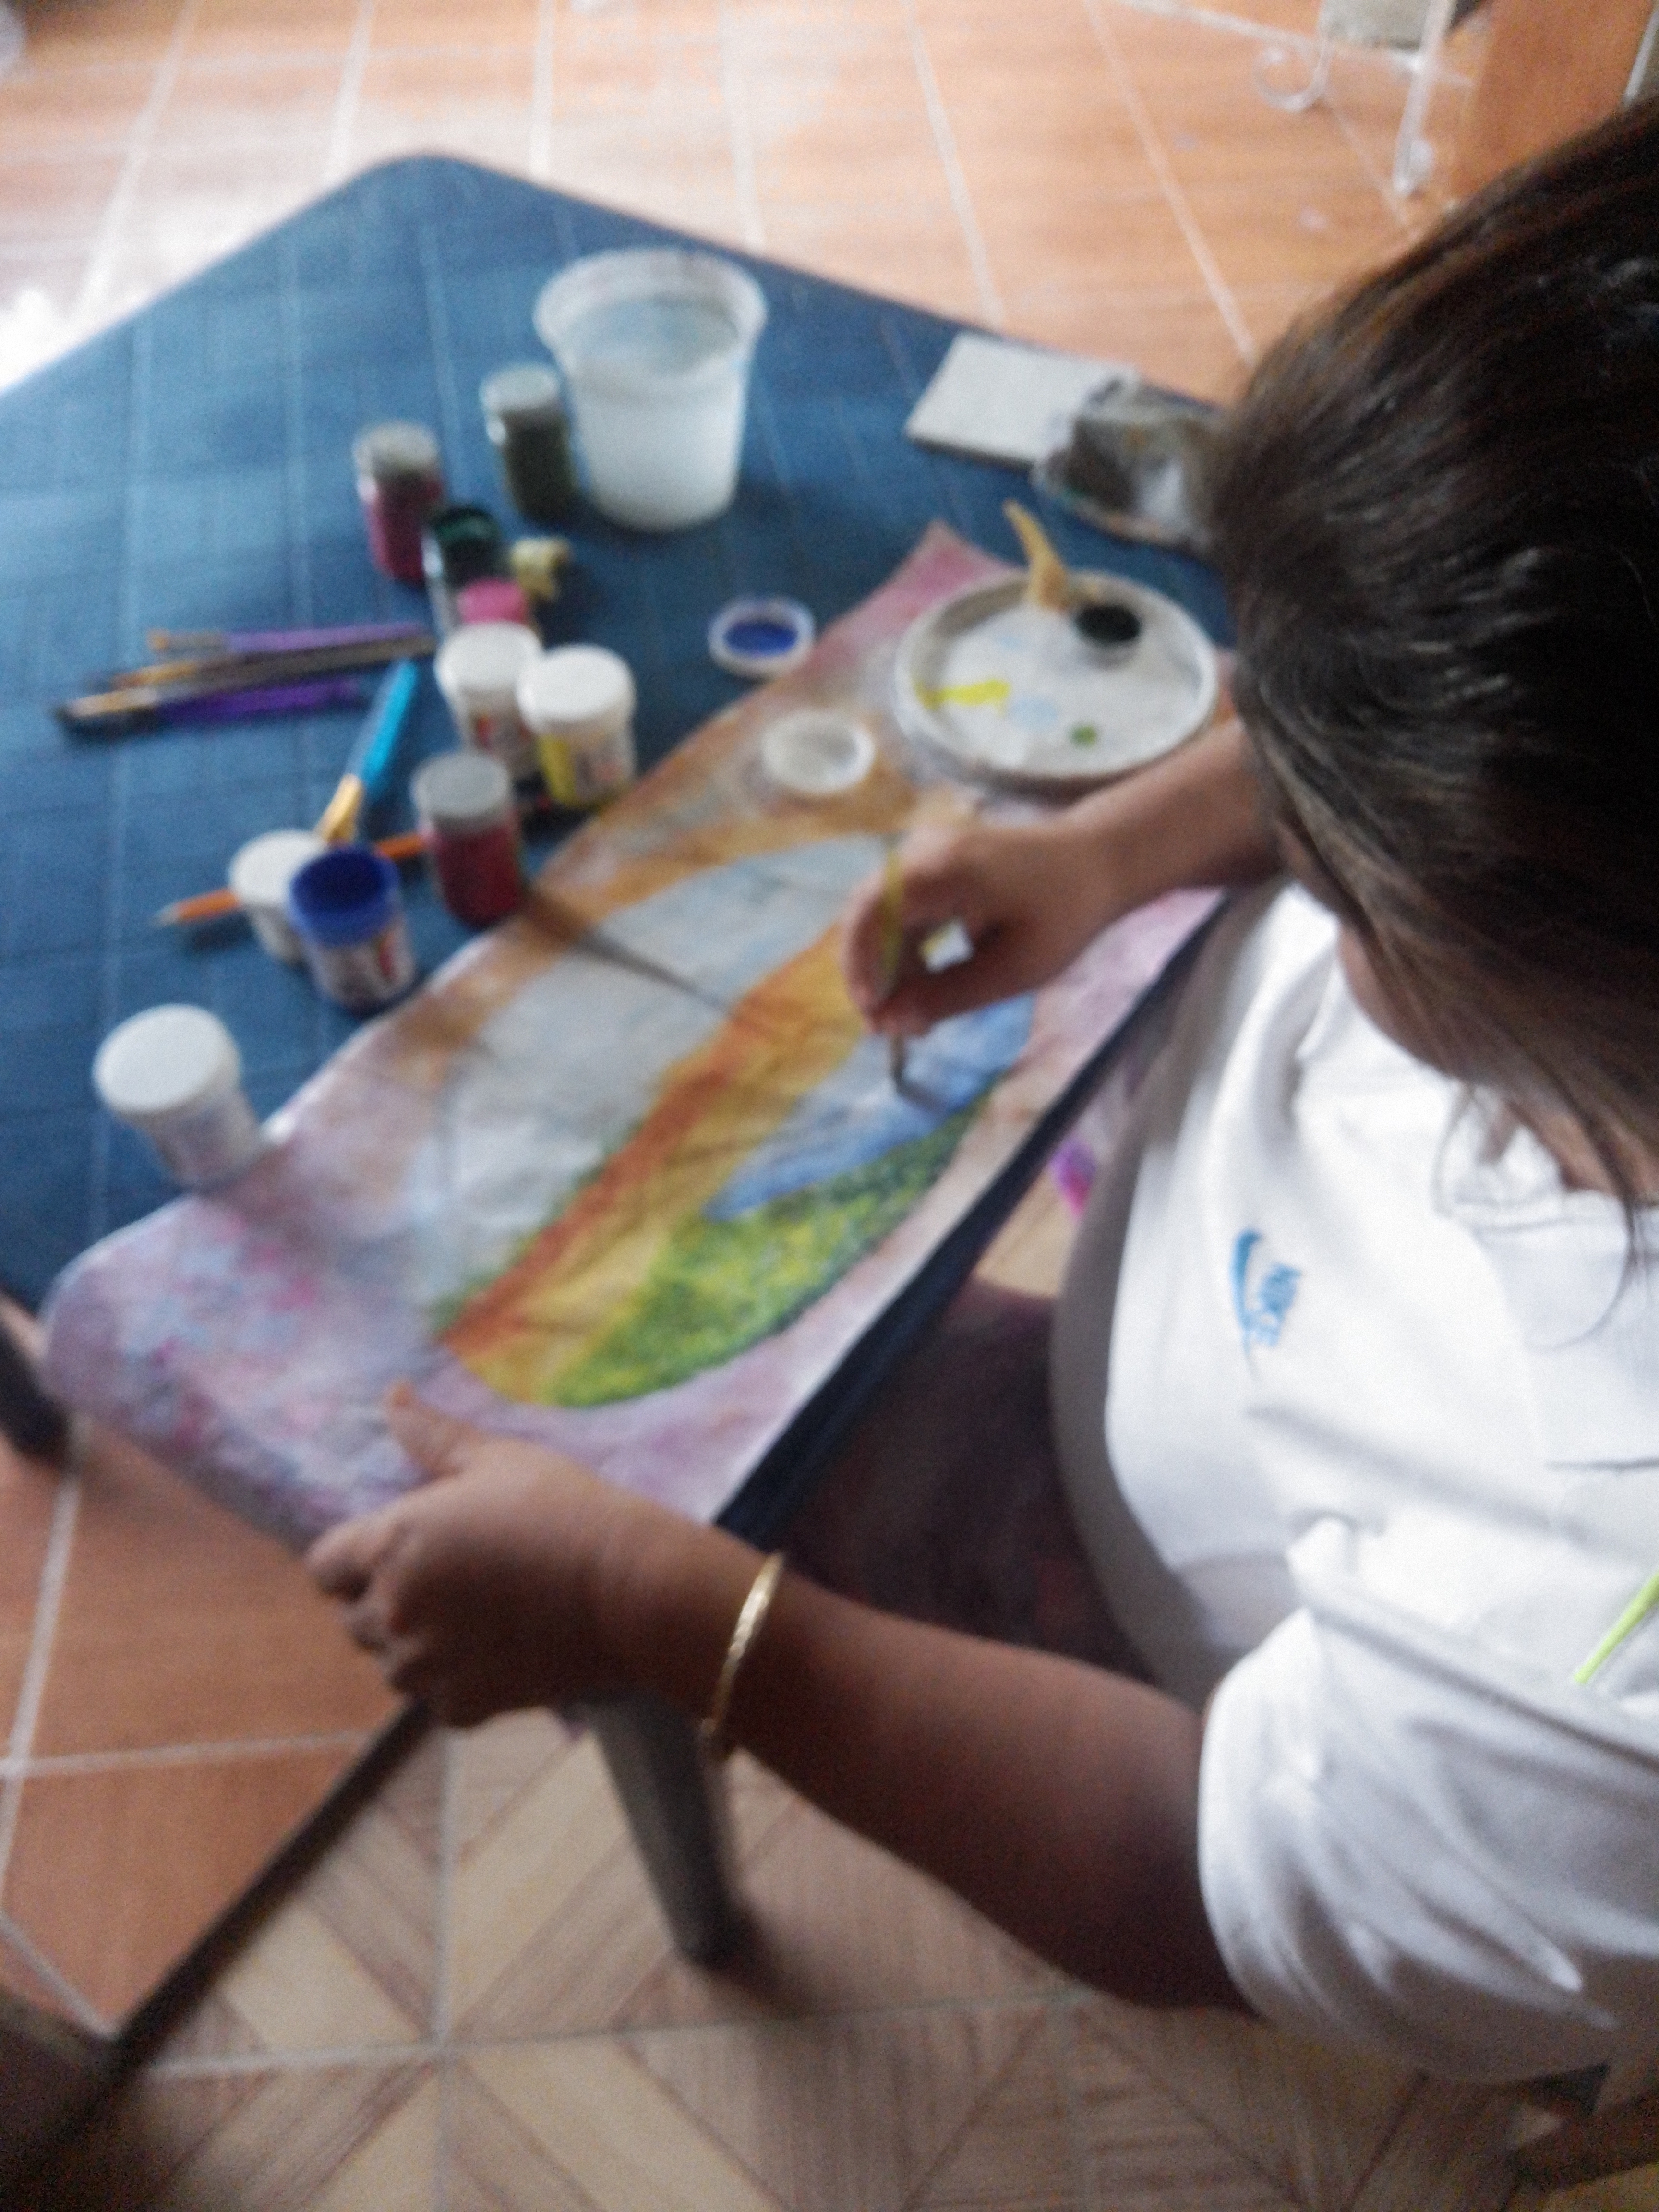
Paso 1:
Primeramente realice un óvalo a mano alzada en el medio de rectángulo y seguidamente comence a motearlo con la esponja de de magenta,azul y amarillo ocre sin tocar el centro del óvalo.
Step 1:
First I made a freehand oval in the middle of the rectangle and then I began to stipple it with the magenta, blue and yellow ochre sponge without touching the center of the oval.
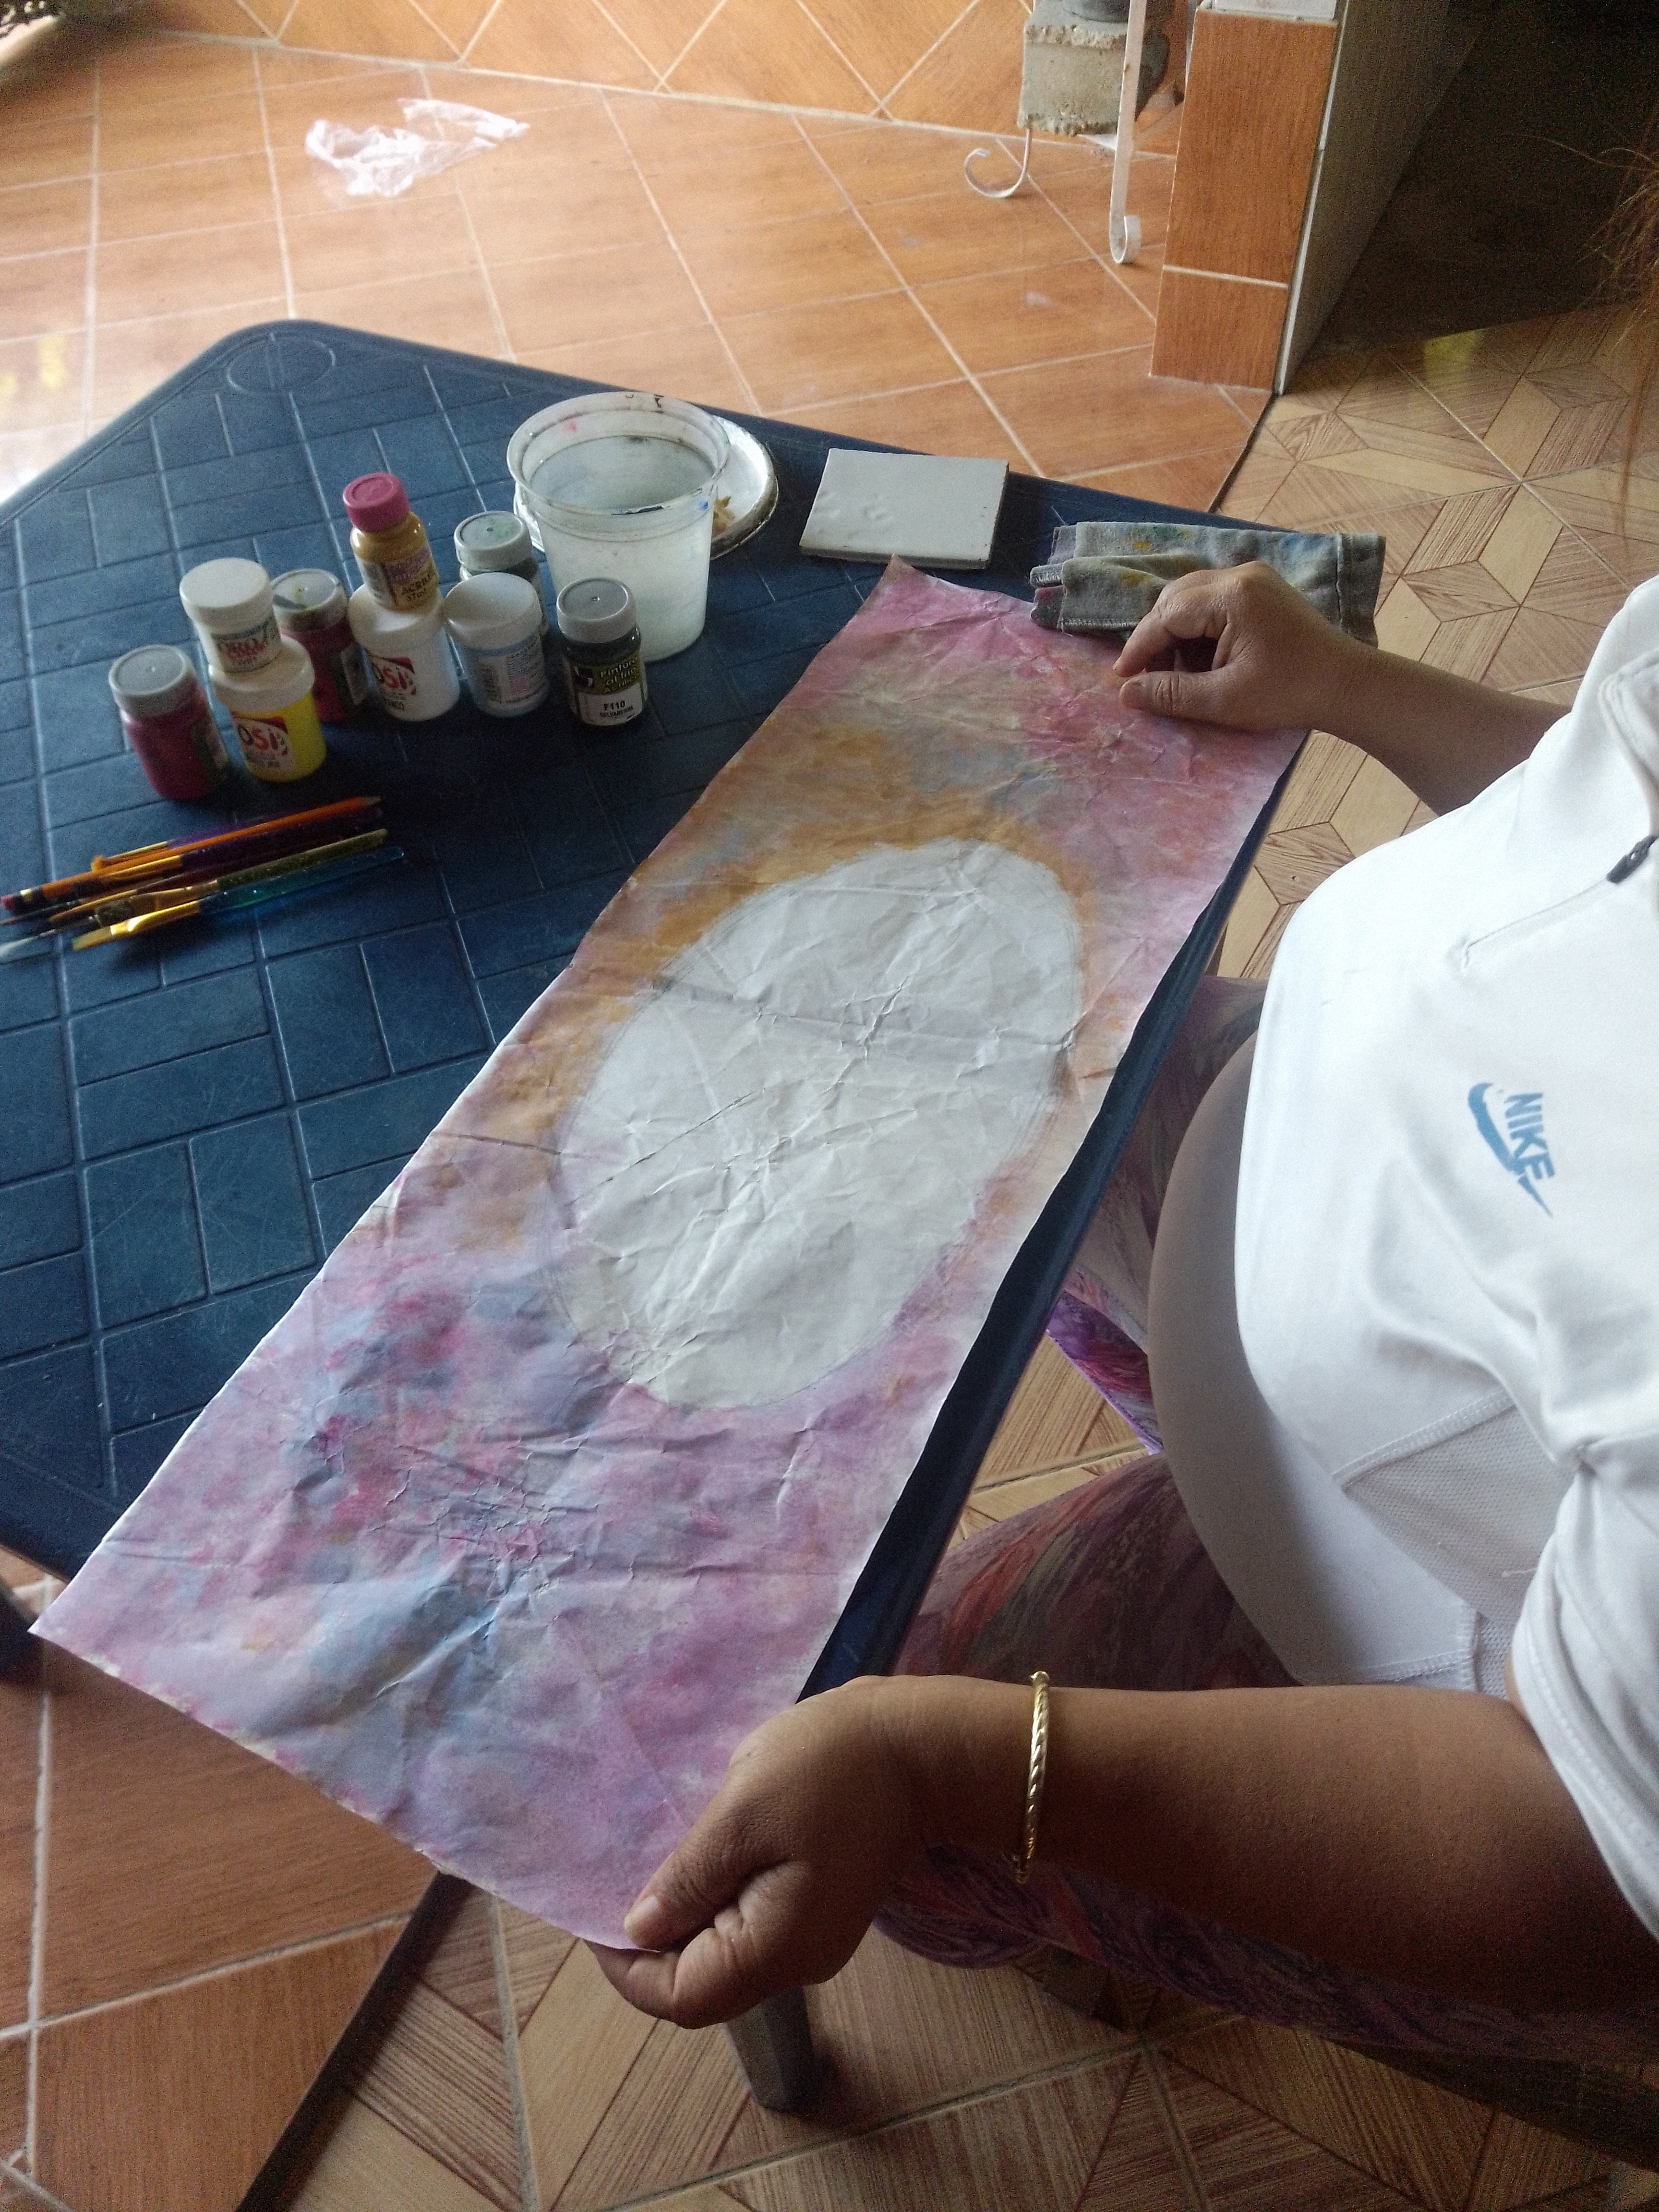

Paso 2:
Trabaje el centro del óvalo primeramente con azul claro y blanco, los dos tonos juntos y con la esponja lo aplique en forma de arrastre (el movimiento es igual cuando uno borra una pizarra para que tengan una idea) en su parte superior para hacer el cielo del paisaje.De la misma forma aplique los tonos magenta, amarillo ocre y blanco para hacer la arena del paisaje. Y le puse un punto de luz en sus centro con blanco.
Step 2:
I worked the center of the oval first with light blue and white, the two tones together and with the sponge I applied it in dragging form (the movement is the same as when one erases a blackboard to give you an idea) in its upper part to make the sky of the landscape, in the same way I applied the magenta, yellow ochre and white tones to make the sand of the landscape. And I put a point of light in its center with white.

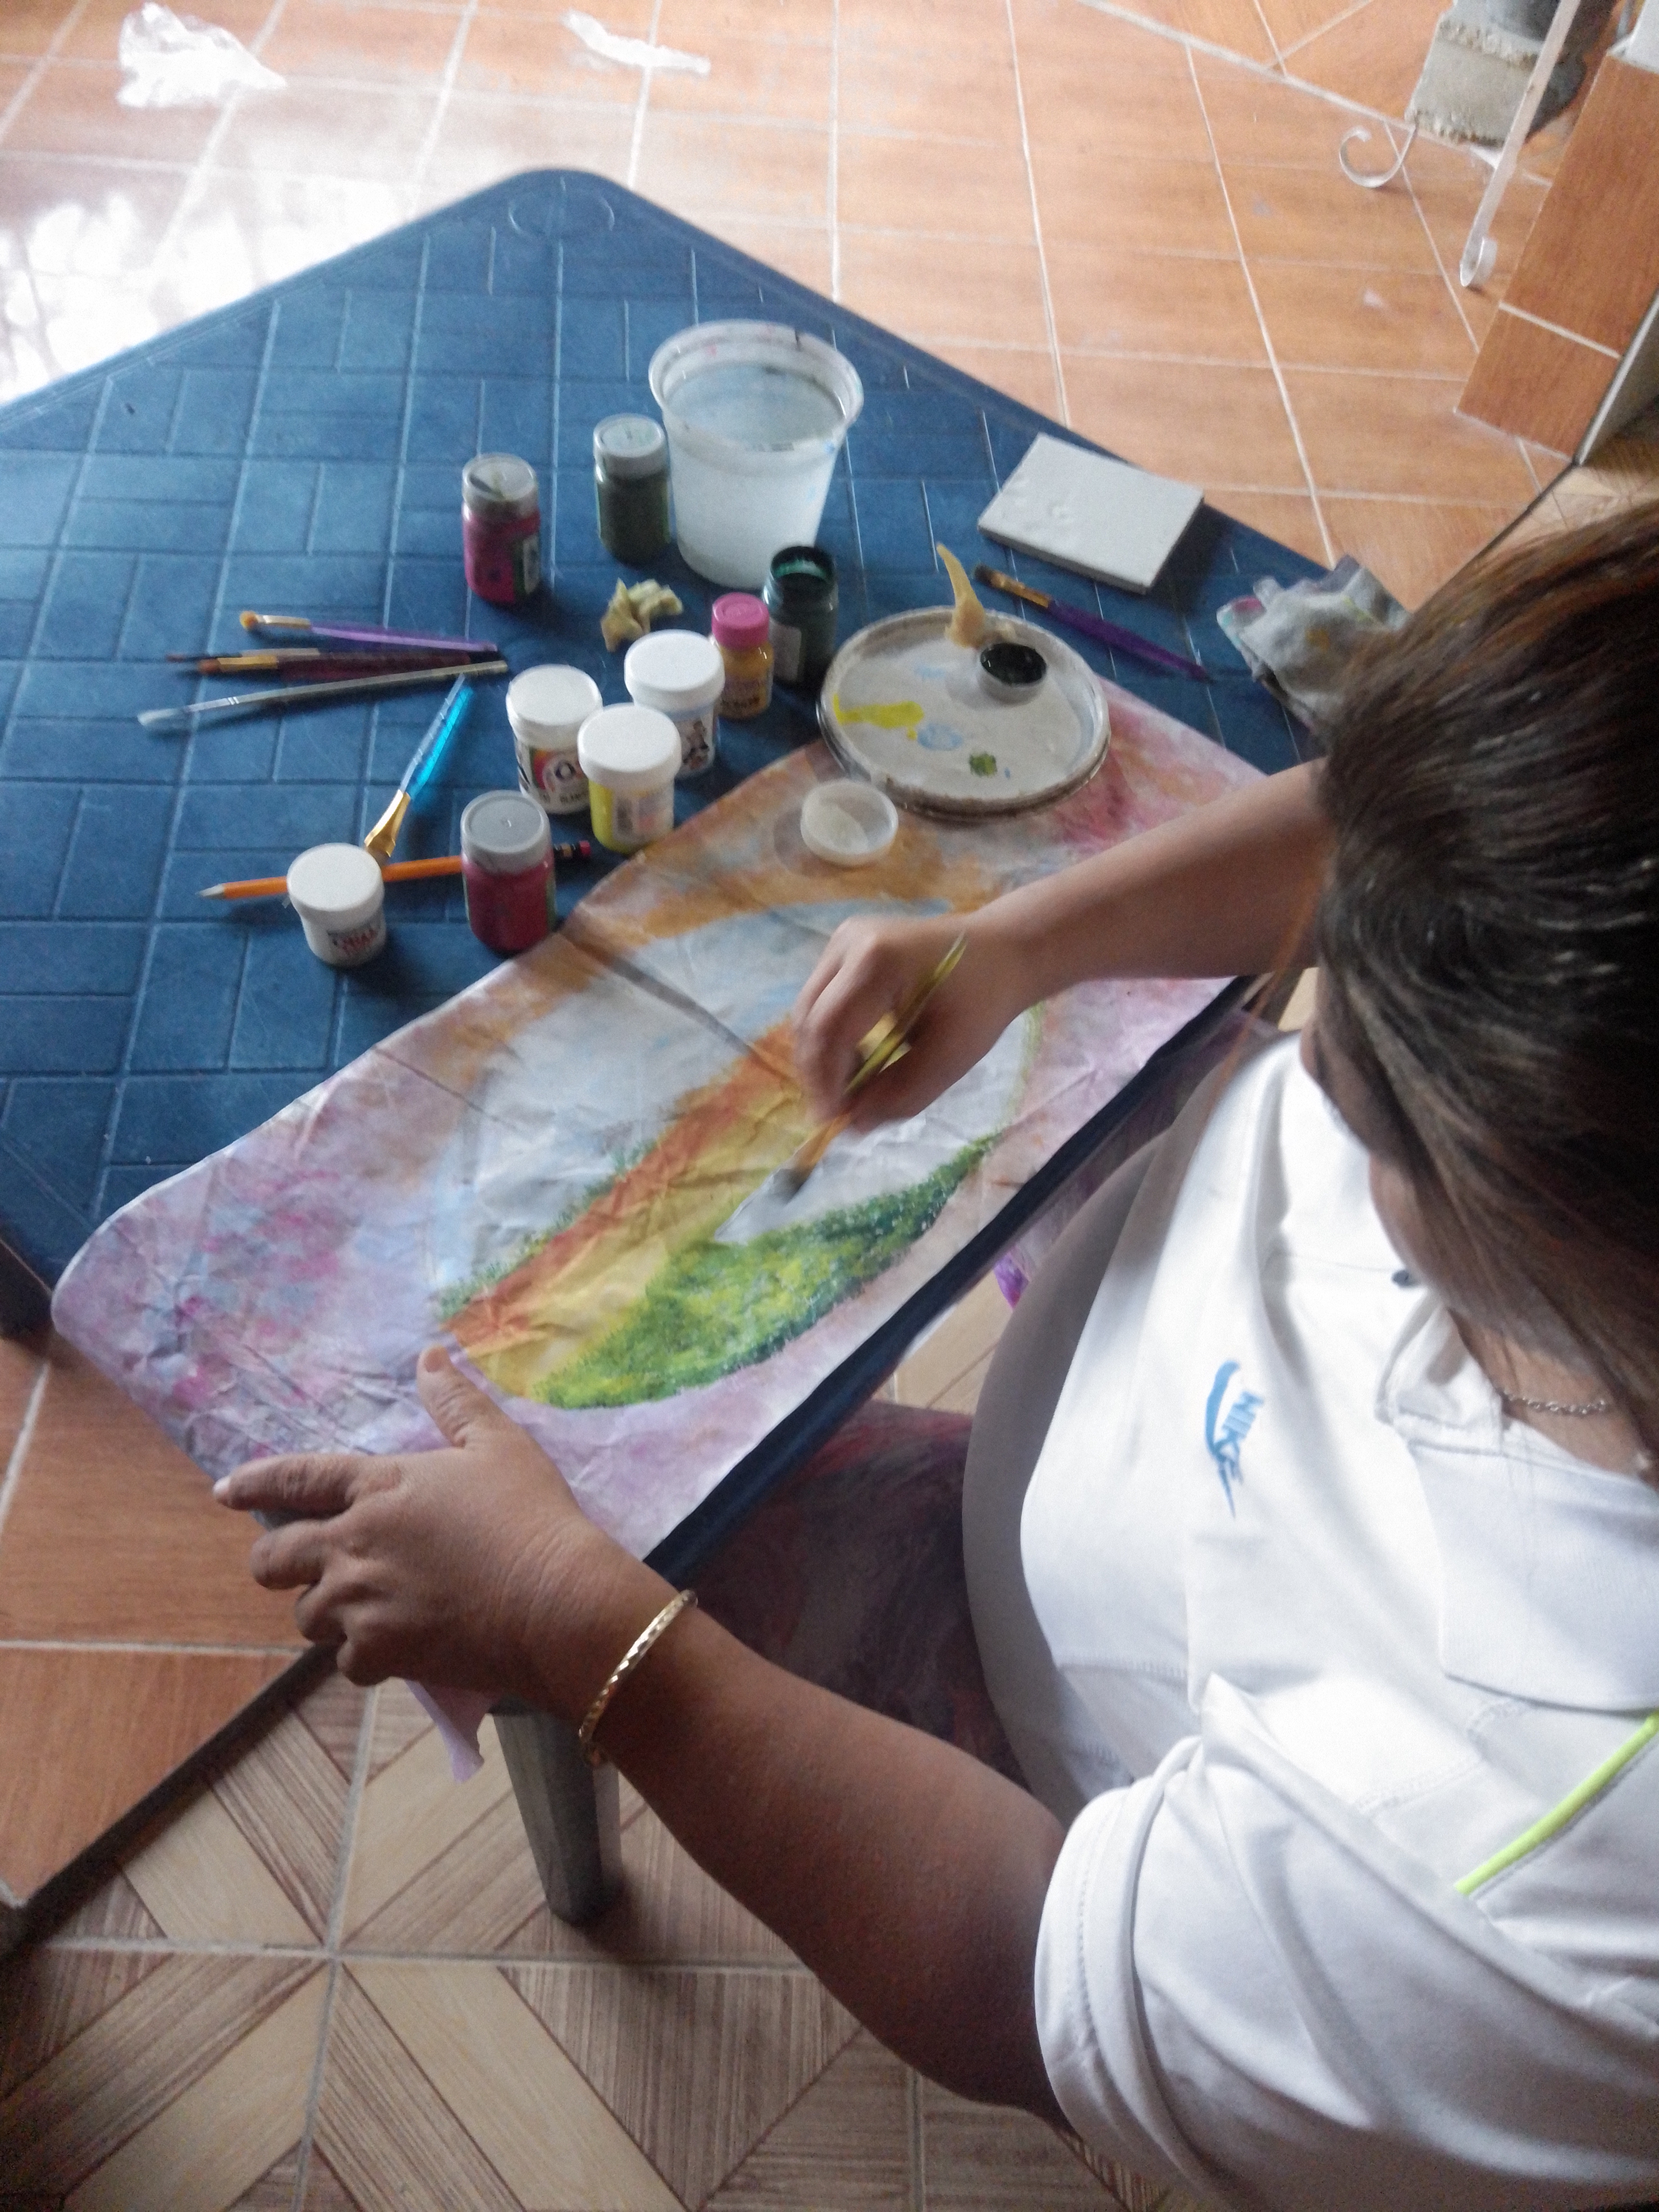
Paso 3:
La grama la trabaje utilizando un pincel desgastado y duro en su punta lo cargue de verde oscuro y lo descargue un poco sobre la tapa de pintura dándole suaves golpecitos hasta que los puntos quedaran un poco dispersos sin dejar secar aplique el amarillo seguidamente el blanco. Cuando realizamos paisajes lo hacemos con la técnica básica de húmedo sobre húmedo es decir que no podemos dejar secar los tonos.Esto se hace para que los tonos se degraden entre sí.
Step 3:
I worked the grass using a worn and hard brush on its tip, I loaded it with dark green and unloaded it a little on the paint cover, tapping it gently until the dots were a little scattered, without letting it dry, I applied the yellow and then the white. When we make landscapes we do it with the basic technique of wet on wet that is to say that we cannot let the tones dry, this is done so that the tones degrade each other.
Paso 4:
Para la Laguna aplique blanco,azul claro y azul oscuro del mismo modo que trabaje el cielo (arrastre) pero con la diferencia de que lo hice con el pincel plano. Coloque un punto de luz con blanco en su centro.Pinté las piedras con marrón chocolate .
Step 4:
For the Lagoon I applied white, light blue and dark blue in the same way I worked the sky dragging but with the difference that I did it with the flat brush. Place a point of light with white in its center and paint the stones with chocolate brown.
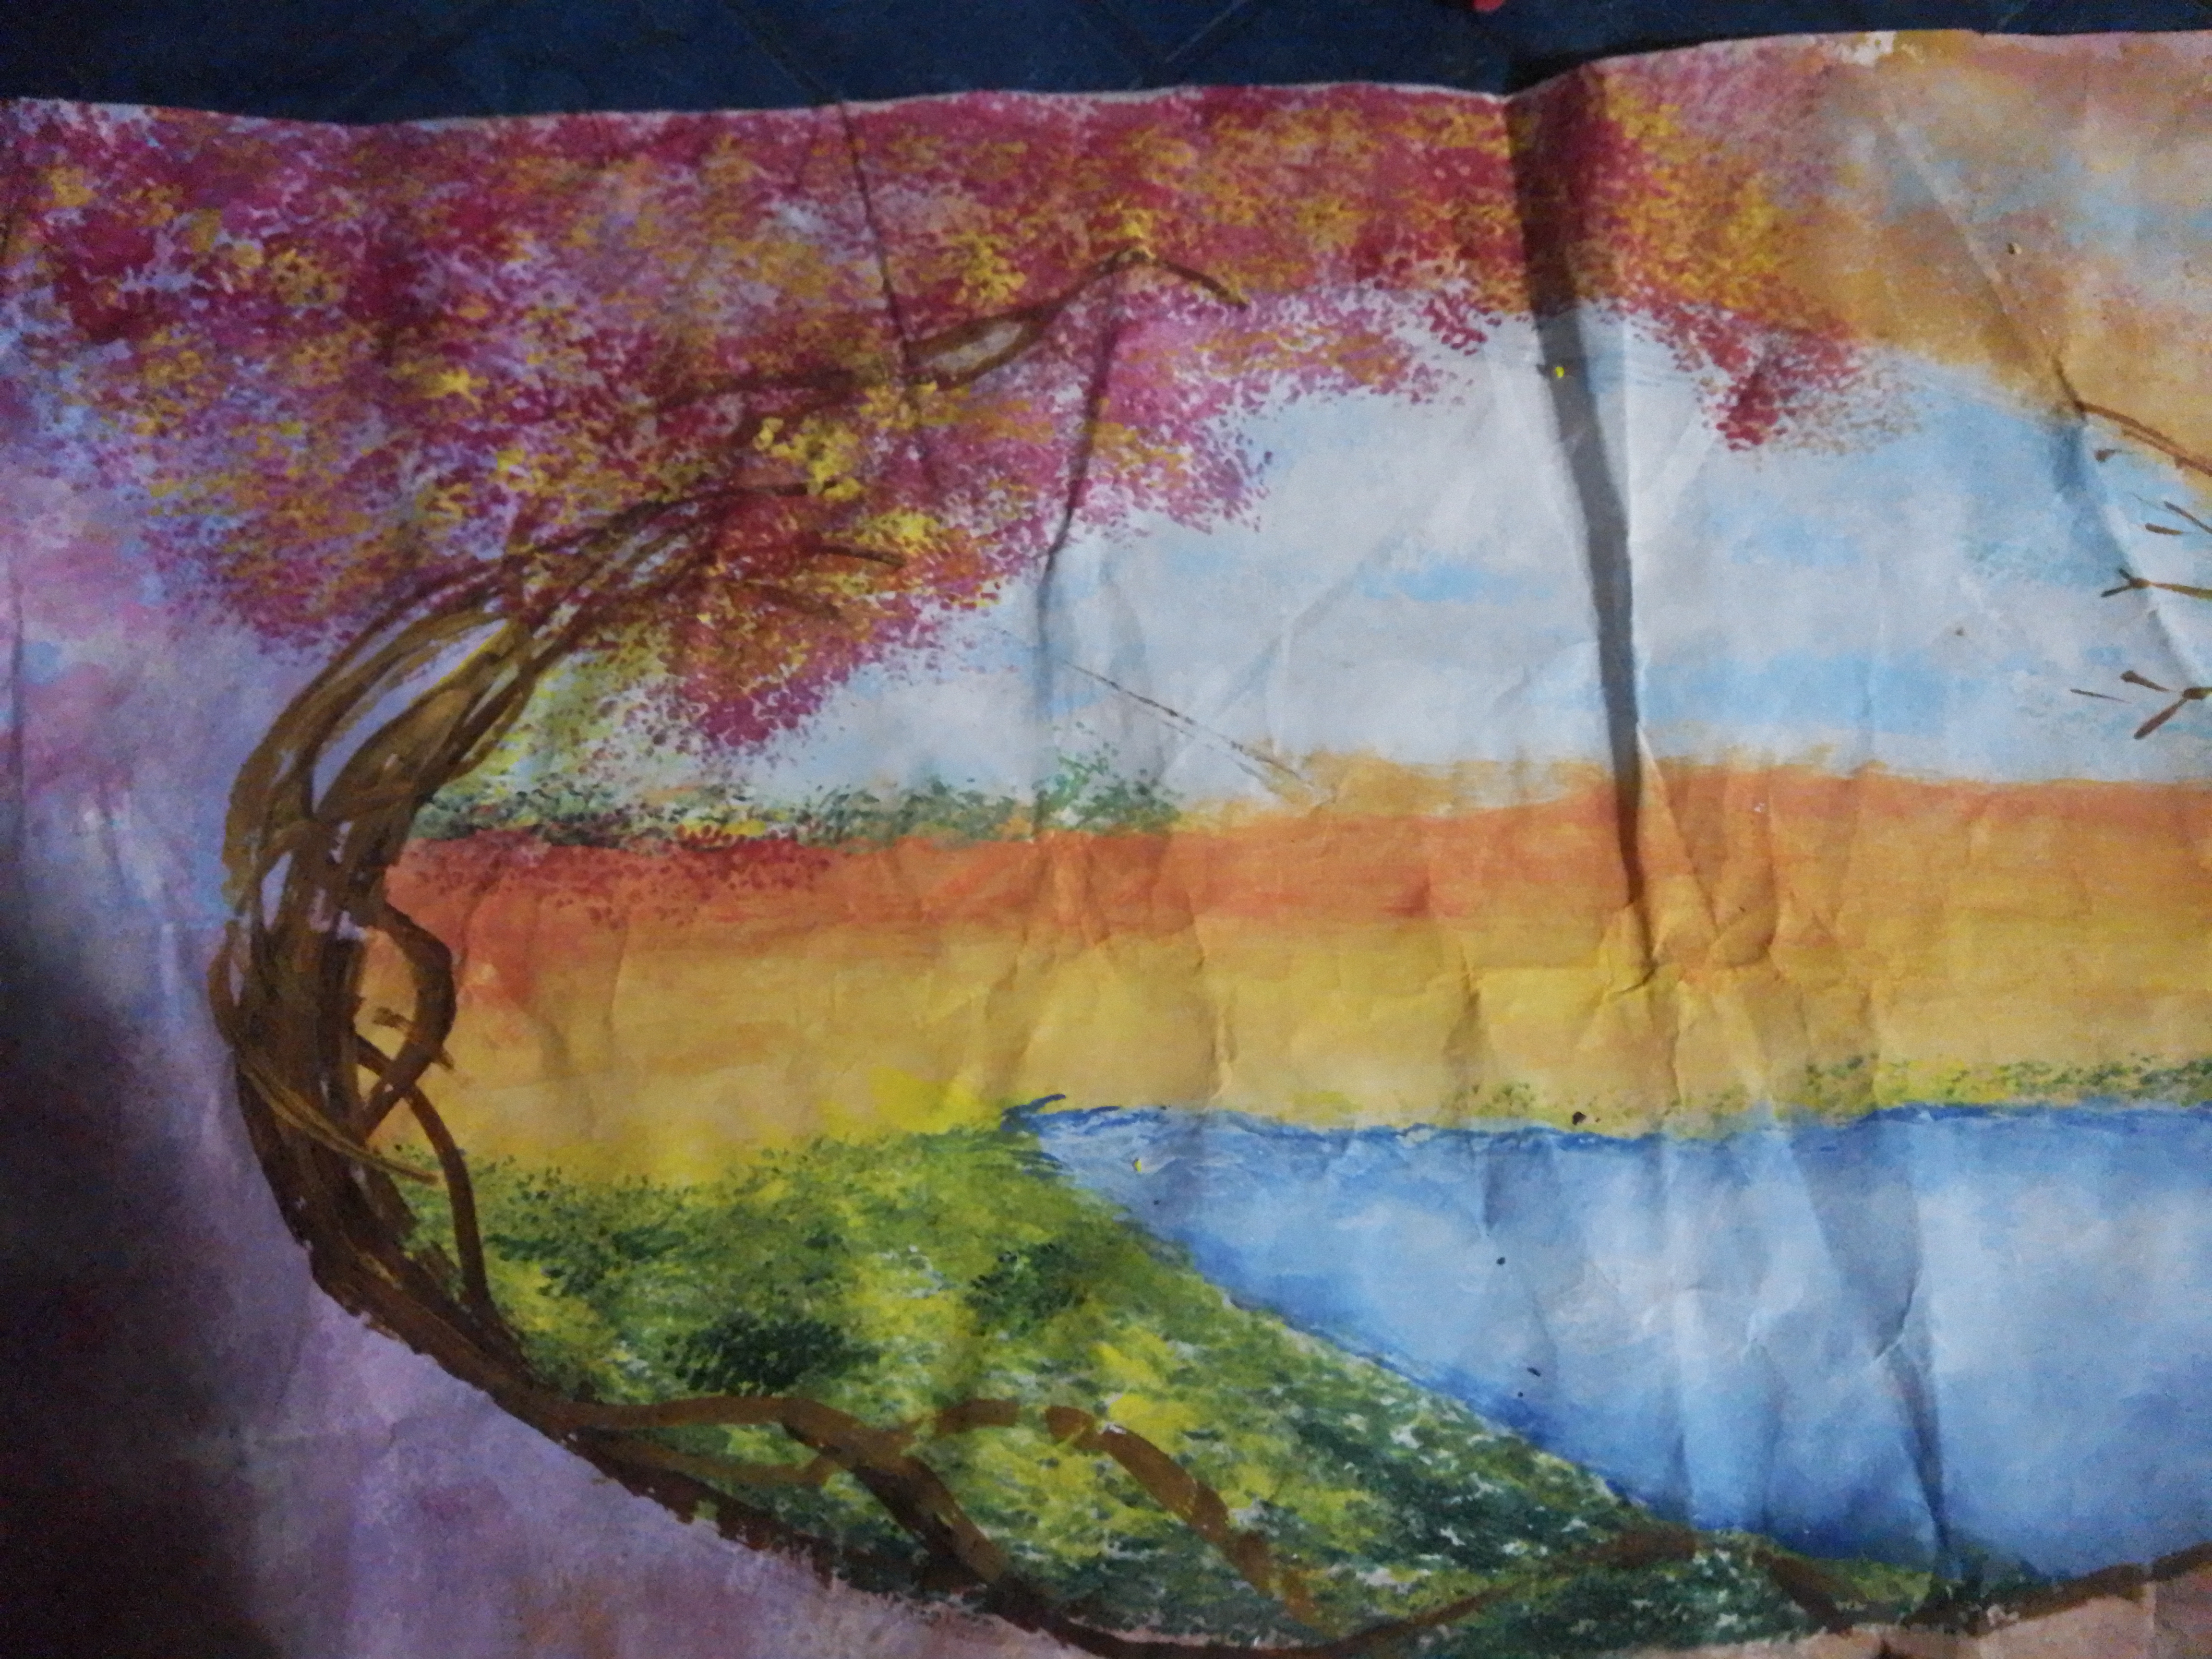


Paso 5:
Con el pincel redondo y liner pinté el tronco,bejuco y ramas del los árboles.EL follaje de los árboles los realice con un pincel desgastado y duro lo realice del mismo modo que hice la grama. Utilice magenta y amarillo para el árbol grande y azul y blanco para el más pequeño.En pinceladas Pinté unas hojas verdes en sus bejucos y una mariposa.El GRACIAS lo realice a un lado en negro con el pincel redondo 5 y coloque claire23.
Step 5:
With the round brush and liner I painted the trunk, vines and branches of the trees.the foliage of the trees I painted with a worn and hard brush in the same way as I did the grass.I used magenta and yellow for the big tree and blue and white for the smaller one. I used magenta and yellow for the big tree and blue and white for the smaller one.in brushstrokes I painted some green leaves on their vines and a butterfly.the THANK YOU I made it on one side in black with the round brush 5 and placed claire23.
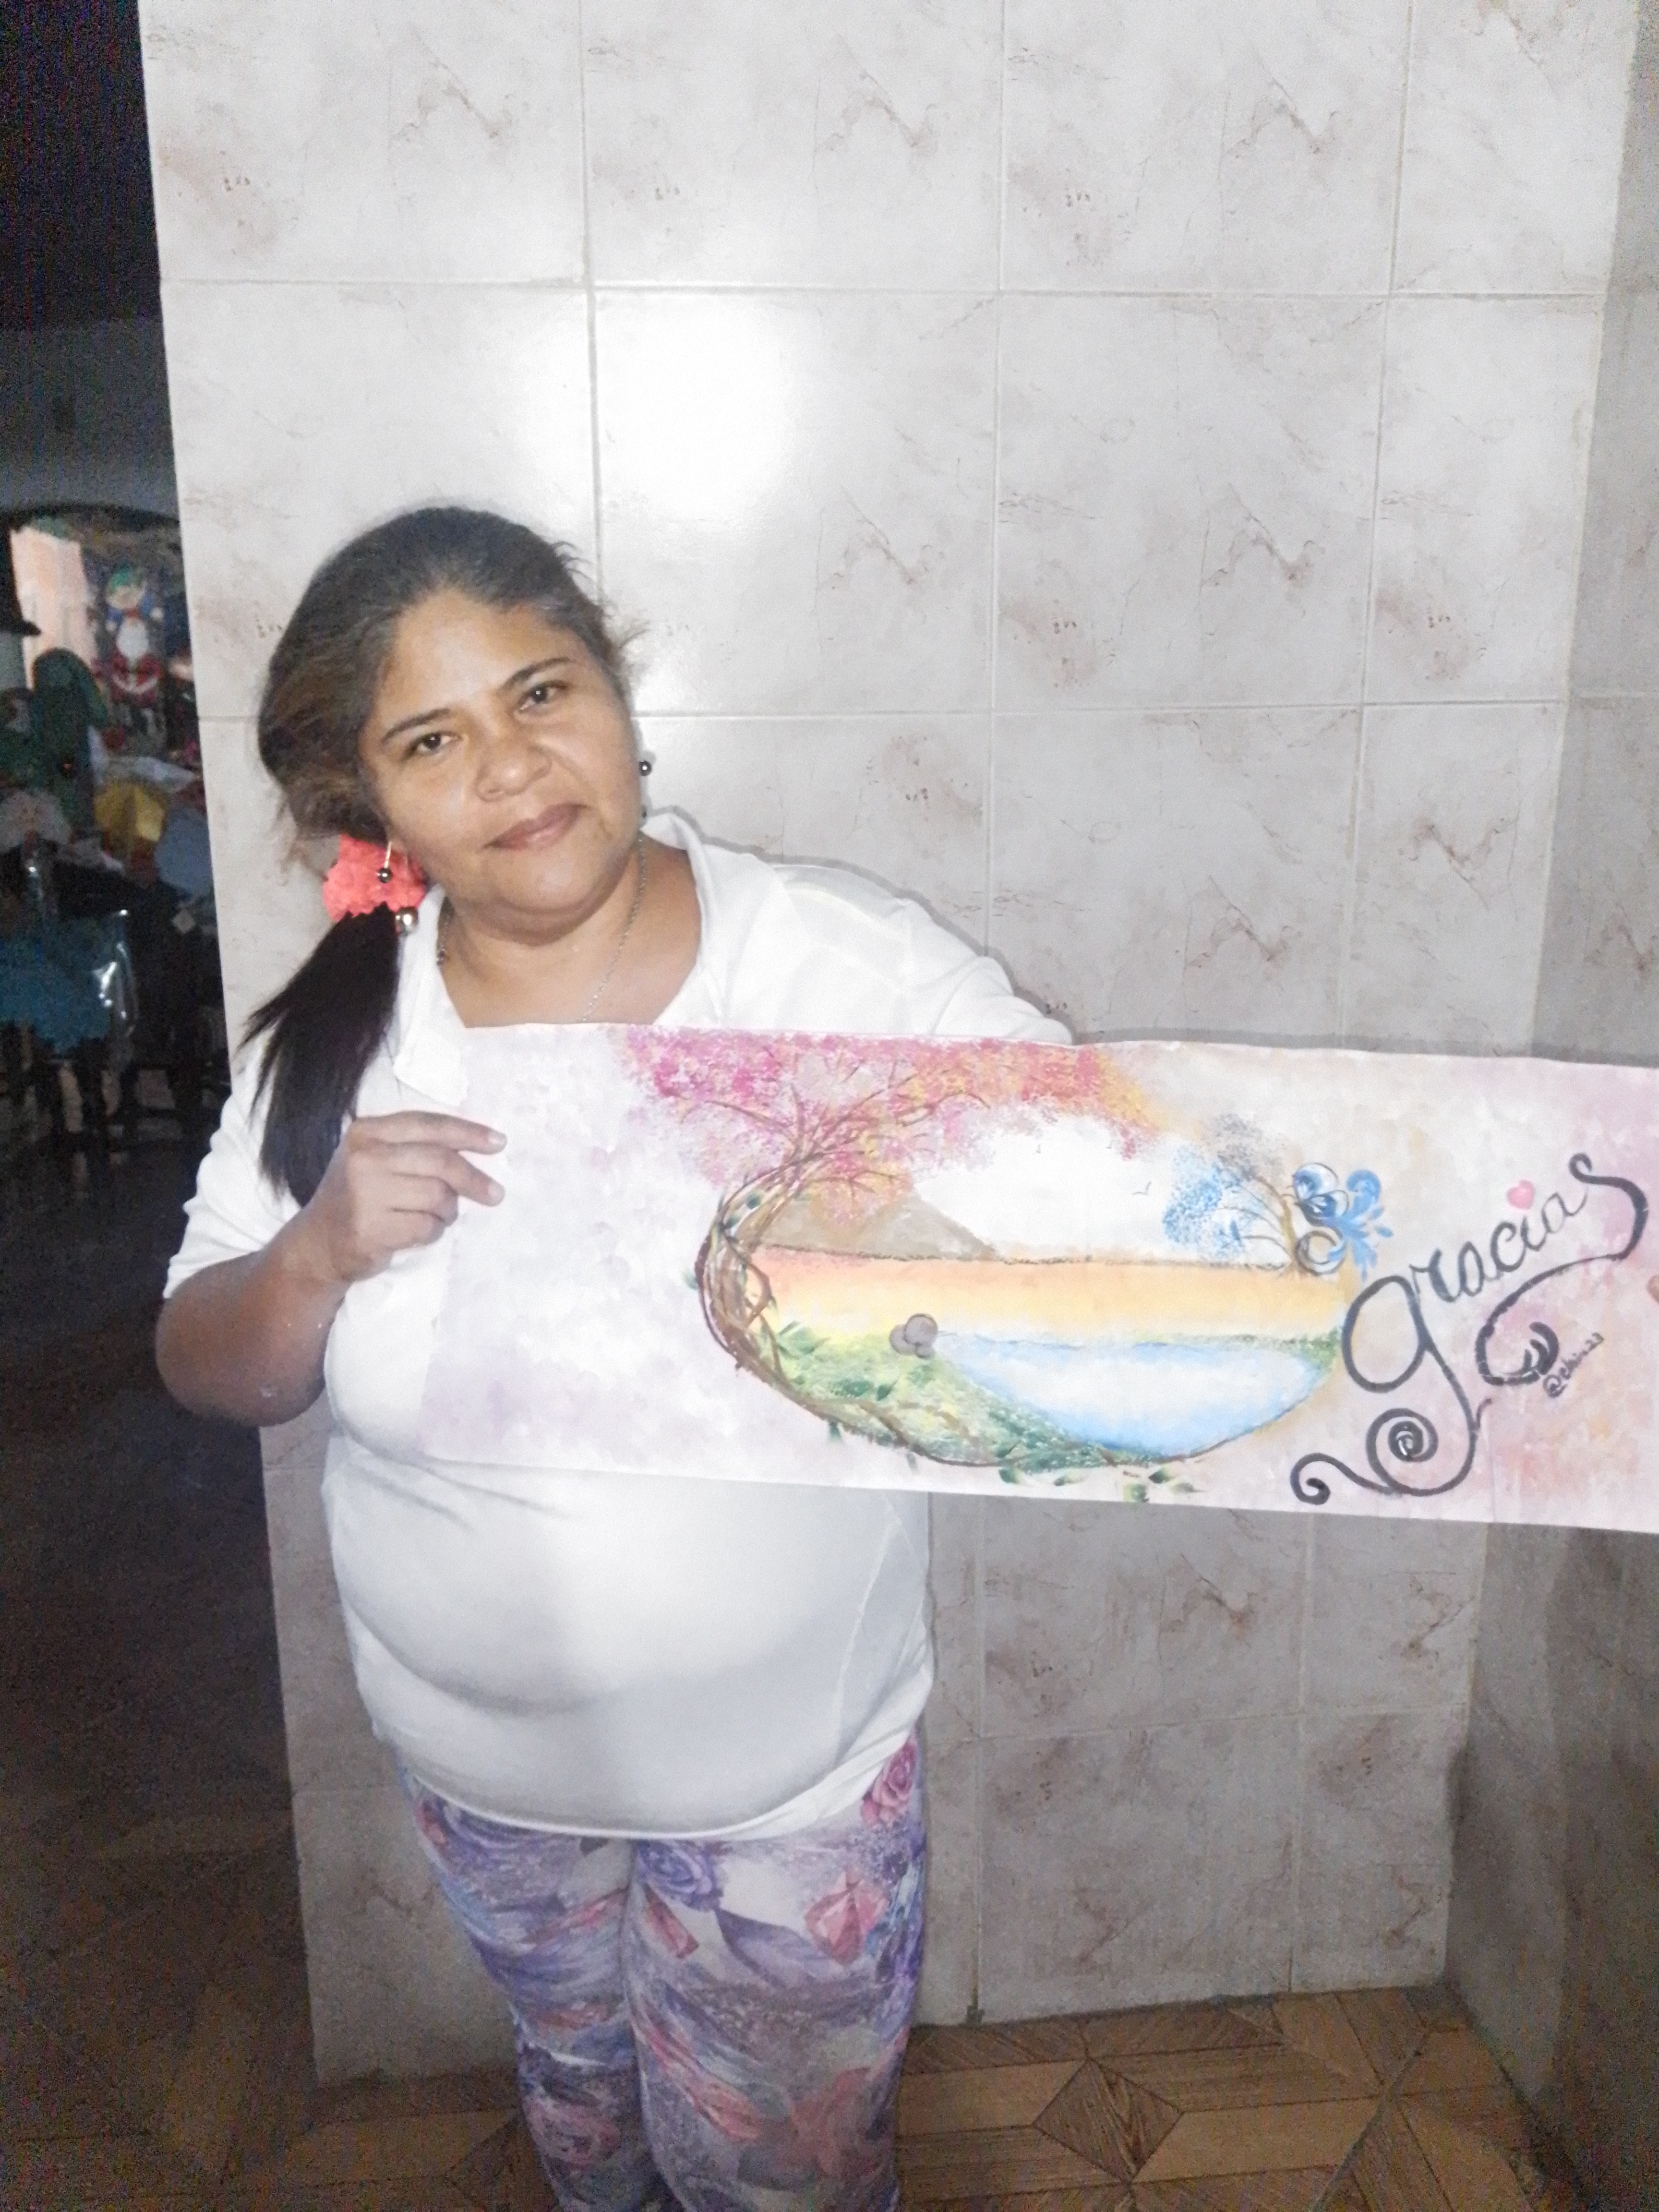
And so was my thank you poster with my beautiful landscape I am not a professional painter I have only basic knowledge of painting that I have acquired over time. I hope you appreciate it, I made it with love for all of you. Until a new opportunity. You are very much loved!
Congratulations @claire23! You have completed the following achievement on the Hive blockchain and have been rewarded with new badge(s):
Your next target is to reach 30 posts.
You can view your badges on your board and compare yourself to others in the Ranking
If you no longer want to receive notifications, reply to this comment with the word
STOPTo support your work, I also upvoted your post!
Check out the last post from @hivebuzz:
Support the HiveBuzz project. Vote for our proposal!
Nice work. Thanks for showing the steps. I like the tree on the left side. It has such reality to me.
Hola, muy creativo y lindo los toque de colores para el paisaje.