Scotman brand domestic ice maker repair [Eng+Spa]

Image's Source - Fuente de la Imagen
Greetings to the Hive Diy community, hoping that you are in the best situation that you can be in at this moment in your lives.
It's been a while since I last posted, I've been recovering from a burn on my hand, but we're back.
On this occasion I'm sharing some of the work I did on a Scotman ice maker, a domestic type, that an old friend brought to my workshop.
The post is not a tutorial, I clarify, the spare parts are somewhat expensive, and a certain minimum training in refrigeration service and electronics service is required. I share with you certain notions that can be useful to understand a little more about this equipment.
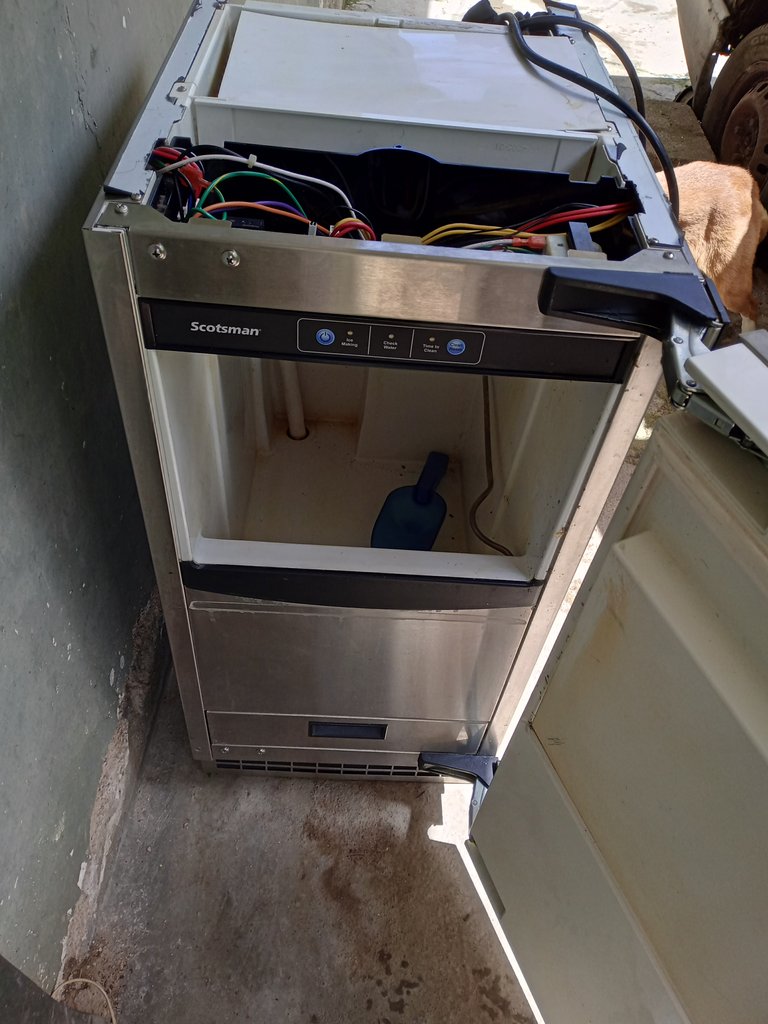
The machine itself came from other workshops of technicians who could not get it to work.
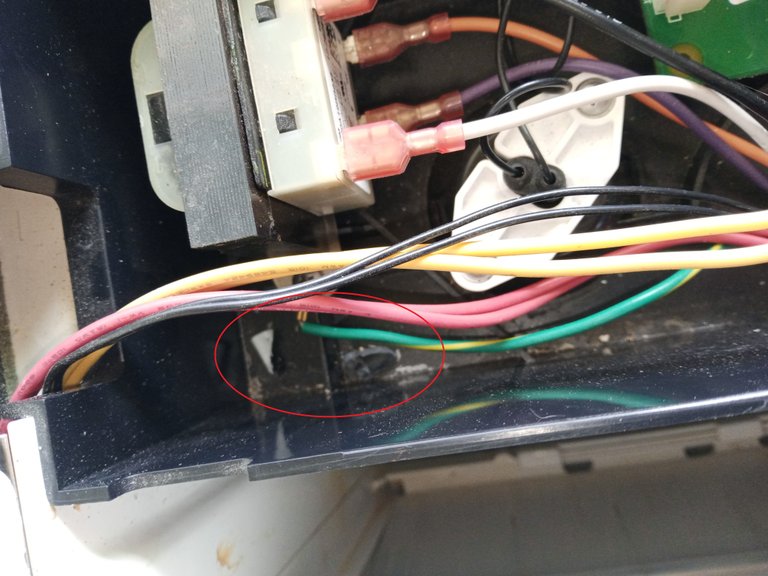
The ice maker was very battered, there were cut cables without any sense and instead of placing a plug-in terminal to connect to the compressor motor start relay, they tied a piece of yellow cable with a terminal to the black cable that goes to the compressor motor.
The truth is that I am not very happy with how I found the equipment when I received it. It was not difficult to put a terminal to connect to the compressor, instead of a piece of cable.
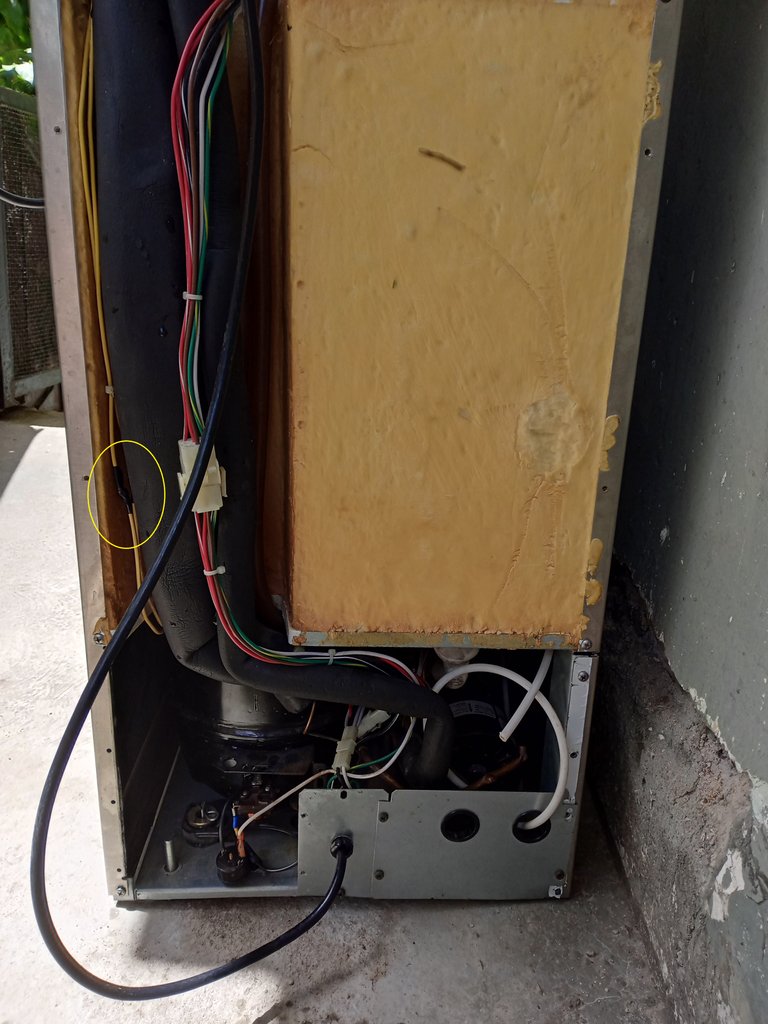
This is the equipment that I had already written about before, in which they gave me the control card, all handled and mistreated, so that I could check it.
Someone broke part of the plastic that holds the screws that hold the control board.
Despite the state it is in, I appreciate the trust that they bring me the ice machine so that I can service it.
Now that it is in the workshop, I have to check it carefully, it does not inspire much confidence in me due to the mistreatment I see, I just received this ice maker.
I take a small break from the subject, part of the burn on my hand is still visible in some other images, I try to do my best not to show all the damage so as not to bother with the publication.
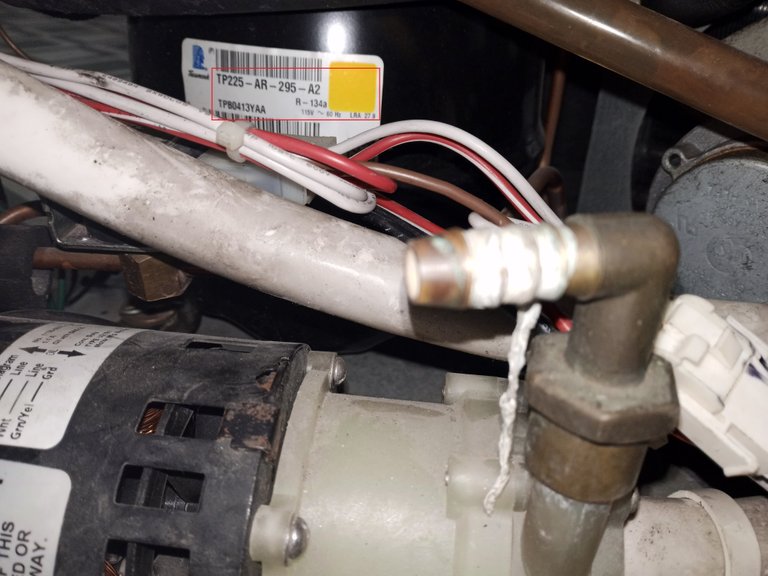
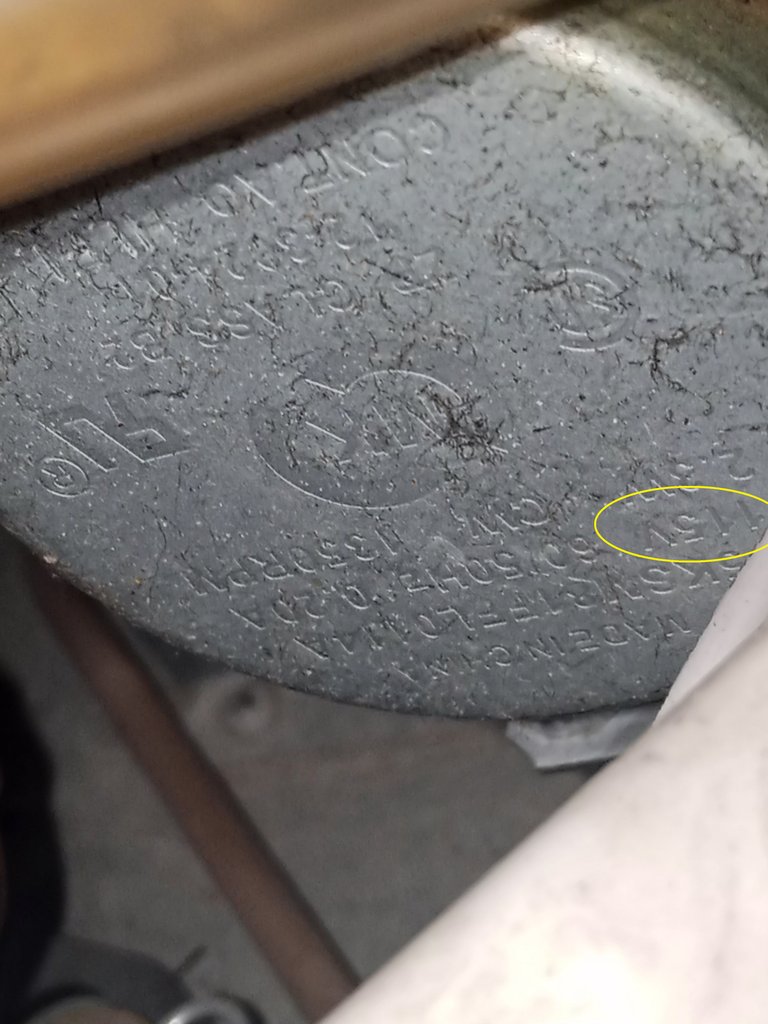
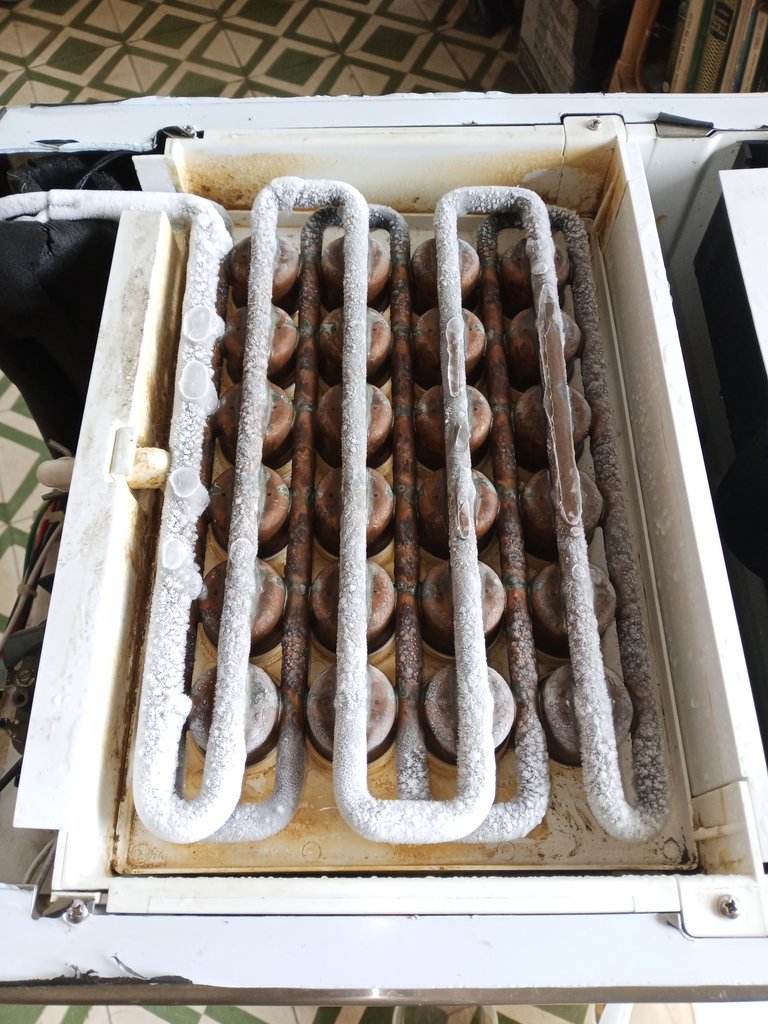
I carefully check that the fan motor, water pump and compressor are the originals, that they have not been changed in a workshop and that they are of the correct voltage.
I have already had other cases where in another technical service workshop, they remove the spare parts to resell them and deliver the equipment with damaged spare parts.
Water pump

Compressor
Fan
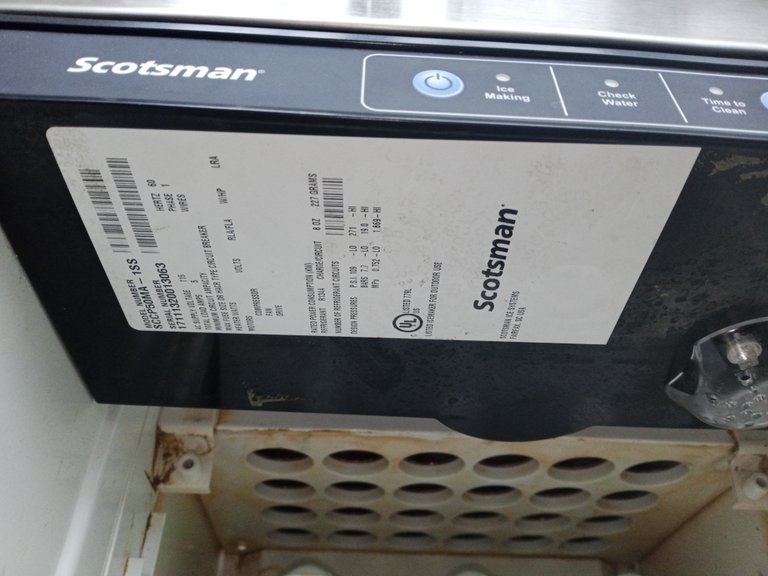
The technical data is on the inside of the ice container.
A while ago I received an air conditioner in the workshop that only required maintenance, and when I checked it in front of the customer, there was no compressor motor inside the equipment, it had already come from another workshop.
It is normal to check all equipment that is received before letting it enter the workshop, I would have had to replace a compressor motor at all costs.
The next step was to verify that none of the motors are grounded or short-circuited. I cannot connect any equipment without being sure that it is not short-circuited.
I use a tester in continuity mode, attaching one of the probes to the chassis or casing of the equipment, and using the other end to test the terminals where the power supply is connected.
Of course, without connecting the machine to the electrical service.
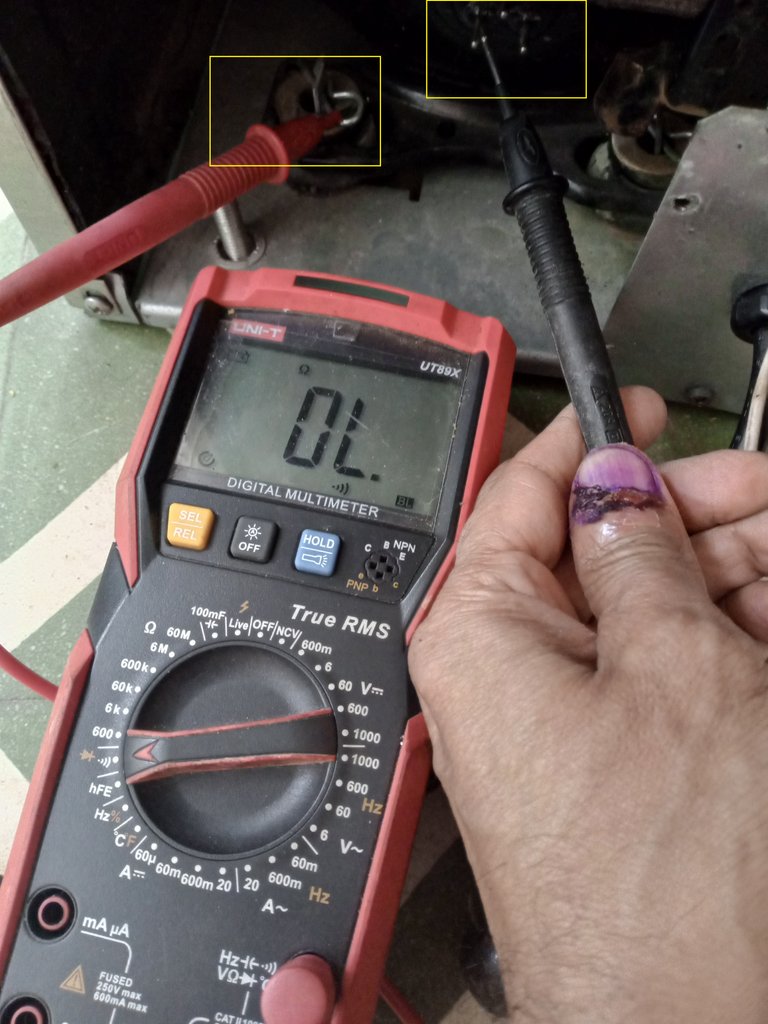

It was a relief that everything was fine up to this point, now I had to test that the mechanical part worked without problems (cooling compressor, water pump and fan).
The concept is simple: you connect the compressor, water pump and fan assembly manually, for the minimum time (30 minutes for refrigerant 134-A) and if you can make ice, the equipment fault is in the electronic control part.
By testing the mechanical section separately from the electronic section, you can locate the fault and only work where the problem is.
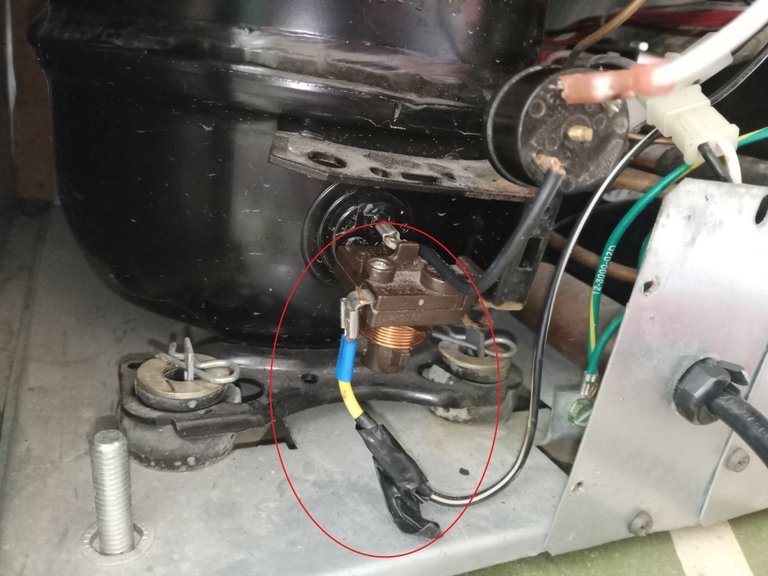
The compressor start system is the old and reliable magnetic relay and thermal protector assembly (bimetallic). We check the start relay before connecting the compressor, the bimetallic has no further explanation, it must measure continuity from the input terminal to the terminal that goes to the compressor.
So I will detail the start relay better with some images, since it is a little more complicated.
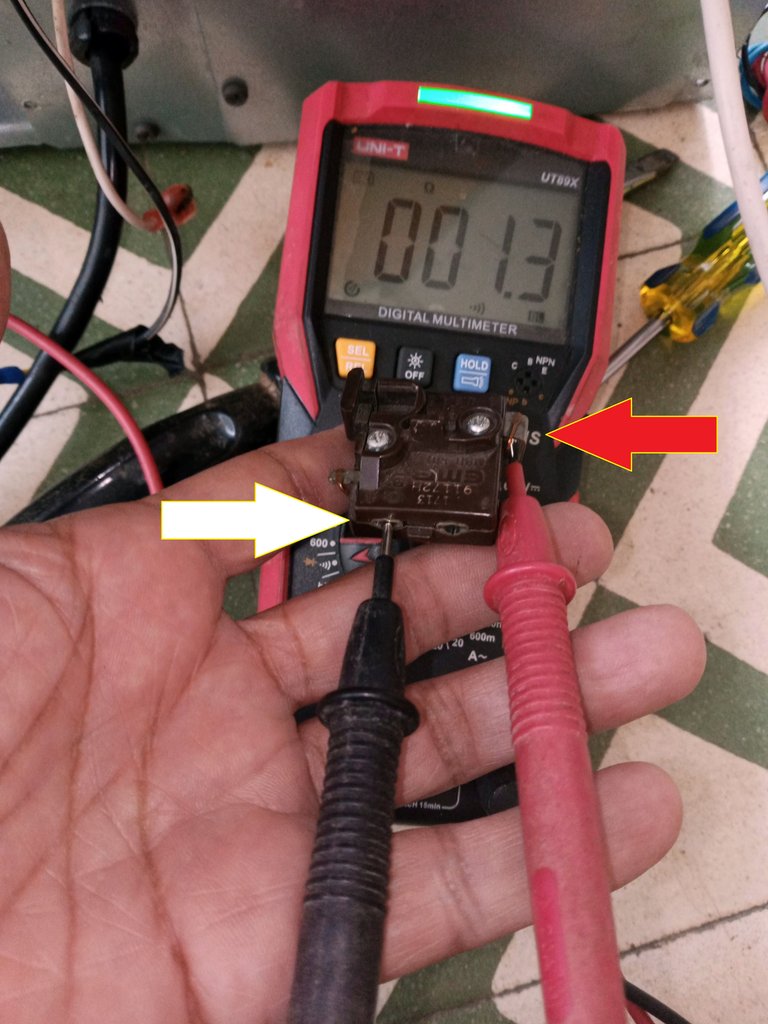
The red arrow is to indicate where the terminal for connecting to the power supply is and the white arrow indicates the terminal that is connected to the compressor (this is only valid for this model of compressor and relay model, it may change in another brand of compressor), it should measure continuity without problems.
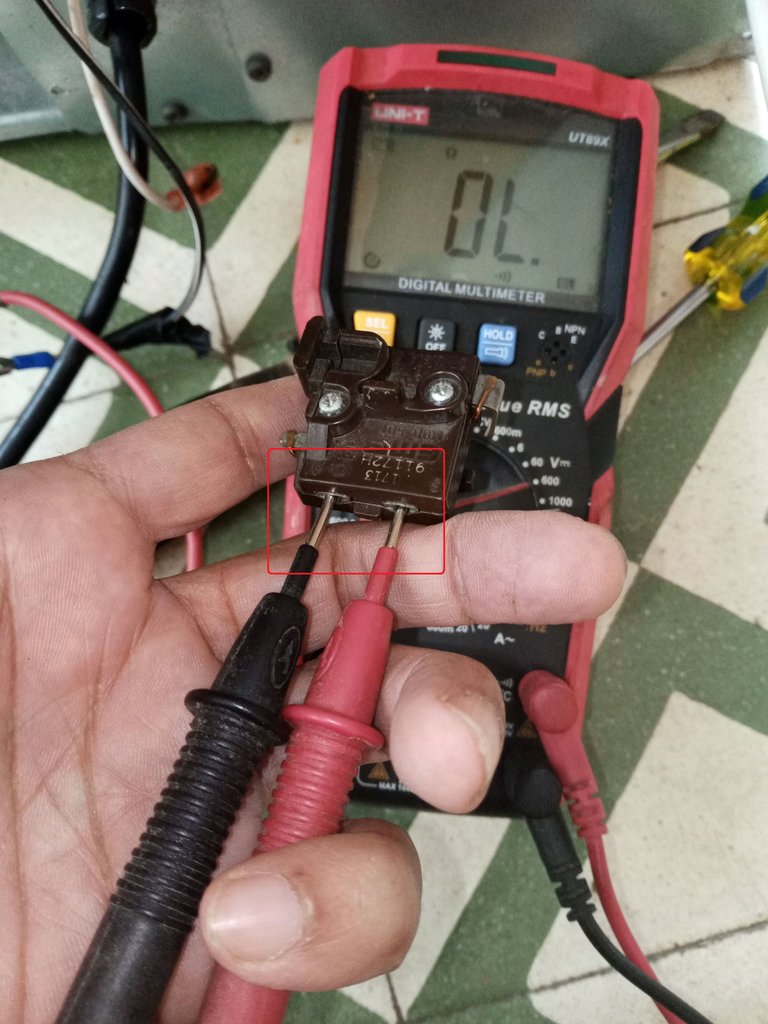
You should not measure any connection or continuity between the two terminals that go to the compressor, if you measure anything, the relay is damaged and can burn the compressor motor.
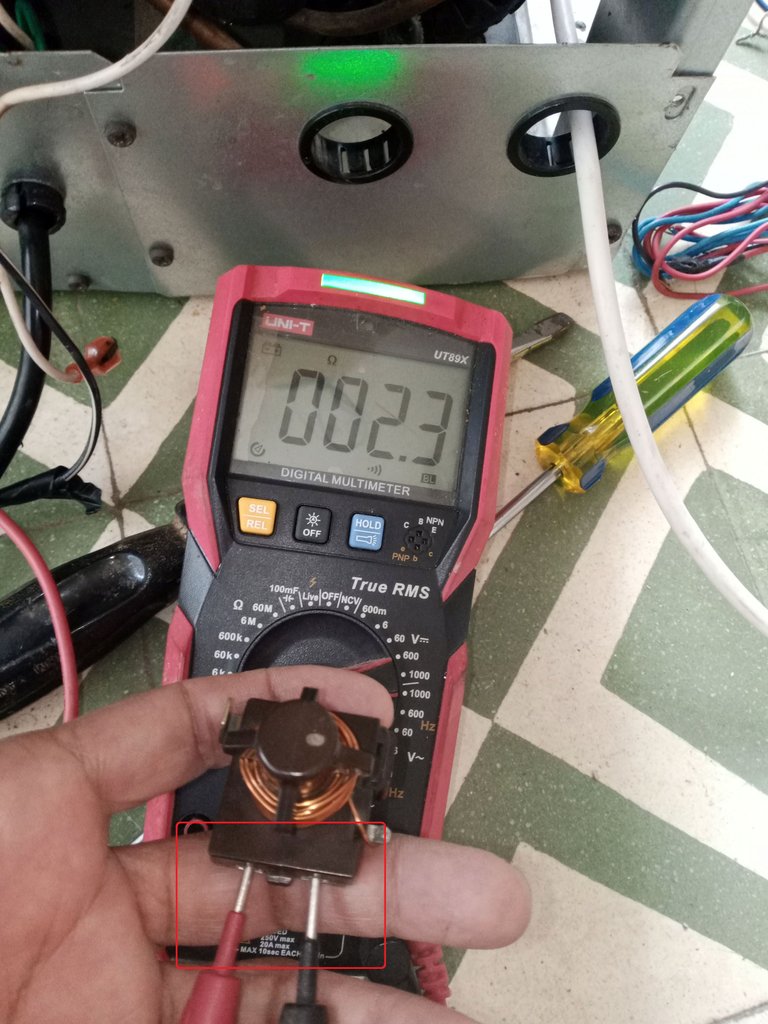
By turning the relay to an inverted position (with the copper winding facing up), we force the contacts to activate and it should show continuity on the tester.
Logically, turning it back and placing it in its normal use position (with the copper winding facing down) should break the connection.
We connected the ice maker manually, but I do not recommend trying it yourself, without proper prior training, for your safety and to avoid damage and accidents.
After 25 minutes we finished the test without incident.

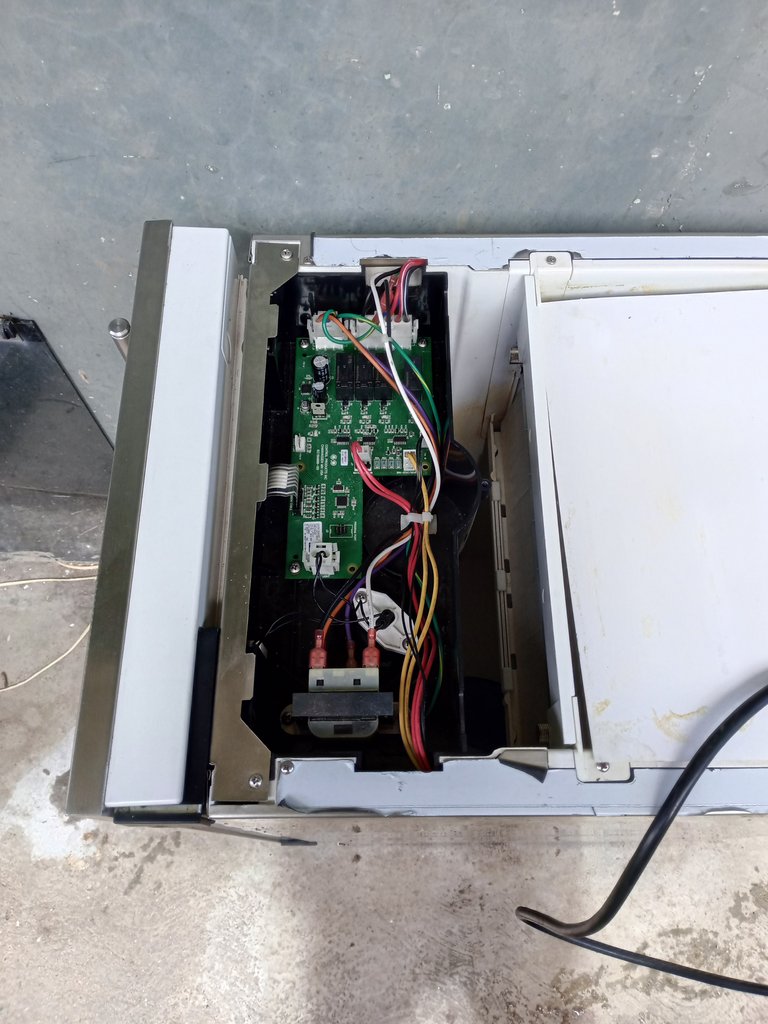
It is very evident that the mechanical section works without problems, and that the ice maker fault is in the control section, the solution to the problem will be left for the next publication that I will share with you soon.
Thank you very much for taking a moment and reading me.
Have a great week.
Peace.
The reason for the publication is not basically a tutorial, I want to share some basic notions to deal with this type of problems. To handle this type of service, training in refrigeration service and electronics service is required. These are quite expensive equipment and spare parts and can seriously affect the budget, apart from the fact that nobody wants an accident.
- I have used Google Translate for the English language.
- The images, unless otherwise indicated, are screenshots of my workshop work.

Image's Source - Fuente de la Imagen
Saludos a la comunidad de Hive Diy, esperando que estén en la mejor situación en que puedan estar en este momento de sus vidas.
Ha pasado un tiempo desde que publique la última vez, yo he estado recuperándome de una quemadura en una mano, pero ya estamos de regreso.
En esta ocasión les comparto parte del trabajo que realice en un fabricador de hielos, marca Scotman del tipo doméstico, que me alcanzo un viejo amigo a mi taller.
La publicación no es un tutorial, les aclaro, los repuestos son algo costosos, y se requiere un cierto adiestramiento mínimo en servicio de refrigeración y en servicio de electrónica. Les comparto ciertas nociones que pueden llegar a ser útiles para entender un poco más sobre estos equipos.
Ya la máquina, venía de otros talleres de técnicos que no pudieron poder hacerlo funcionar.
El fabricador de hielos venía muy maltratado, había cables cortados sin ningún sentido y en vez de colocar un terminal enchufable para conectar al relé de arranque del motor compresor, empataron un trozo de cable amarillo con un terminal al cable negro que va al motor compresor.
La verdad es que no estoy muy conforme como encontré el equipo al recibirlo. No costaba mucho colocar un terminal para conectar al compresor, en vez de un trozo de cable.
Este es el equipo del que ya había escrito antes, en que me alcanzaron la tarjeta de control, toda manoseada y maltratada para que la revisara.
Partieron parte del plástico que sostiene los tornillos que sujetan la tarjeta de control.
A pesar de todo el estado en que está, agradezco la confianza, de que me alcancen la máquina de hielos para que le haga servicio.
Ahora que está en el taller, tengo que revisarlo con cuidado, no me genera mucha confianza por el maltrato que veo, apenas recibo este fabricador de hielo.
Hago una pequeña pausa del tema, aun se ve parte de la quemadura de la mano en alguna que otra imagen, procuro hacer lo posible para no mostrar todo el daño para no incomodar con la publicacion.
Verifico con cuidado que el motor del ventilador, la bomba del agua y el compresor sean los originales, que no hayan sido cambiados en algún taller y que sean del voltaje correcto.
ya he tenido otros casos en que en otro taller de servicio técnico, retiran los repuestos para revenderlos y entregan el equipo con repuestos dañados.
Bomba de agua
Compresor
Ventilador
Los datos técnicos están en la parte interna del contenedor de los hielos.
Hace un tiempo recibi en el taller un aire acondicionado que solo requeria mantenimiento, y al revisarlo delante del cliente, no habia motor compresor dentro del equipo, ya venia de otro taller.
Es norma corriente revisar todo equipo que se recibe antes de dejarlo entrar al taller, me habría tocado reponer un motor compresor con todos los gastos.
El siguiente paso fue verificar que no estén a tierra o en corto circuito ninguno de los motores. No puedo conectar ningún equipo sin estar seguro de que no está en corto circuito.
Uso un tester con el modo del probador de continuidad, coloco una de las sondas al chasis del equipo o la carcasa, y el otro extremo lo uso para ir probando los terminales en donde se conecta el suministro eléctrico.
Por supuesto, sin conectar la máquina al servicio eléctrico.
Fue un alivio que estuviese todo bien hasta aquí, ahora tenía que probar que la parte mecánica funcionase sin problemas (compresor de refrigeración, bomba de agua y ventilador).
El concepto es sencillo: conectas el conjunto del compresor, bomba de agua y ventilador de forma manual, por el tiempo mínimo (30 minutos para el refrigerante 134-A) y si puedes hacer hielos, la falla del equipo está en la parte de control electrónica.
Al probar por separado la sección mecánica de la sección electrónica, puedes tener localizada la falla y solo trabajas en donde está el problema.
El sistema de arranque del compresor es el antiguo y confiable conjunto de relé magnético y protector térmico (bimetálico). Revisamos el relé de arranque antes de conectar el compresor, el bimetálico no tiene mayor explicación, debe medir continuidad desde el terminal de la entrada al terminal que va al compresor.
Así que detallo mejor el relé de arranque con unas imágenes, ya que es un poco más complicado.
La flecha roja es para indicar a donde está el terminal de conexión al suministro de electricidad y la flecha blanca indica el terminal de la marcha que va conectado en los conectores del compresor (esto solo es válido para este modelo de compresor y modelo de relé, puede cambiar en otra marca de compresor), debe de medir continuidad sin problemas.
No debe medir ninguna conexión o continuidad entre los dos terminales que van al compresor, si mide algo es que el relé está dañado y puede quemar el motor compresor.
Al girar el relé a una posición invertida (con el bobinado de cobre hacia arriba), forzamos la activación de los contactos y debe mostrar continuidad en el tester.
Lógicamente, al volver a girar y colocar en su posición de uso normal (con el bobinado de cobre hacia abajo) se debe interrumpir la conexión.
Conectamos el fabricador de hielos de forma manual, pero no les recomiendo intentarlo por ustedes mismos, sin el adecuado adiestramiento previo, por su seguridad y para evitar daños y accidentes.
Luego de 25 minutos terminamos la prueba sin novedad.
Es muy evidente que la sección mecánica trabaja sin problemas, y que la falla del fabricador de hielos está en la sección de control, la solución del problema quedara para la siguiente publicación que les comparta próximamente.
Muchas gracias por pasar un momento y leerme.
Que tengan una excelente semana.
Paz.
El motivo de la publicacion no es basicamente un tutorial, quiero compartir algunas nociones basicas para afrontar este tipo de problemas.
Para encarar este tipo de servicios se requiere un adiestramiento en el servicio de refrigeración y en el servicio de electrónica, son equipos y repuestos bastante costosos y pueden afectar seriamente el presupuesto, aparte del hecho de que nadie desea un accidente.
- He usado el traductor del Google para el idioma inglés.
- Las imágenes a menos que se indiquen son capturas de mi trabajo de taller.
Eso de talleres que te cambian los repuestos es algo muy molesto, pero es más frecuete de lo que me gustaría que fuera.
!ALIVE
!BBH
!PGM
Lo he visto más de lo que quisiera. Los clientes terminan por volverse un poco paranoicos.
@soltecno! @pedrobrito2004 likes your content! so I just sent 1 BBH to your account on behalf of @pedrobrito2004. (1/1)
(html comment removed: )
)
Estupendo trabajo querido amigo, te has convertido en todo un maestro reparando electrodomésticos, sin duda alguna han sido muchos años de experiencia, haces ver en cada uno de tus pasos que todo es fácil de hacer.
Escrito por lionsaturbix / Written by lionsaturbix
¡¡¡Buen trabajo!!! Gracias por publicar tu excelente contenido en Hive Diy.
Saludos, muchas gracias por su comentario, la reparación al final estuvo en la parte de control, ya estaré subiendo la segunda parte.
Disculpa por responder tarde, estuve atareado el día arreglando un cortocircuito en la electricidad de la casa, gracias a Dios pude solucionar.
Oh amigo siento lo del accidente ¿Como sucedió? ¿Fue muy grave?
Bueno veo que has sido bien minucioso al revisar y reparar este equipo, tenia muchos detalles que parece que se fueron acumulando en el tiempo, probablemente varias personas lo vieron e intentaron de reparar sin tener conocimientos.
Gracias por pasar y comentar, le cuento que el trabajo en el fabricador de hielos es un poco más extenso, la reparación de la parte de control electrónico, ya la publicaré mañana.
Estuve varios días sin poder usar la mano, por lo hinchada y lo doloroso, gracias a dios ya puedo ir trabajando.