Beautiful Butterfly Applique / Hermoso Aplique de Mariposa
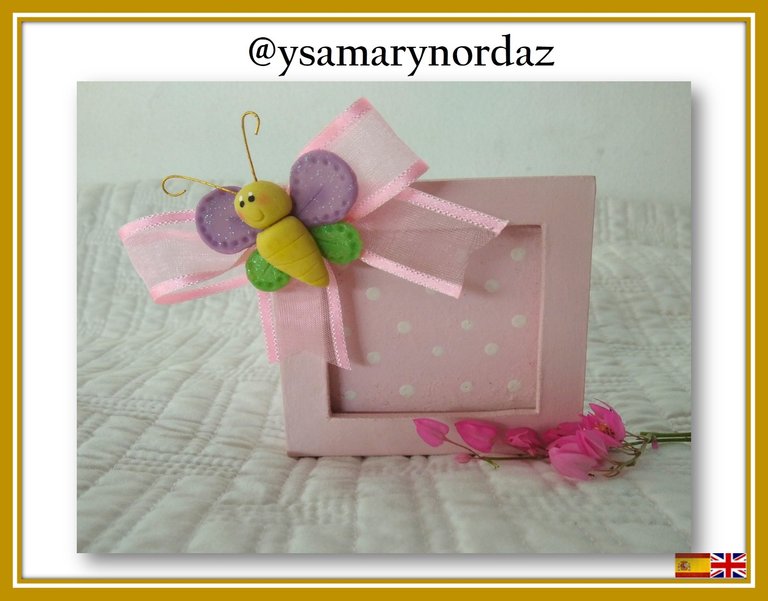
Hello dear #DIYHub community. TI continue working with the flexible clay and this time I will show you a step by step on how to make a butterfly applique. With it I will decorate a small photo frame previously, painted in a pink tone. This is optional since you can place this wall light on any object, it can even serve as a magnet. Come with me to carry out the next step by step. Let's get started!
Hola querida comunidad de #DIYHub. Continúo trabajando con la masa flexible y en esta oportunidad les mostraré un paso a paso de cómo realizar un aplique de mariposa. Con el mismo decoraré un pequeño portarretrato previamente, pintado en tono rosado. Esto es opcional ya que tú puedes colocar este aplique sobre cualquier objeto, incluso puede servir de imán. Acompáñeme a realizar el siguiente paso a paso. ¡Vamos a comenzar!

Materials:
• Masa flexible de colores: morado, verde claro y amarillo
• Crema humectante
• Rodillo
• Pega blanca
• Portarretrato adornado con lazo
• Esteca de cuchilla
• Bolillo metálico pequeño
• Cortadores en forma de alas (mediano y pequeño)
• Cortador de sonrisa
• Tijera
• Pinza
• Pincel
• Pintura de color blanco y negro
• Pintura gel escarchado
• Alambre dorado
• Hisopo
• Tiza de colores morado, verde y fucsia
Materiales:
• Flexible clay colors: purple, light green and yellow
• Moisturizing lotion
• Rolling pin
• White glue
• Photo frame
•Pottery clay cutter
• Metallic ball
• Wings cutters (medium and small)
• Smile marker
•1 gold wire hoop
• Scissors
• Pincers
• Brush
• Black and white paint
• Frosty gel paint
• Golden wire
• Cotton bud
• Purple, green and fuchsia chalk
Step 1
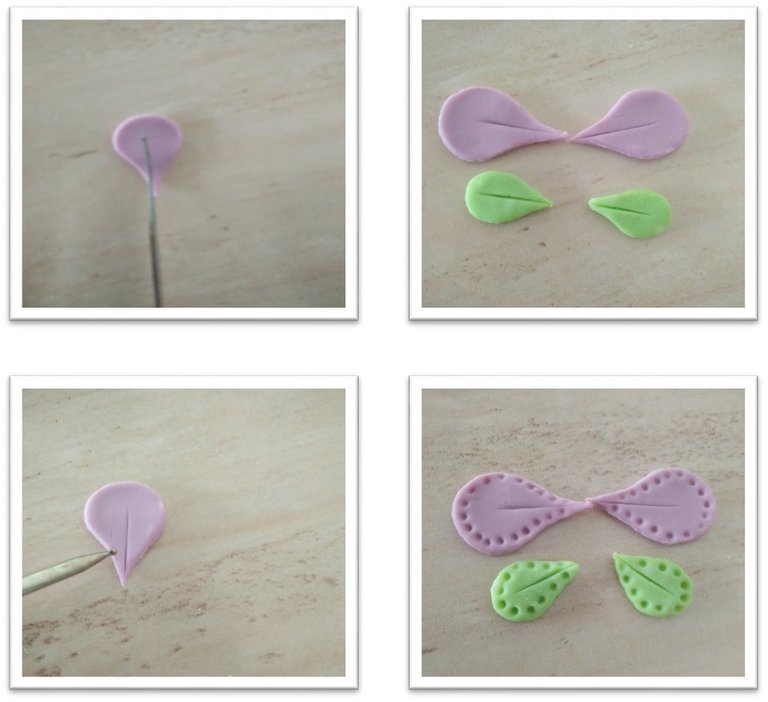
To make the wings of the butterfly, take the purple clay and place it on the surface, with the help of the rolling pin, roll it out (put some moisturizing cream on your hands to make it easier to work with the clay). Once rolled out, place the medium-sized wing-shaped cutter on top of the clay to remove two pieces. Repeat the same procedure, but this time with the light green clay, now use the small wing cutter and remove two pieces as well.
Paso 1
Para hacer las alas de la mariposa, toma la masa de color morado y colócala sobre la superficie, con la ayuda del rodillo extiéndela (coloca en tus manos un poco de crema humectante para que sea más fácil trabajar con la masa). Una vez extendida, coloca el cortador de tamaño mediano en forma de alas sobre la masa para así, extraer dos piezas. Repite el mismo procedimiento, pero esta vez con la masa de color verde claro, utiliza ahora el cortador de alas de tamaño pequeño y extrae igualmente dos piezas.


Step 2
Take the cutting edge and mark a line down the center of the wings. Then, with the metallic ball, mark points around the wings as shown in the image.
Paso 2
Toma la esteca de cuchilla y marca una línea por el centro de las alas. Luego, con el bolillo metálico marca puntos alrededor de las alas como se muestra en la imagen.
Step 3
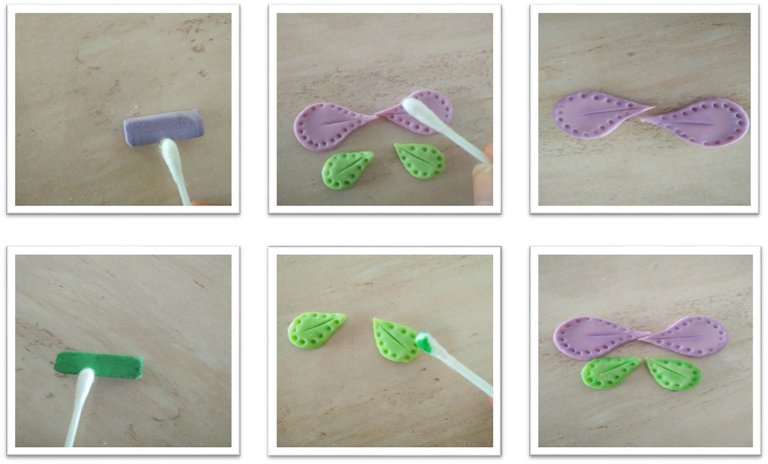
To give the wings some color, take the cotton bud and run it over the purple chalk first. Then, shade the edge of the wings, and then repeat this procedure with the green wings. Finally, apply a layer of frosty gel with the brush.
Paso 3
Para darle un poco de color a las alas, toma el hisopo y pásalo primero por encima de la tiza de color morado. Luego, sombrea el borde de las alas y seguidamente, repite este procedimiento con las alas de color verde. Por último, aplícales con el pincel una capa de gel escarchado.

Step 4
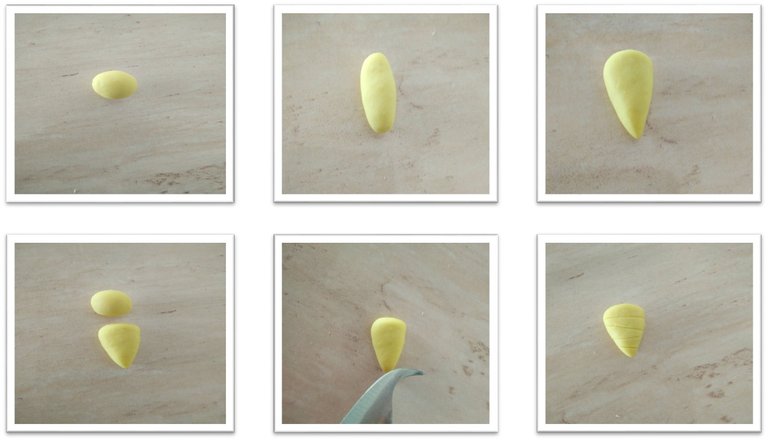
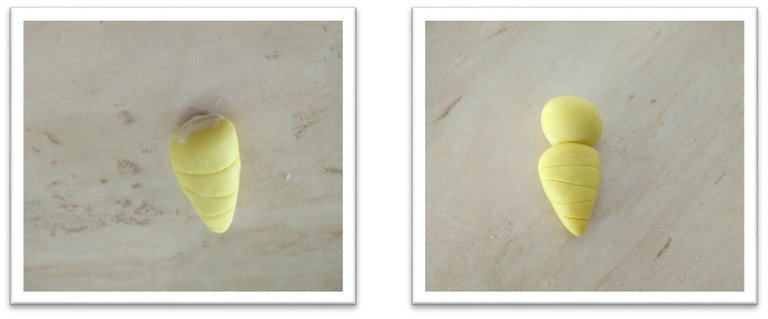
To make the face and body of the butterfly, first form a sphere. Then, form a cylinder and refine it at one end as shown in the image. Next, with the help of the blade, make some cuts on the body. Finally, glue both pieces together.
Paso 4
Para hacer la cara y el cuerpo de la mariposa, primero forma una esfera. Luego, forma un cilindro y lo afinas en uno de sus extremos como se observa en la imagen. Seguidamente, con la ayuda de la esteca de cuchilla marca algunos cortes sobre el cuerpo. Por último, pega ambas piezas.
Step 5
To make the butterfly's smile, take the smile marker and place it on the clay. To paint the cheeks, take the cotton bud and run it over the fuchsia chalk. Then, paint the cheeks lightly.
Paso 5
Para hacer la sonrisa de la mariposa, toma el marcador de sonrisa y colócalo sobre la masa. Para pintar las mejillas, toma el hisopo y pásalo por encima de la tiza color fucsia. Luego, pinta las mejillas suavemente.

Step 6
For the eyes, take the metallic ball and dip it into the black paint, then paint them. Once the paint has dried, now paint a white dot over the eyes with the help of a toothpick to give it lighting.
Paso 6
Para los ojos, toma el bolillo metálico y sumérgelo dentro de la pintura de color negro luego, píntalos. Una vez la pintura haya secado, ahora pinta con la ayuda de un palillo un puntito blanco sobre los ojos para darle iluminación.

Step 7
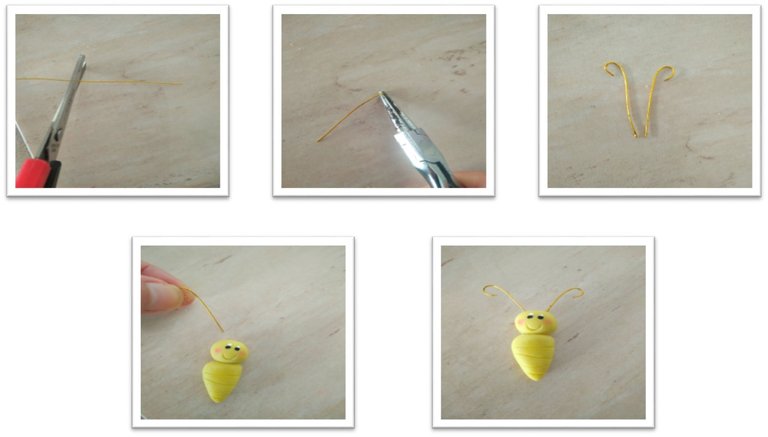
For the antennae, take the scissors and cut the 4 cm wire. Then, with the help of the pincer, bend its ends and finally, insert them in the upper part of the head.
Paso 7
Para las antenas, toma la tijera y corta el alambre de 4 cm. Luego, con ayuda de la pinza dobla sus puntas y por último, introdúcelas en la parte superior de la cabeza.
Step 8
To assemble the butterfly, take a little glue and place it on the tips of the wings. Next, glue the body of the butterfly. Finally, glue the applique to the bow.
Paso 8
Para armar la mariposa toma un poco de pega y colócalo en las puntas de las alas. Luego, pega el cuerpo de la mariposa. Por último, pega el aplique al lazo.

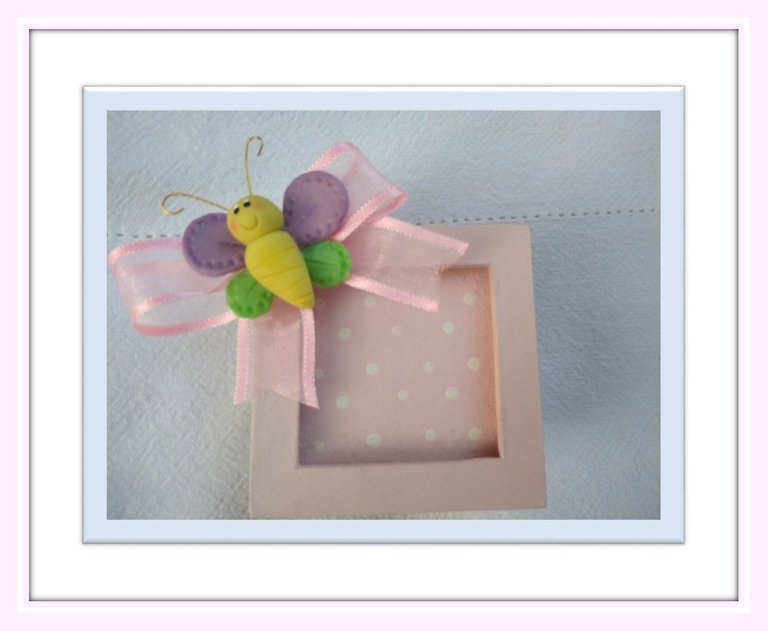
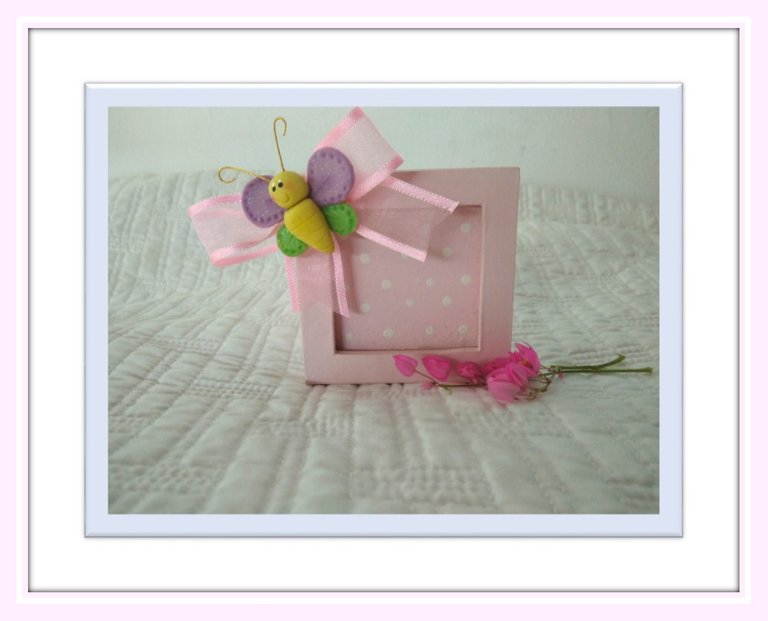
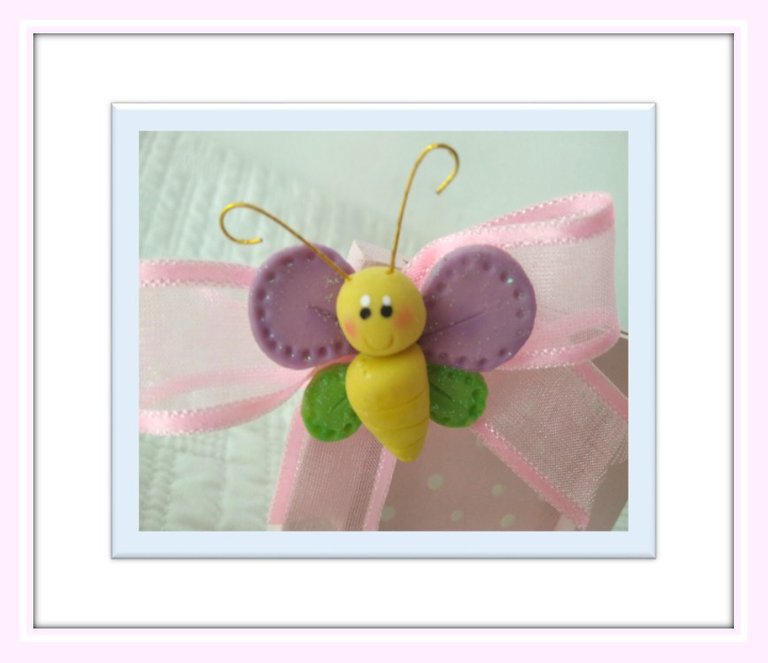

The applique is finished, and it looks beautiful, as you have seen, it is a simple step by step which you can do with the colors of your choice. I loved how this butterfly looks in the photo frame I chose. I hope you dare to do it! .See you soon!
El aplique está terminado, y se ve hermoso, como has podido observar es un paso a paso sencillo el cual, puedes realizar con los colores de tu preferencia. Me ha encantado como esta mariposa luce en el portarretrato que escogí. ¡Espero se animen a realizarlo, hasta una próxima oportunidad!
The images were taken by myself with my Redmi Note 8 cell phone.
Translation: Google Translation
I used the program Microsoft Power point
Las fotografías fueron tomadas por mí con mi teléfono celular Redmi Note 8.
Utilicé el programa Microsoft Power point
Traducción: Google Translation

This looks amazing, I have no idea of how to work with clay moulds, but you make it seem pretty easy. Well done dear.
Hi darling @glorydee. Thank you very much for your message, I am glad to know that you liked my work. Working with flexible clay is very easy and many crafts can be done. Take care!
Really nice, you have presented something great and the last scene is just amazing. Good feelings work in doing good things.
Hello! Thank you very much for such a beautiful message. I felt very happy reading it!
You're welcome. Keep up the great work.
https://twitter.com/1480885722559102976/status/1637111378388606976
The rewards earned on this comment will go directly to the people( @semarekha ) sharing the post on Twitter as long as they are registered with @poshtoken. Sign up at https://hiveposh.com.
This is really beautiful, hope the process wasn't too tedious?
Well done dear @ysamarynordaz thanks for sharing this tutorial with us.
Hello! Dear @monica-ene. Thank you very much for your message. I am glad to know that you liked my work. Really, it was not tedious, it is a craft that can be done easily, you just have to have a little patience and enjoy what you are doing. Take care!
Great, am glad to hear that 💖
¡Felicidades! Esta publicación obtuvo upvote y fue compartido por @la-colmena, un proyecto de Curación Manual para la comunidad hispana de Hive que cuenta con el respaldo de @curie.
Si te gusta el trabajo que hacemos, te invitamos a darle tu voto a este comentario y a votar como testigo por La Colmena.
Si quieres saber más sobre nuestro proyecto, te invitamos a acompañarnos en nuestro servidor de Discord.
Es un trabajo precioso, una mariposa muy tierna y realza la belleza del portarretrato. Saludos.
Hola amiga @jessiencasa. Muchas gracias por su lindo mensaje. ¡Un abrazo!
Hola querida amiga te quedo hermoso como todos tus trabajos saludos.
Muchas gracias amigo por todos tus mensajes. ¡Un gran abrazo!
Hace un uso muy creativo de la masa flexible. Es un trabajo bastante agradable a la vista.
Hola muchas gracias. Me alegra saber que le gustó este trabajo. ¡Saludos!