Diy Topiary with Paper Flowers / Diy Topiario con Flores de Papel
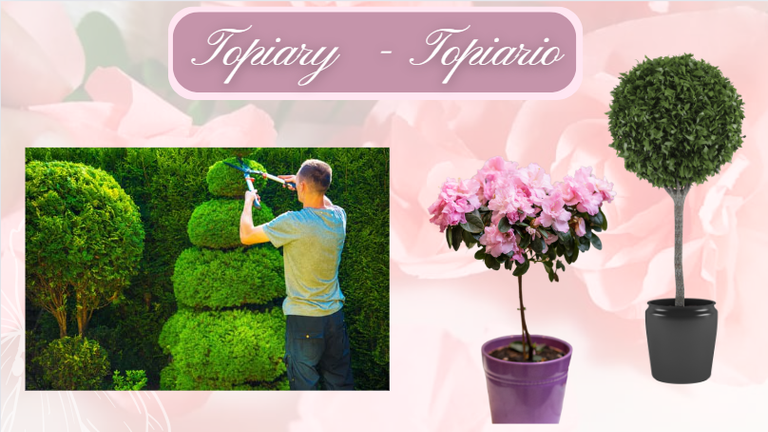
Topiaries are an ornamental tree that is pruned and given a special shape for decorative purposes, such as geometric shapes, animals, etc. one of those that we see in gardens well cared for by professional or specialized hands.
We can also have this decorative element inside our homes or at parties, and what I like most is that we have an infinite list of materials available for its production, as many as our creativity and budgets are willing to be present.
Topiario es un árbol ornamental que se poda y se le da una forma especial para fines decorativos, como de formas geométricas, de animales, etc. de esos que vemos en jardines muy atendidos por manos profesionales o especializada.
Este elemento decorativo también lo podemos tener dentro de nuestros hogares o en fiestas, y lo que más me gusta es que tenemos una infinita lista de materiales disponibles para su elaboración, tantos como nuestra creatividad y presupuestos estén dispuestos a estar presentes.
I really wanted to uncover my creativity with this first DIY Crepe Paper Flower Topiary, since I got it with paper of a beautiful pink color, but I had not done it because I had 3 Problems:
1- It did not have the anime or Styrofoam sphere for the upper base.
2- I didn't have the florist's foam or Oasis for the bottom base or to fill the pot.
3- I didn't have school glue or white glue.
Even with these 3 Problems present, I wanted to make my Topiary improvising the materials to replace them, and below I will tell you:
Deseaba mucho destapar mi creatividad con este primer Diy Topiario de Flores que Papel Crepé, ya que conseguí con papel de un hermoso color rosado, pero no lo había hecho porque tenía 3 Problemas:
1- No tenía la esfera de anime o telgopor para la base superior.
2- No tenía la espuma de floristería u Oasis para la base inferior o para rellenar la maceta.
3- No tenía pegamento escolar o pega blanca.Aún con estos 3 Problemas presentes, quise realizar mi Topiario improvisando los materiales para sustituirlos, y a continuación te cuento:

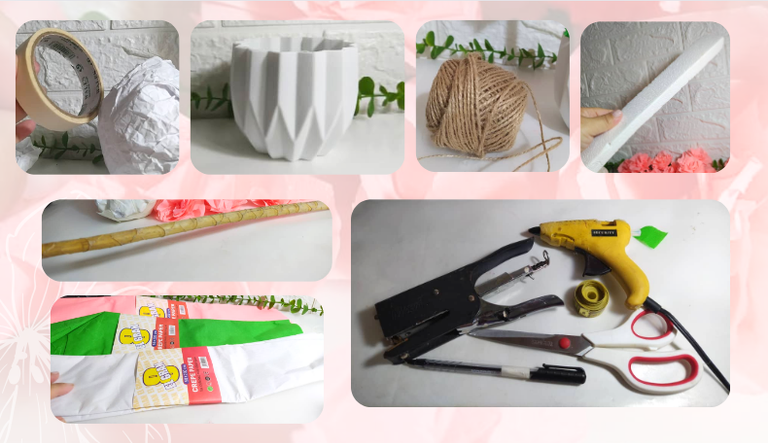
- Papel reciclado
- Cinta adhesiva de papel
- Maceta bonita
- Anime o telgopor reciclado
- Tallo de planta seco
- Papel crepé
- Grapadora, bolígrafo, tijera, cinta métrica y pistola de silicón caliente.
- Recycled paper
*Paper adhesive tape - Pretty flower pot
- Anime or recycled Styrofoam
*Dry plant stem - Crepe paper
- Stapler, pen, scissors, tape measure and hot glue gun.


First I made the Top Base of the Topiary where the flowers will be glued, but as I told you, I didn't have the anime or Styrofoam sphere that is used, so to solve this first problem I decided to make a sphere myself with sheets of recycled paper:
1- I took a sheet of letter paper in my case, and crumpled it until it became a small ball.
2- I open and do the same process several times until the paper completely loses its rigidity and is quite soft without firm folds, this was like crumpling and opening each sheet of paper 5 times.
3- I take one of the leaves that I have prepared and softened, and make a sphere or ball by wrapping it around itself.
4- I take another leaf and wrap the previous ball, then I continue taking another leaf and another leaf, until I obtain the desired size.
Primero hice la Base Superior del Topiario donde van a ir pegadas las flores, pero como les conté No tenía la esfera de anime o telgopor que se usa, así que para resolver este primer problema decidí realizar yo misma una esfera con hojas de papel reciclado:
1- Tomé una hoja de papel tipo carta en mi caso, y lo arrugué hasta volverlo una pequeña bola.
2- Abro y realizo el mismo proceso varias veces hasta que el papel pierda totalmente su rigidez y sea bastante suave sin pliegues firmes, esto fue como arrugar y abrir 5 veces cada hoja de papel.
3- Tomo una de las hojas que tengo preparadas y suavizadas, y hago una esfera o bola envolviendo sobre ella misma.
4- Tomo otra hoja y envuelvo la bola anterior, luego sigo tomando otra hoja y otra hoja, hasta obtener el tamaño deseado.

5- With paper adhesive tape I am going to wrap the sphere or ball as much as possible.
6- I continue going around with the adhesive tape, emphasizing where there are peaks, that is, making sure it is as even as possible.
7- Here is my finished sphere or ball, and its circumference measures 27 cm. It is important to take this measurement into account to know that with this size we achieve a specific job. Subsequently, whether one wants to do a larger or smaller job, we have this data for ourselves to have reference and do the jobs of the exact size we want.
5- Con cinta adhesiva de papel voy a envolver lo más que pueda la esfera o bola.
6- Sigo dando vueltas con la cinta adhesiva, haciendo énfasis donde hay picos, es decir que quede lo más pareja posible.
7- Aquí está mi esfera o bola terminada, y en su circunferencia mide 27 cms. Esta medida es importante tomarla en cuenta para saber que con este tamaño logramos un trabajo específico. Posteriormente, que uno quiera realizar un trabajo más grande o más pequeño, tenemos estos datos para nosotros mismos tener referencia y hacer los trabajos del tamaño exacto que queremos.
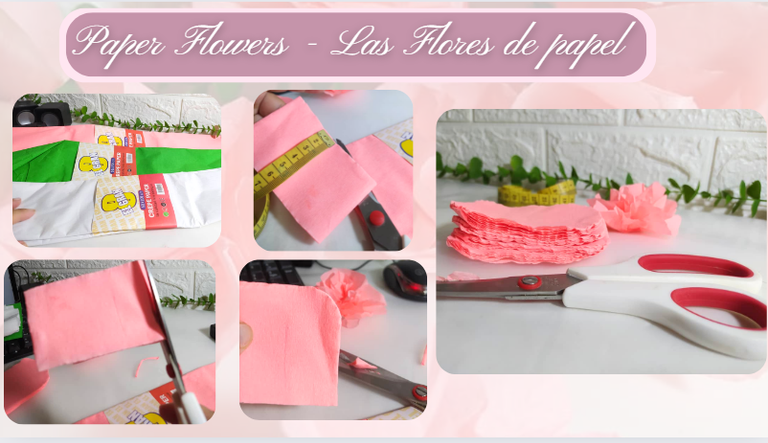
Now I am going to make the Crepe Paper Flowers, and up to this point I was thinking of making combinations of pink and white, but I decided to make them all pink.
Without opening the crepe paper as it comes, I mark 6 cm at one end, cut out those rectangles, cut both ends where the paper folds and make curves in the corners.
So, I'm left with these individual rectangles with curved ends.
Ahora voy a realizar las Flores de papel Crepé, y hasta este punto pensaba hacer combinaciones de rosado y blanco, pero decidí hacerlas todas rosadas.
Sin abrir el papel crepé como viene, marco en un extremo 6 cms, recorto esos rectángulos, corto ambos extremos donde dobla el papel y hago curvas en las esquinas.
De manera que, me quedaran estos rectángulos individuales con extremos curvos.
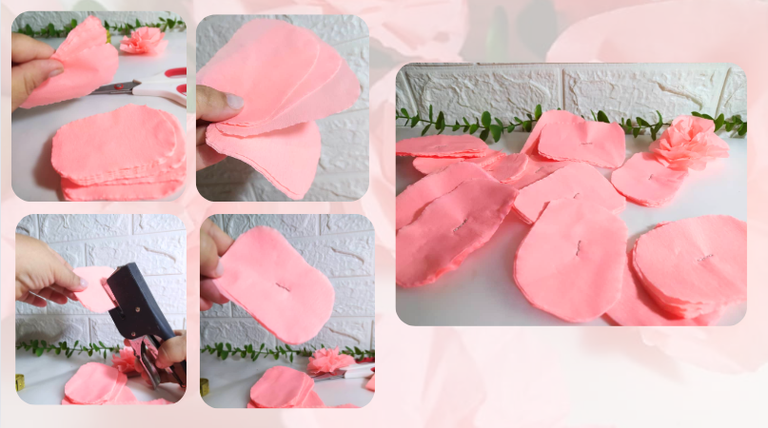
Now I take groups of 6 rectangles and staple them.
Ahora tomo grupos de 6 rectángulos y los engrapo.
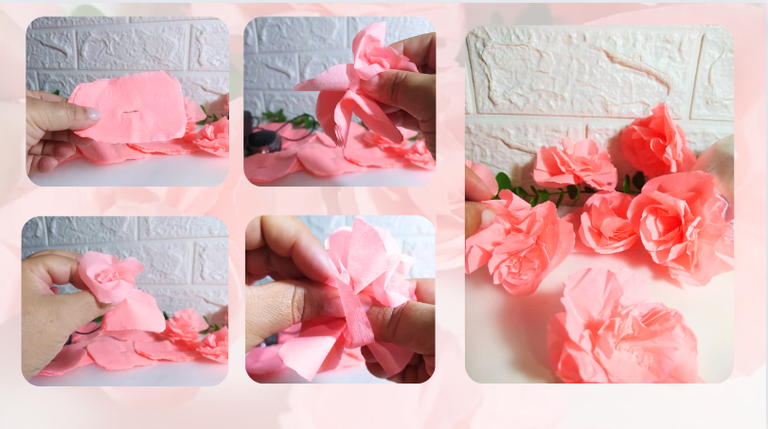
I begin to take each group rectangle by rectangle and fold it irregularly towards the front, forming with these like each petal of that flower.
I made the shapes rectangular, because this way more interesting shapes are formed.
Comienzo a tomar de cada grupo rectángulo por rectángulo y lo doblo de forma irregular hacia al frente, formando con estos como cada pétalo de esa flor.
Realicé las formas rectangulares, porque así se van formando formas más interesantes.
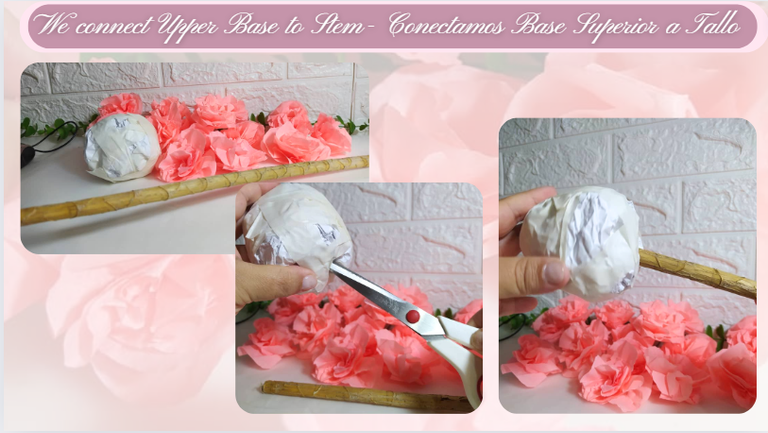
The stem is from a plant that I had in the front of my house and that I had to eliminate since it had uncontrolled growth and was of no use for my planter, that plant was called Croton and it started in a pot, but then it was taller than my home. Before removing it from the garden, I kept its stems and reproduced some and saved others to use as a support for other plants, for example I used this one in this Topiary project.
I opened the space for the stem, with a closed scissors and then I inserted the stem almost completely to the edge of the sphere or ball. In this case you can put some glue.
El tallo es de una planta que tenía en el frente de mi casa y que tuve que eliminar ya que tenía un crecimiento descontrolado y no me servía para mi jardinera, esa planta se llamaba Crotón y empezó en maceta, pero luego estaba más alta que mi casa. Antes de retirarla del jardín, me quedé con sus tallos y reproduje algunos y otros los guardé para usarlos como tutor de otras plantas, este por ejemplo lo usé en este proyecto de Topiario.
Abrí el espacio para el tallo, con una tijera cerrada y luego si introduje el tallo casi completamente hasta al borde de la esfera o bola. Es este caso se puede colocar algo de pegamento.
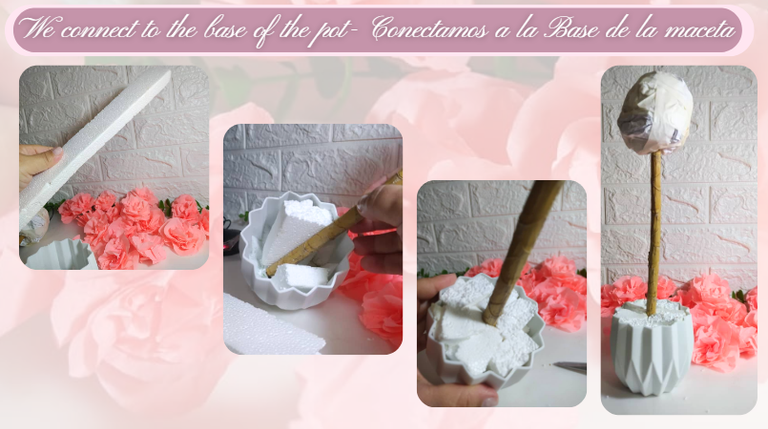
For the pot, I had the second problem and that was that I did not have gardening foam or Oasis as I know it. In this case I used some scraps of anime or Styrofoam, the kind that electronic equipment comes with and that I had saved.
I located the stem and then filled the pot with the anime or Styrofoam, pressing very well so that it didn't move anywhere. And with these steps, the structure of the Topiary is completely formed.
Para la maceta se me presentó el 2do problema y es que no tenía espuma de jardinería u Oasis como lo conozco. En este caso usé unos retazos de anime o telgopor de esos que traen los equipos electrónicos y que tenía guardado.
Ubiqué el tallo y luego fue llenando la maceta con el anime o telgopor, presionando muy bien para que no se moviera hacia ningún lado. Y ya con estos paso queda totalmente formada lo que es la estructura del Topiario.
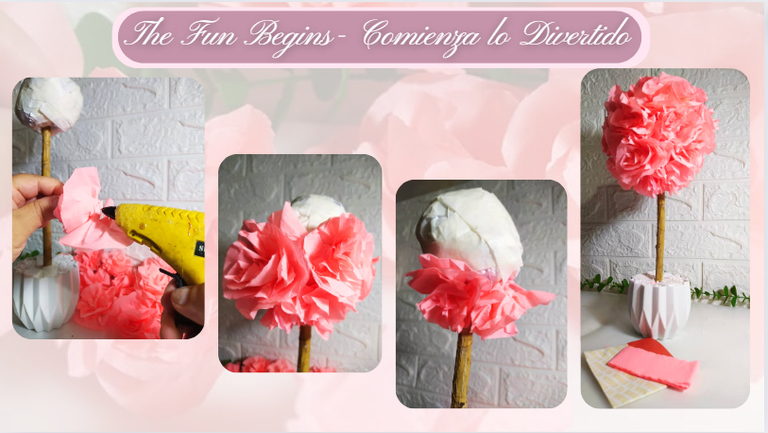
Now the fun part: the decoration itself. To glue the flowers to the top base, white glue is ideal, but I didn't have any, so I used my hot glue gun, which made the job faster but I had to be more careful since the crepe paper is very thin and could burn myself with hot silicone easily.
I glued the flowers from below until the top base was completely covered.
Ahora la parte divertida que la decoración propiamente. Para pegar las flores a la base superior lo ideal es la pega blanca, pero no tenía así que utilicé mi pistola de silicón caliente, lo que me hizo el trabajo más rápido pero debía tener más cuidado ya que el papel crepé es muy delgado y podía quemarme con el silicón caliente fácilmente.
Pegué las flores desde abajo hasta cubrir totalmente la base superior.
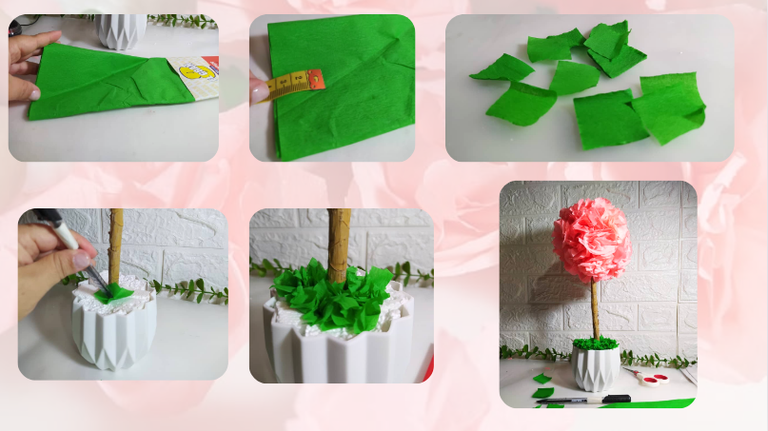
At the base of the pot to recreate the grass, I cut 3 cm squares of green crepe paper, and easily inserted them with a pen by pressing on the anime or Styrofoam. Here the ideal was to add a layer of white glue, but I didn't have any and they really stayed well fixed since the anime or styrofoam is of good quality, very compact.
En la base de la maceta para recrear el césped, corté cuadrados de 3 cms del papel crepé verde, y fácilmente los introduje con un bolígrafo haciendo presión en el anime o telgopor. Aquí lo ideal era echar una capa de pega blanca, pero no tenía y realmente quedaron bien fijos ya que el anime o telgopor es de buena calidad, muy compacto.
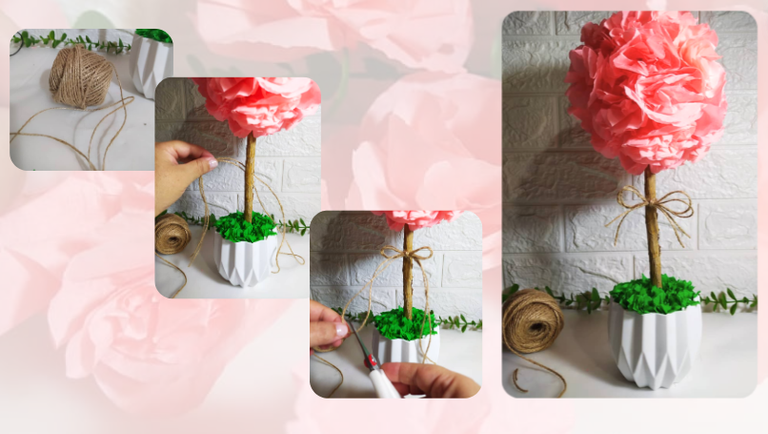
An additional element was a bow with jute cord, but it could perfectly be any ribbon that accompanies the design.
Un elemento adicional fue un lazo con cordón de yute, pero perfectamente podía ser cualquier cinta que acompañe el diseño.
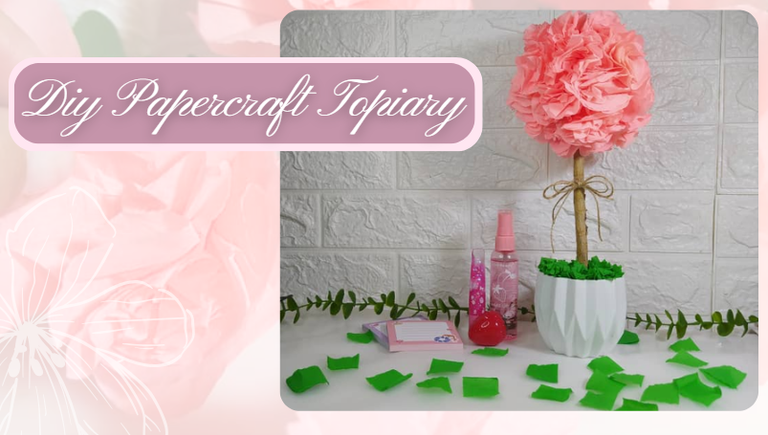
I loved the result, as it always has an owner, one of my daughters named Albani took ownership of the Topiary during the process, and when she saw it finished she fell even more in love with it.
I hope you liked it, I think I will continue making other Topiaries, with different techniques and materials.
El resultado me encantó, ya como siempre tiene dueña, una de mis hijas llamada Albani se adueñó del Topiario durante el proceso, y ya cuando lo vio terminado aún más enamorada quedó de él.
Deseo que les haya gustado, creo que seguiré realizando otros Topiarios, con diferentes técnicas y materiales.

I took the photos with my phone Redmi Note 8
Apps I used:
Canva Pro for Cover, Collage and Banners
I used Deepl Translator
My social networks:
Discord: YennysYaneth#0189
Twitter: @yennysferm
Instagram: @yennysyaneth
Las fotos las tomé con mi teléfono Redmi Note 8
Apps que utilicé:
Canva Pro para la Portada, Collage y Banners
Utilicé el Traductor Deepl
Mi redes sociales:
Discord: YennysYaneth#0189
Twitter: @yennysferm
Instagram: @yennysyaneth
Posted Using InLeo Alpha
https://x.com/yennysferm/status/1814155347449229556
Me maravilla el talento y la habilidad que tienen esas personas que le dan forma a esos arboles, cada que veia uno me preguntaba como los hacian jaja un arte esplendido que muchos deseariamos tener en nuestro jardin ❤️
Me encanto tu manualidad, el color es bellisimo y es muy decorativo 😍
Sí tienes razón, cuando veo un jardín así con esas formas me hace feliz de alguna forma, creo que son hechos para ser admirados y darnos alegría.
Me alegra que te haya gustado y gracias por comentar
Que manera tan creativa de solucionar con aquellos materiales que necesitabas y usaste lo que tenias a la mano. Quedó demasiado hermoso 😍
What a creative way to solve with those materials you needed and used what you had on hand. It turned out so beautiful 😍
A veces toca improvisar, y hasta cierto punto es buen ejercicio para el cerebro.
Me alegra que te guste y gracias por comentar
El resultado es muy lindo y delicado 💓😍
Gracias, me alegra que te guste. Y gracias por comentar
Quedó de tienda, elegante, hermoso, perfecto. Amo estas cositas para decorar espacios. Espero te sientas mejor de salud.
Amiga, lo publiqué en mi WhatsApp y me preguntaron si podía hacer cinco para ponerlos regaditos en una vitrina de tienda. Me hizo muy feliz... no es como que me vaya a hacer millonaria con eso, pero es genial que aprecien mi trabajo.
Gracias por comentar y el apoyo.
Pos yo quiero tambien <3 me encantaron amiga, excelente idea de emprendimiento.
👏 Keep Up the good work on Hive ♦️ 👏
❤️ @equipodelta suggested sagarkothari88 to upvote your post ❤️
🙏 Don't forget to Support Back 🙏
Muy hermoso y minimalista. Me encanta que no sea tan chillón, pero aún así llama la atención por su belleza.
El color rosado de ese papel fue inspirador. Los materiales a veces nos llaman a hacer algo lindo, hacen que fluyan las ideas.
Me alegra que te haya gustado y gracias por comentar, amigo
@tipu curate 2
Upvoted 👌 (Mana: 37/57) Liquid rewards.
Verdaderamente hermoso, me encantó tu creatividad para trabajar con los materiales que tenías en casa, reciclar y reutilizar siempre es buena opción, gracias por compartir amiga, saludos.💗✨