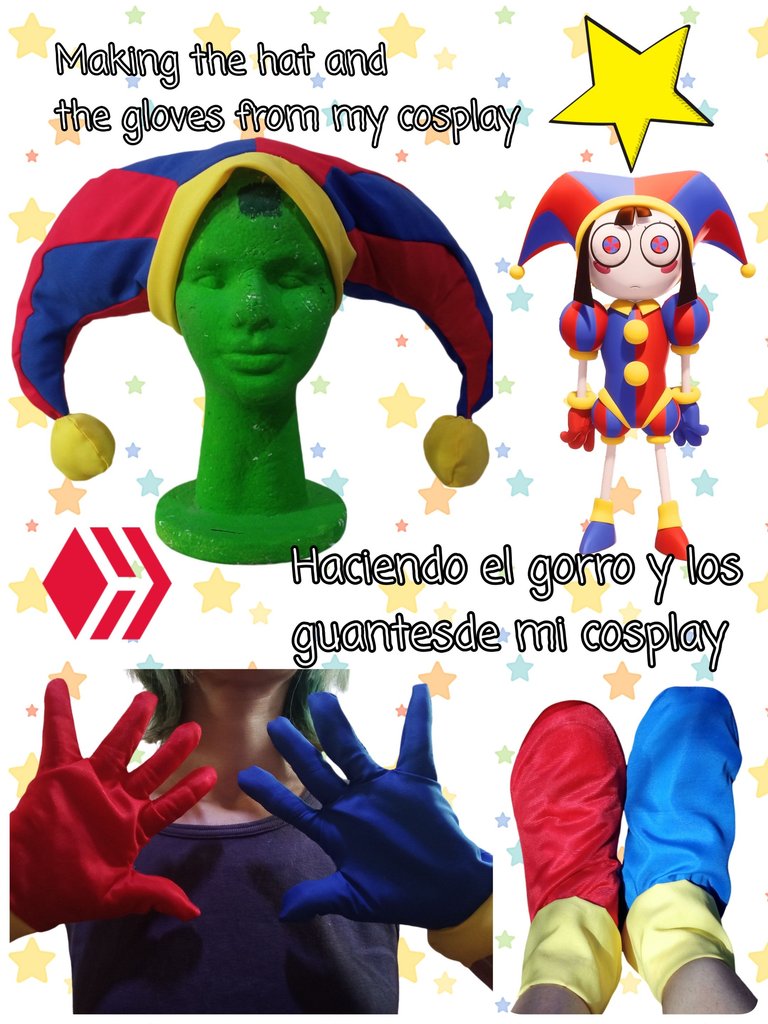
(ENG/ESP) Making the hat and gloves for my "Pomni from the Amazing Digital Circus" cosplay / Haciendo el gorro y los guantes de mi cosplay de "Pomni del Asombroso Circo Digital" 🤡✂️
ENGLISH CONTENT
Hello to all the members of this community and lovers of crafts! This time I come to show you a little of the procedure for the missing accessories to complete my cosplay project (Outfit or costume based on a series) of Pomni, Whose making of the costume, I showed it right here on the platform, only lacking to make what would be the hat, gloves and shoe lining.

The character is a clown. I searched the Internet for different references that could help me make the hat and gloves.


💙 Hat ❤️
To make this piece, I first took the measurement of my head and then, I drew the shape of one of the sides of the hat on a piece of paper. Then, since I was recycling scraps of fabric that I had, I tried to make this piece that I drew on the paper with the blue and red fabric. Once this was done, I divided the pieces with several cuts, trying to make them have the same shape as the reference image.
 |  |  |
|---|
Once this was done, I sewed the cut pieces together, alternating the colors to obtain the design similar to that of the character's hat (If we want to make a single-color hat, it will be much easier, since we won't have to make these ties). Then, I joined the front and back pieces, closing the hat on the sides as well as on the top. I made some small cuts in the most curved parts so that when you turned the piece over, the fabric would give way.
 |  |  |
|---|
Next, I cut a strip of fabric 10 cm wide and the length of the circumference of my head, as well as 6 slightly oval circles, which I would use to make the decoration that alludes to the bells on the hat. I sewed this strip of fabric to the bottom of the hat.
 |  |
|---|
I sewed the circumferences along all the edges, leaving a small opening at the top which allowed me to turn the piece over and then insert a little stuffing. This way I then hand sewed the fake bells to the peaks of the hat.
 |  |  |
|---|

And so the hat was finished. I confess I was a little apprehensive about the procedure, due to the lines and the limited material I had, but it was a fairly simple process compared to the costume I had made before.
 |  |  |
|---|

💙 Gloves ❤️
Making gloves the right way is a very delicate process that requires a lot of practice to get it right. I only made gloves once using the proper procedure, but this time, I'm going to show you a way to make gloves that works quite well for when you need to get by and it's not necessary to get a piece that's so neat.
To do this, just place your hand on the fabric and draw it like when you were kids and drew your hand on paper. Then, simply cut and sew with a straight seam, checking afterwards that it fits your hand. As you can see, it doesn't look too bad, although it's not quite perfect. It's necessary to use lycra or stretch fabric to make the gloves.
 |  |  |
|---|
For the bottom trim I did the same as with the hat and cut a 10cm wide strip, the length of my wrist. I sewed these pieces to the edge of the gloves, leaving a small opening where I added a little bit of stuffing, closed it and the gloves were finished.
 |  |  |
|---|
 |  |  |
|---|

💙 Shoe lining ❤️
In the case of the shoe lining, I didn't really like the result, since I didn't have the right material and what I ended up doing was something improvised, since the event is very close. So I plan to do a tutorial later on how to make a shoe lining in the most appropriate way. But anyway, I'll show you how they turned out:
 |  |
|---|

As I mentioned in the post where I showed how I made the rest of the costume, the materials I used were mostly recycled, so the fabric was not suitable for making certain pieces. So, I plan to make the gloves again later (this time with the more complex procedure), as well as the lining of the shoes. Of course, I hope to show the procedure on my blog. I also hope to bring you the photo shoot of the complete costume, so if you are interested in seeing it, don't miss my next updates 😉✨
Thank you very much for visiting my post. I hope you found it interesting.
Until next time!

CONTENIDO EN ESPAÑOL
¡Hola a todos los integrantes de ésta comunidad y amantes de las manualidades! En esta ocasión vengo a mostrarles un poco del procedimiento de los accesorios faltantes para culminar mi proyecto del cosplay (Atuendo o traje basado en una serie) de Pomni, Cuya elaboración del traje , la mostré aquí mismo en la plataforma, faltándome únicamente realizar lo que sería el gorro, los guantes y el forrado de los zapatos.

El personaje se trata de una payasita. Busqué por Internet diferentes referencias que pudieran servirme para la elaboración del gorro y de los guantes.


💙 Gorro ❤️
Para elaborar esta pieza, primero tomé la medida de mi cabeza y después, dibujé la forma de uno de los lados del gorro en un trozo de papel. Luego, como estaba reciclando trozos de tela que tenía , traté de sacar esta pieza que dibujé en el papel con la tela azul y roja. Una vez hecho esto dividí las piezas con varios cortes, tratando de que tuvieran la misma forma que la imagen de referencia.
 |  |  |
|---|
Una vez hecho esto, cosí las piezas cortadas intercalando los colores para obtener el diseño parecido al del gorro del personaje (En el caso de que queramos elaborar un gorro unicolor, será mucho más sencillo, pues no tendremos que hacer estos empates). Después, junté las piezas delantera y trasera, Cerrando el gorro por los laterales así como por la parte superior. Hice unos pequeños cortes en las partes más curvas para cuando volteaste la pieza, cediera la tela.
 |  |  |
|---|
Acto seguido, corté una tira de tela de 10 cm de ancho y del largo del contorno de mi cabeza, así como 6 circunferencias un poco ovaladas, las cuales me servirían para realizar el adorno qué hace alusión a los cascabeles del gorro. Esta tira de tela la cosí en la parte inferior del gorro.
 |  |
|---|
Cosí la circunferencias por todos los bordes, Dejando una pequeña abertura en la parte superior la cual me permitió voltear la pieza y posteriormente introducirle un poco de relleno. De esta forma cosí luego a mano los falsos cascabeles a los picos del gorro.
 |  |  |
|---|

Y de esta forma el gorro estuvo terminado. Confieso que estaba un poco temerosa acerca del procedimiento, debido a las líneas y al escaso material con el cual contaba, pero fue un proceso bastante sencillo comparado con el traje que había realizado anteriormente.
 |  |  |
|---|

💙 Guantes ❤️
Elaborar guantes de la forma correcta, es un proceso bastante delicado que requiere de mucha práctica para que quede bastante bien. Una sola vez realicé guantes con el procedimiento adecuado, pero en esta ocasión, les mostraré una forma de hacer guantes que sirve bastante bien para cuando necesitas salir del paso y no es necesario obtener una pieza tan pulcra.
Para ello bastará con que coloquemos nuestra mano sobre la tela y la dibujemos como cuando éramos niños y dibujábamos nuestra mano sobre el papel. Luego, simplemente cortamos y cosemos con una costura recta, verificando seguidamente que se amolde a nuestra mano. Cómo pueden ver, no luce tan mal, aunque no es del todo perfecto. Es necesario utilizar tela lycra o que estire, para realizar los guantes.
 |  |  |
|---|
Para el adorno de la parte inferior hice lo mismo que con el gorro y corté una tira de 10 cm de ancho, del largo del contorno de mi muñeca. Cosí estas piezas al borde de los guantes, dejando una pequeña abertura en donde les agregué un topo de relleno, cerré y los guantes estuvieron terminados.
 |  |  |
|---|
 |  |  |
|---|

💙 Forro de los zapatos ❤️
En el caso del forro de los zapatos el resultado no me gustó mucho que digamos, ya que no contaba con en material adecuado y lo que terminé haciendo fue algo improvisado, ya que el evento está muy cercano. Así que tengo pensado hacer más adelante un tutorial de cómo hacer un forrado de zapatos de la forma más apropiada. Pero de igual modo, les muestro cómo me quedaron:
 |  |
|---|

Como he mencionado en el post en el cual mostré como hice el resto del traje, los materiales que utilice en su mayoría, fueron reciclados, por lo que la tela no era la adecuada para realizar ciertas piezas. De modo que, tengo pensado más adelante volver a realizar lo que serían los guantes (Esta vez con el procedimiento que es más complejo), así como el forrado de los zapatos. Por supuesto, espero mostrar el procedimiento en mi blog. También espero traerles la sesión de fotos del traje completo , así que si están interesados en verlo, no se pierdan mis próximas actualizaciones 😉✨
Muchas gracias por haber visitado mi publicación. Espero que les haya parecido interesante.
¡Hasta una próxima oportunidad!

This is really an attractive and creative piece showing your innovative mindset.
Luvz from my side
Thank you so much. I fell in love with the character design from the very first moment and when I realized I had some material, I needed to know if I was capable of making it. My seamstress heart is happy about it 😊 Really, thank you so much 😌💚
muy bonito y creativo!
very nice and creative!
¡Muchas gracias, disfruté mucho el hacerlo! Mi objetivo es que otras personas vean que se puede hacer lo que se quiere con lo que hay a disposición 😊💚
Muy bonito. Felicitaciones!
!HUESO
!LUV
¡Muchas gracias, me alegro que haya sido de tu agrado! 😃💚
@tipu curate 8
Upvoted 👌 (Mana: 0/71) Liquid rewards.
Thanks a lot! 💚
¡Felicitaciones!
Estás participando para optar a la mención especial que se efectuará el domingo 22 de septiembre del 2024 a las 8:00 pm (hora de Venezuela), gracias a la cual el autor del artículo seleccionado recibirá la cantidad de 1 HIVE transferida a su cuenta.
¡También has recibido 1 ENTROKEN! El token del PROYECTO ENTROPÍA impulsado por la plataforma Steem-Engine.
1. Invierte en el PROYECTO ENTROPÍA y recibe ganancias semanalmente. Entra aquí para más información.
2. Contáctanos en Discord: https://discord.gg/hkCjFeb
3. Suscríbete a nuestra COMUNIDAD y apoya al trail de @Entropia y así podrás ganar recompensas de curación de forma automática. Entra aquí para más información sobre nuestro trail.
4. Visita nuestro canal de Youtube.
Atentamente
El equipo de curación del PROYECTO ENTROPÍA