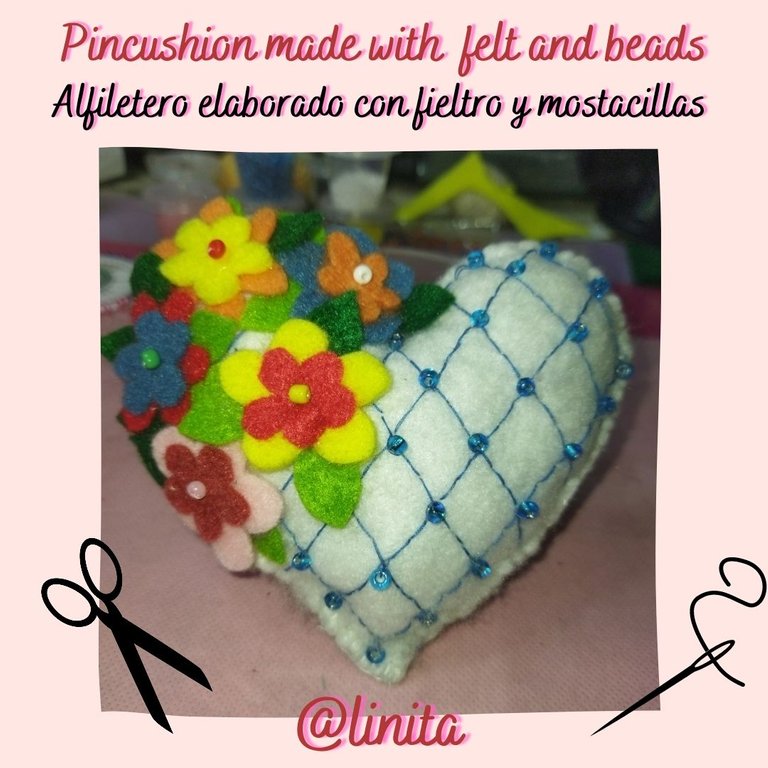
[ENG-ESP] Pincushion made with felt and beads // Alfiletero elaborado con fieltro y mostacillas
WELCOME TO MY BLOG!
My warmest greetings to all of you who day by day make life in this community.
Many times we try to organize our household items to prevent them from being misplaced before, during or after use. The kitchen utensils in their space, clothes, cleaning materials and so many other things we have in our homes to maintain order and always have on hand what we need.
Since I have been a homeowner, it has been impossible for me to keep needles, threads and pins from getting misplaced or lost. I have lost count of how many packages of needles and pins I have bought in the 24 years that I have owned my home and after my daughters grew up and learned to use them the loss is greater.
It is for this reason that today I find myself doing this project, I urgently need a pincushion, which in addition to facilitate the work at the time of some sewing, will allow the losses are less, or so it is expected.
This is a very practical element, both for sewing by hand and in the machine, as it is placed in a place where we can extract and insert without fear that we are going to puncture or get lost, plus it is very easy to do and does not require a lot of materials.
If you have or have had the same problem as me, I invite you to follow this step by step that I will gladly show you. Without further ado, let's get started.
¡BIENVENIDOS A MI BLOG!
Mis más cordiales saludos a todos los que día a día hacen vida en esta comunidad.
Muchas veces tratamos de organizar nuestros elementos del hogar para evitar que se traspapelen antes, durante o después de haberlos utilizados. Los utensilios de cocina en su espacio, las ropas, los materiales de limpieza y así entre tantas cosas que poseemos en nuestras casas para mantener el orden y siempre tener a la mano lo que necesitamos.
Desde que soy dueña de casa, me ha sido imposible evitar que las agujas, hilos y alfileres se traspapelen o pierdan. Ya perdí la cuenta de cuantos paquetes de agujas y alfileres he comprado en 24 años que soy dueña de mi hogar y después de que mis hijas crecieron y aprendieron a usarlos la pérdida es mayor.
Es por este motivo que hoy me encuentro realizando este proyecto, necesito con urgencia un alfiletero, que además de facilitarme la labor a la hora de realizar alguna costura, permitirá que las pérdidas sean menores, o eso es lo que se espera.
Este es un elemento muy práctico, tanto para realizar costuras a mano como en la máquina, ya que lo colocaos en un lugar donde podamos extraer y meter sin temor a que nos vayamos a punzar o se nos pierdan, además de que es bien fácil de hacer y no requiere gran cantidad de materiales.
Si tienes o has tenido el mismo problema que yo, te invito a seguir este paso a paso que con gusto te muestro. Sin más, comencemos.

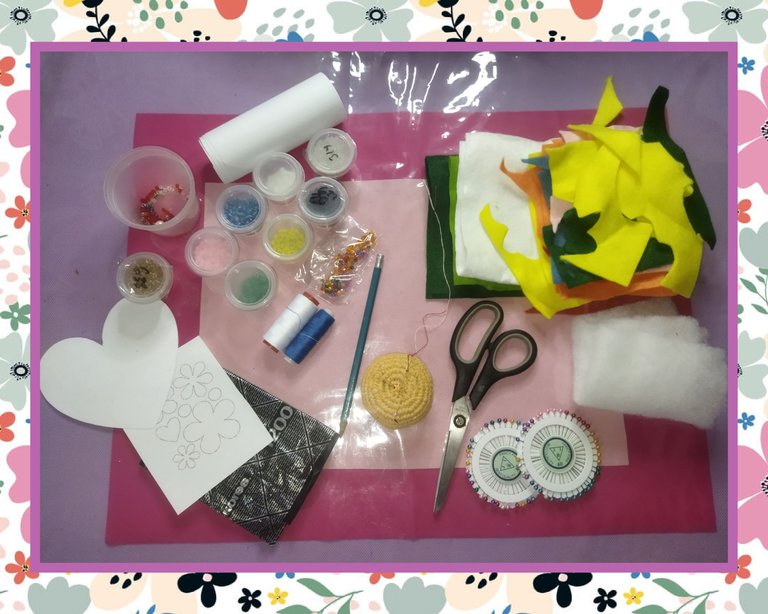
- Felt scraps, assorted colors
- Beads, assorted colors
- Wadding or synthetic padding
- Sewing threads
- Needle
- Pins
- Scissors
- Pencil
- Patterns (heart and flowers)
- Retazos de fieltro, colores variados
- Mostacillas, colores variados
- Guata o relleno sintético
- Hilos de coser
- Aguja
- Alfileres
- Tijera
- Lápiz
- Patrones (corazón y flores)

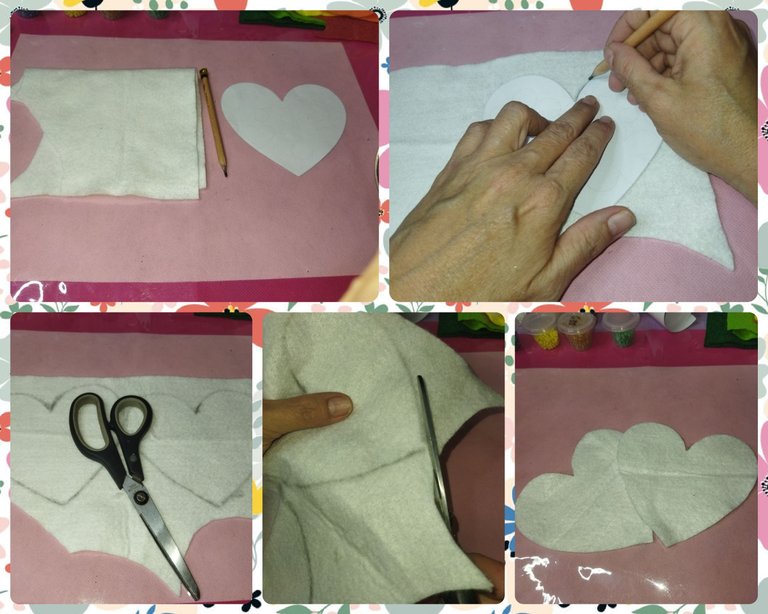
STEP Nº1
Transfer the heart shape to the white felt with the pencil. We will make two hearts with which we will form the pad that will be used to place the pins. Once marked, carefully cut both hearts.
PASO Nº1
Traspasamos con el lápiz la forma de corazón al fieltro de color blanco. Haremos dos corazones con el que formaremos la almohadilla que nos servirá para colocar los alfileres. Una vez marcados, cortamos con cuidado ambos corazones.
STEP Nº2
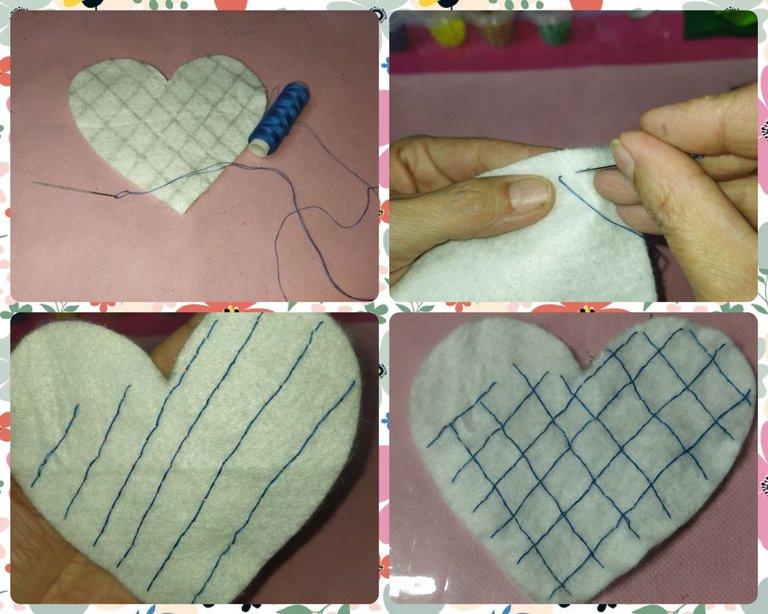
We draw with the help of the pencil and the ruler, diagonal lines in double direction. We will only use one heart.
PASO Nº2
Trazamos con la ayuda del lápiz y la regla, lineas diagonales en doble dirección. Sólo utilizaremos un corazón.
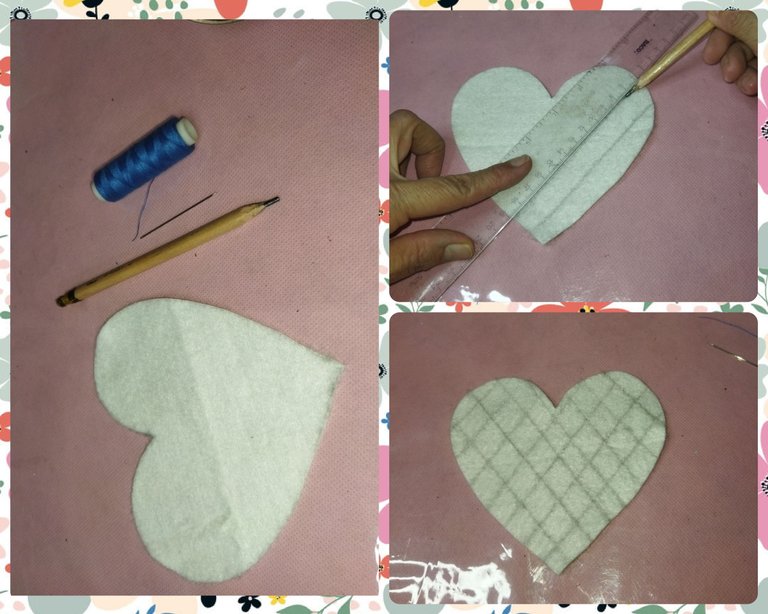
STEP Nº3
We use thread of a color that highlights the figure that we will form, in this case it will be rhombuses. We start by making the run from right to left with back stitches. Then we make the ones from left to right, with the same stitch. It is not necessary to finish the whole heart, since at one of the ends we will place the detail of the flowers.
PASO Nº3
Utilizamos hilo de un color que resalte la figura que formaremos, en este caso serán rombos. Comenzamos haciendo la carrera de derecha a izquierda con puntadas punto atrás. Luego hacemos las de izquierda a derecha, con la misma puntada. No es necesario culminar todo el corazón, ya que en uno de los extremos colocaremos el detalle de las flores.
STEP Nº4
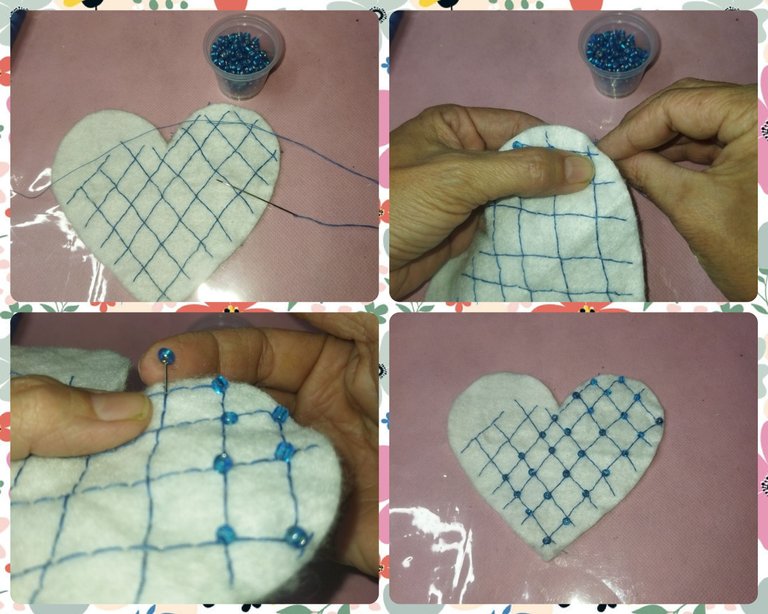
Now at each crossing of the lines we will place a stitch, using a single stitch and moving on to the next one until the rhombus is completed.
PASO Nº4
Ahora en cada cruce de las líneas colocaremos una mostacilla, utilizando una sola puntada y pasando a la siguiente hasta completar los rombos.
STEP Nº5
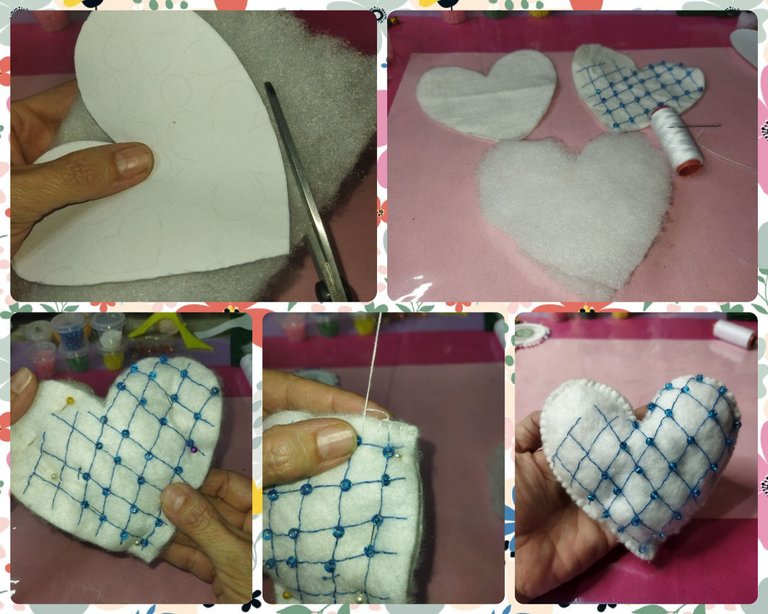
We form the pillow, using the wadding or stuffing that we will cut in the shape of a heart of the same size as the felt. Then we join the three pieces, felt, wadding and felt, and stitch with buttonhole stitch until we finish the heart with white thread.
PASO Nº5
Formamos la almohadilla, utilizando la guata o relleno que cortaremos en forma de corazón del mismo tamaño que los de fieltro. Luego unimos las tres piezas, fieltro, guata y fieltro, y realizamos puntadas con punto ojal hasta finalizar el corazón con hilo blanco.
.
STEP Nº6
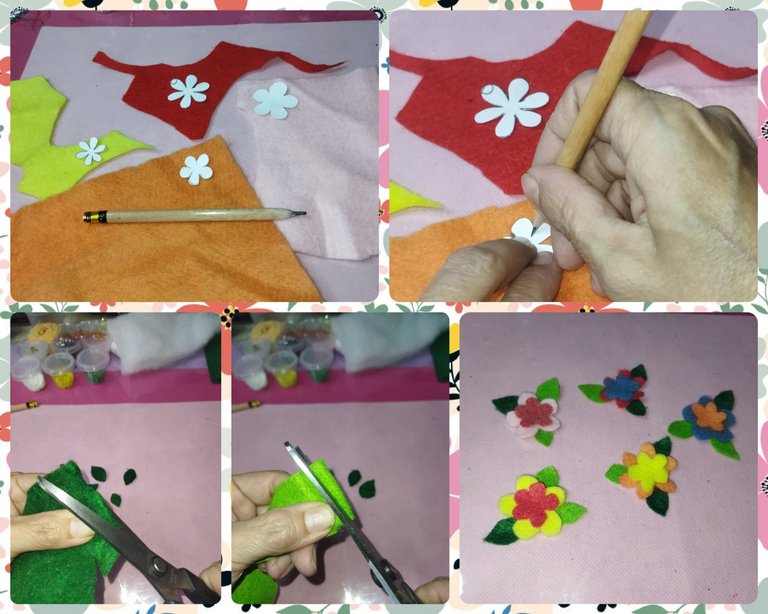
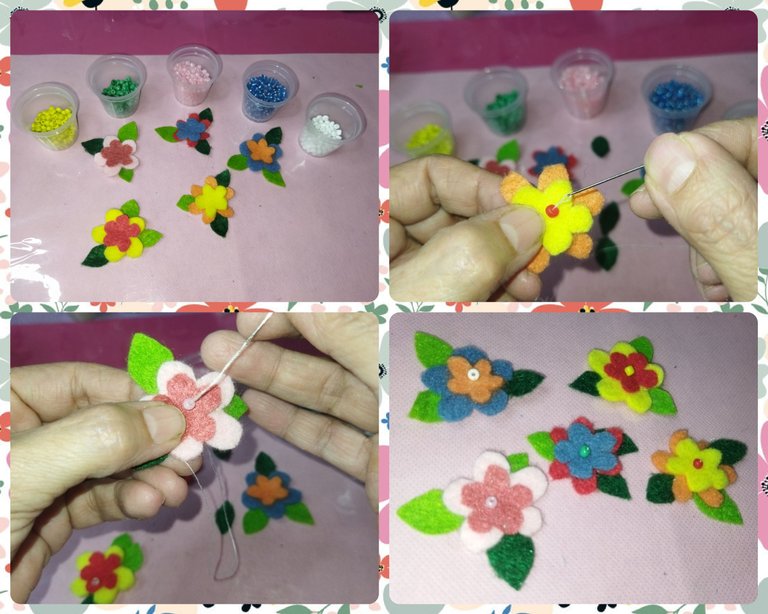
We make felt flowers of different colors and sizes to decorate the upper left side of the heart. We also make leaves of different sizes in apple green and dark green colors and form different flowers of various colors.
PASO Nº6
Realizamos flores con fieltro de diferentes colores y tamaños para decorar la parte superior izquierda del corazón. Igualmente hacemos hojas de diferentes tamaños en colores verde manzana y verde oscuro y formamos diferentes flores de colores variados.
STEP Nº7
We join each part of the flowers using a matching mustard with the desired color selection and sew the leaves together.
PASO Nº7
Unimos cada parte de las flores utilizando una mostacilla a juego con la selección de colores deseados y cosemos las hojas.
STEP Nº8
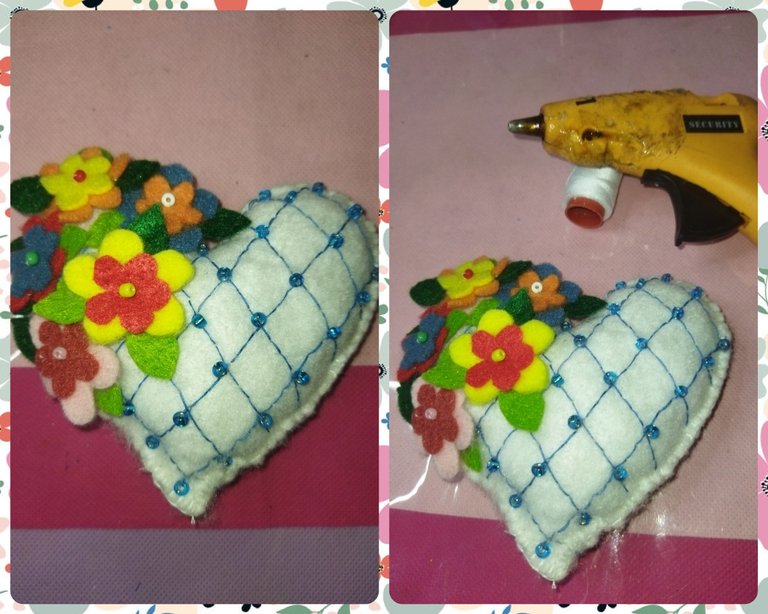
Finally, so as not to deform the shape of the heart, we glue the flowers with silicone, grouping them so that they cover the upper left part.
PASO Nº8
Por último, para no deformar la forma del corazón, pegamos las flores con silicón, agrupándolas de manera que cubra la parte superior izquierda.
FINISHED PROJECT
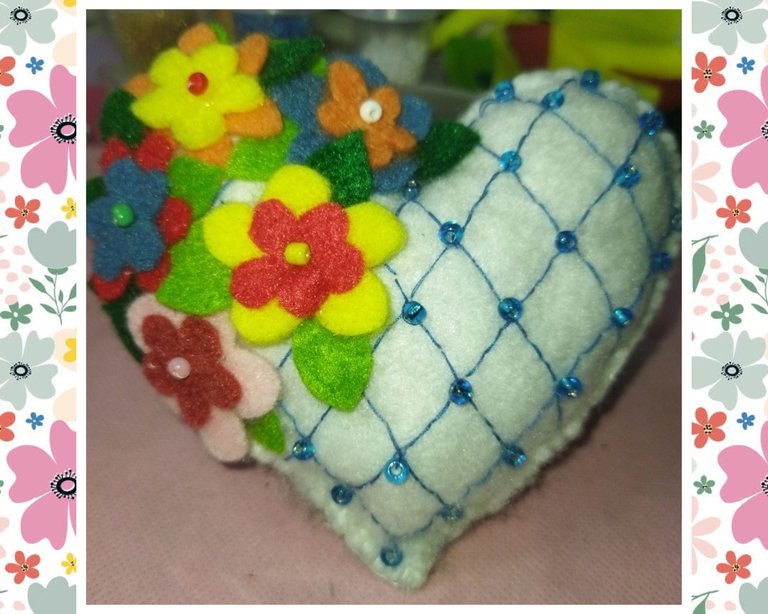
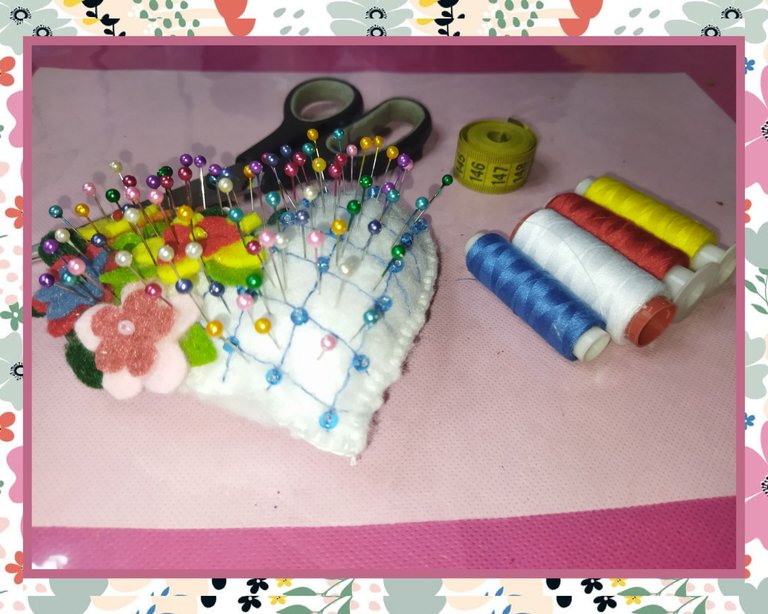
I am very happy with the final result. Now we will know where the needles and pins will be. The use of the sewing box is for the whole family and that is why with this pincushion we will keep more order and will last at home. I hope you liked it. See you next time.
PROYECTO FINALIZADO
Estoy muy feliz con el resultado final. Ahora ya sabremos donde estarán las agujas y los alfileres. El uso del costurero es de toda la familia y es por ello que con este alfiletero mantendremos más orden y perdurarán en el hogar. Espero les haya gustado. Nos vemos en la próxima.
Que lindo te quedó el alfiletero. Mucha dedicación y paciencia para hacer cada flor y que quedaran tan bonitas.
Muchas gracias, la verdad que las flores fueron las que más trabajo me dieron, es bien difícil cortar cosas muy pequeñas en fieltro, pero bueno, hice lo que se pudo. Me alegro que te haya gustado 😊. Saludos.
Hermoso trabajo ❤❤ me encanta porque es pequeñito y a la vez tiene muchos detalles bonitos y muy prolijos.
Te quedó bellisimo!
Your content has been voted as a part of Encouragement program. Keep up the good work!
Use Ecency daily to boost your growth on platform!
Support Ecency
Vote for new Proposal
Delegate HP and earn more
Thank you for sharing this amazing post on HIVE!
Your content got selected by our fellow curator @priyanarc & you just received a little thank you via an upvote from our non-profit curation initiative!
You will be featured in one of our recurring curation compilations and on our pinterest boards! Both are aiming to offer you a stage to widen your audience within and outside of the DIY scene of hive.
Join the official DIYHub community on HIVE and show us more of your amazing work and feel free to connect with us and other DIYers via our discord server: https://discord.gg/mY5uCfQ !
If you want to support our goal to motivate other DIY/art/music/homesteading/... creators just delegate to us and earn 100% of your curation rewards!
Stay creative & hive on!