MWM|| My first bucket hat
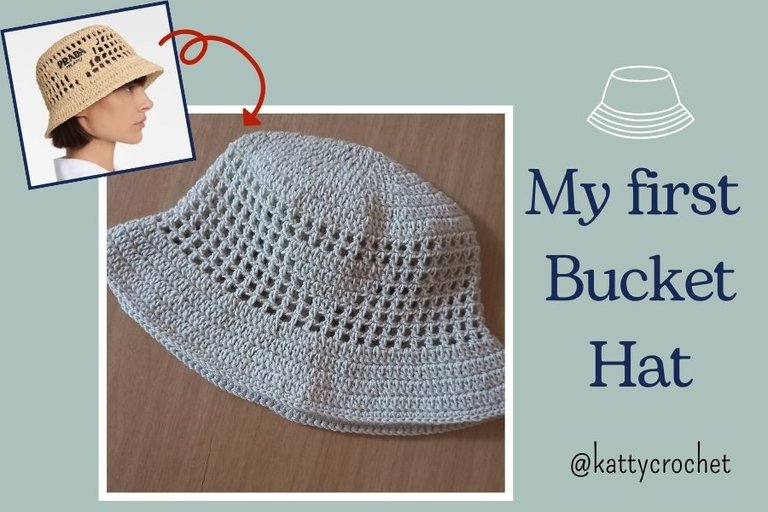

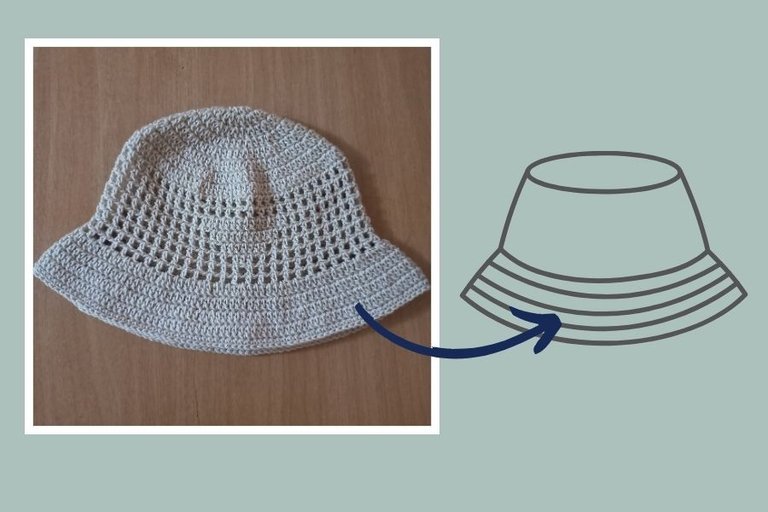
Hoy me complace compartirles mi más reciente proyecto a crochet. Se trata de mi primer sombrero tejido. Un modelo al estilo Bucket Hat que hice a pedido de mi querida hija.
Happy and blessed start of the week. It's a new Monday of needlework that allows us to greet each other and share our creations. I hope your weekend has been one of rest, relaxation and also creativity.
Today I am pleased to share with you my latest crochet project. This is my first knitted hat. A Bucket Hat style model that I made at the request of my dear daughter.

Fuente
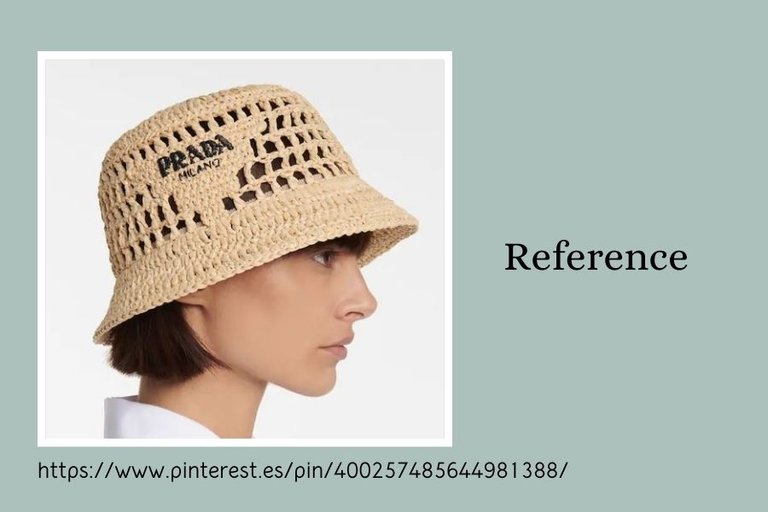
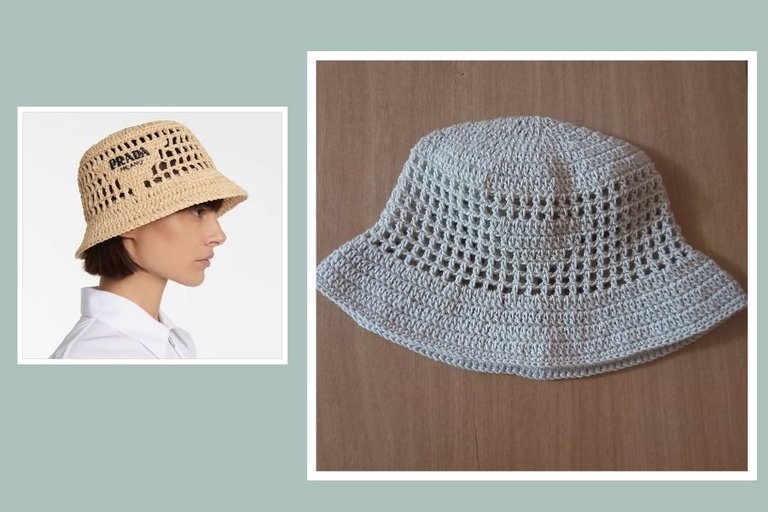
This is the first time I have knitted a hat in this style, although I had always wanted to try it. So when my daughter asked me to knit her a bucket hat, I didn't hesitate to get to work. She chose the pattern she wanted and it turned out to be this design from a well-known brand. We took this image as a reference and for the size I used a fabric bucket hat that we have at home.
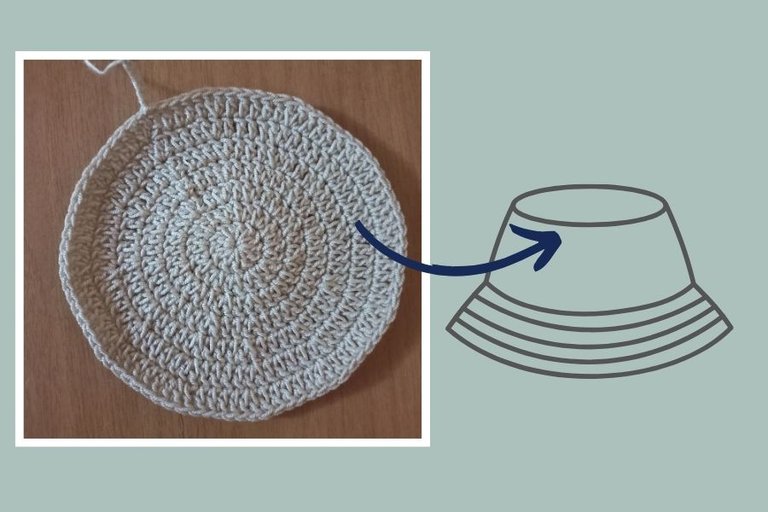
Para la corona se teje una circunferencia de aproximadamente 17 cm para un sombrero juvenil. Esta circunferencia se logra tejiendo entre 6 y 7 vueltas de aumentos, dependiendo del grosor del hilo y de la aguja que utilicemos.
I was pleasantly surprised to realize that the pattern is quite simple and very similar to the one used for knitting winter hats with a few variations. You can say that the hat is divided into three basic parts which are: The crown, the body and the brim.
For the crown a circumference of approximately 17 cm is knitted for a youth hat. This circumference is achieved by knitting between 6 and 7 rows of increases, depending on the thickness of the yarn and the needle we use.
El diseño original tiene en esta parte como una especie de triángulo que se forma con puntos altos. Yo intenté simularlo lo mejor posible.
Me pareció que también quedaría muy bien con un corazón, esta idea la dejaré para el próximo bucket hat que teja.
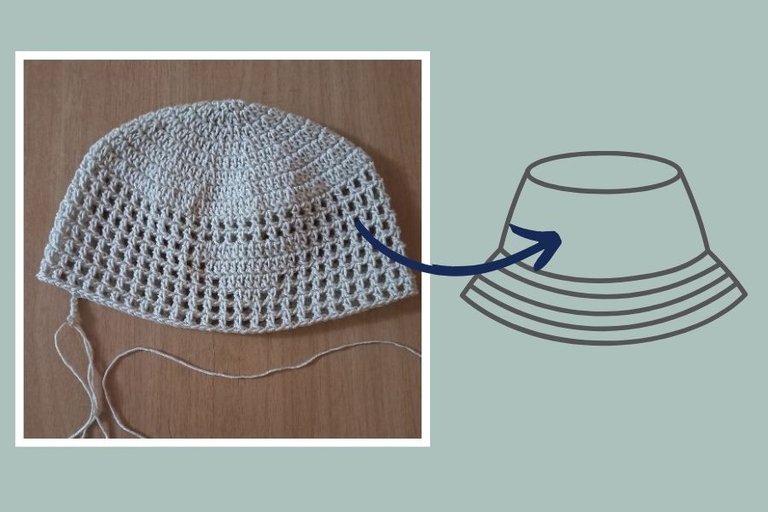
To knit the body of this particular design, 8 rows are knitted in a sequence of 1 double crochet, 1 chain, 1 double crochet. This will allow you to create a sort of grid stitch. No increases are made in this part, all the knitting is straight.
The original design has in this part as a kind of triangle that is formed with high stitches. I tried to simulate it as well as possible.
I thought it would also look great with a heart, but I will leave this idea for the next bucket hat I knit.
- 5 puntos altos más 1 aumento.
- Tejido recto (1 punto alto por cada punto alto de la vuelta anterior)
- 6 puntos altos más 1 aumento.
- Tejido recto (1 punto alto por cada punto alto de la vuelta anterior)
- punto deslizado por todo el borde del ala.
Finally, the brim or shadow of the hat is woven. In this part the following sequence is knitted:
5 high stitches plus 1 increase.
Straight knit (1 double crochet for each double crochet of the previous row).
6 double crochet plus 1 increase.
Straight knit (1 double crochet for each double crochet of the previous row).
1 single crochet for each double crochet of the previous row.
Slipped stitch all the way around the edge of the wing.
Realmente me gustó mucho tejer este sombrero y espero que sea el primero de muchos, ya que me encantaría tejerlo en diferentes diseños y combinaciones de colores.Siempre es un placer compartir con ustedes mis proyectos. Gracias por leer.
Saludos y bendiciones.I really enjoyed knitting this hat and hope it will be the first of many, as I would love to knit it in different designs and color combinations.
It is always a pleasure to share with you my projects. Thanks for reading.
Greetings and blessings.
Todas las fotos fueron tomadas con mi celular Samsung A32.
El banner de portada y los separadores de textos son diseñados por mi en Canva.com
Uso traductor Deepl

¡Felicidades! Esta publicación obtuvo upvote y fue compartido por @la-colmena, un proyecto de Curación Manual para la comunidad hispana de Hive que cuenta con el respaldo de @curie.
Si te gusta el trabajo que hacemos, te invitamos a darle tu voto a este comentario y a votar como testigo por La Colmena.
Si quieres saber más sobre nuestro proyecto, te invitamos a acompañarnos en nuestro servidor de Discord.
Gracias por el apoyo.
Te quedó muy bien para ser la primera vez haciendo un proyecto de estos. La verdad están a la moda y quedan muy bonitos. Saludos y feliz inicio de semana Katty.
Si, están a la moda, varias marcas famosas han sacado sus propios diseños a crochet, lo cual me parece genial porque le da valor a este bonito arte.
Gracias por pasar, saludos.
Your talent is so beautiful, really good.
Thanks so much
How long did it take you to knit it? Your daughter must be happy with her new hat 😊
I like how it turned out and I also like the color 😍
Thank you for sharing!
It took me about 4 hours to knit it since it was my first time making this pattern.
I am glad yoy liked it. Thanks for your visit.
Con el apoyo de la familia.
También nos puedes apoyar en nuestro Trail de TopFiveFamily
Si desea delegar HP al proyecto de la Familia del Top Family puedes hacerlo desde aquí: Delegue 5 HP - Delegue 10 HP - Delegue 20 HP - Delegue 30 HP - Delegue 50 HP - Delegue 100 HP.
Se ve lindo es gorrito, a mi me gustan mucho como quedan. Mi mamá tiene uno rojo y lucen muy bonito.
This is so detailed and the result is so beautiful.
Even though I crochet, I don’t know how knitting works but would love to learn it soon.
Thanks so much. Crochet is a beatiful technique I am sure you would like it.
Alright. Be expecting my works soon.
Esoooo era lo que yo quería hacer para mí Rafa. Jajajaja. Ay Dios, ni siquiera sabía cómo se llamaban.
Quedó muy lindo. Gracias por este tutorial tan bien explicado. Este es una talla media o sirve para una niña pequeña?
Este es una talla para jóvenes y adultos. Para una talla de niñas haces sólo 6 vueltas de aumentos en la copa y la circunferencia debe medir unos 15 o 16cm aproximadamente, todo depende del grosor del hilo. Es el único cambio que se hace, la medida de la copa o corona, todos los demás pasos son iguales.
Gracias por pasar, saludos 🤗
Wow I tried this mesh like pattern and I sucked at it. You make it look easy @kattycrochet
For the first time you did this. Wow congratulations, the out look so neat and beautiful
I love it! I also want to crochet this design long time but with other design or projects I've been busy. Thanks for sharing you work, it really reeminds me to make like this.
Estos días me propuse tejerme un sombrero, porque tengo planeado pasar más tiempo en el sol, es decir, en la huerta con las plantitas, jaja.
Veo que en la imagen ha usado un hilo grueso, me parece que es para que mantenga la forma. Oye, sería chévre ver más sombreros de diferentes colores, como mencionas con corazones y eso. Abrazos.