(Esp/Eng) Tutorial: Hermosos aretes a crochet en forma de búho / Tutorial: Beautiful crochet earrings in the shape of an owl
¡Bienvenido a mi blog!
Welcome to my blog!
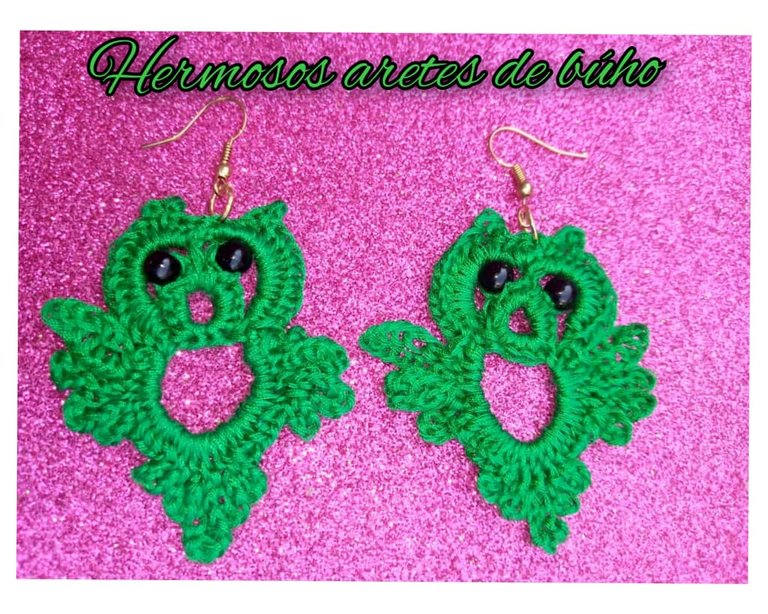
Buenas noches , feliz Jueves, a todos los que forman parte de esta comunidad #jewelry, deseo estén bien.
Hoy quiero mostrar a través de un tutorial como realizar unos hermosos aretes en forma de búho búho a crochet.
La elaboración es muy fácil de hacer, hay veces que queremos hacer algo y sin averiguar como se hace , le ponemos la etiqueta , es muy difícil, no puedo hacerlo. Les cuento que no sabía tejer, pero veía un tejido y me gustaba , siempre decía: Dios dame sabiduría para hacer algún tejido. Con el tiempo fui viendo tutoriales , aprendiendo los puntos, cuando me di cuenta, ya había aprendido los pasos de tejido de un principiante, luego comencé a meterme de lleno en el tejido, aunque no soy experta , pero si me atrevo a realizar tejidos, por ejemplo este Búho me quedó super lindo.
Good evening , happy Thursday, to all who are part of this community #jewelry, I wish you well.
Today I want to show through a tutorial how to make some beautiful earrings in the shape of owl owl crochet.
The elaboration is very easy to do, there are times when we want to do something and without finding out how to do it , we put the label , it is very difficult, I can not do it. I tell you that I did not know how to knit, but I saw a fabric and I liked it, I always said: God give me wisdom to do some knitting. Over time I was watching tutorials, learning the stitches, when I realized, I had already learned the steps of knitting a beginner, then I started to get fully into knitting, although I am not an expert, but if I dare to make fabrics, for example this owl I got super nice.
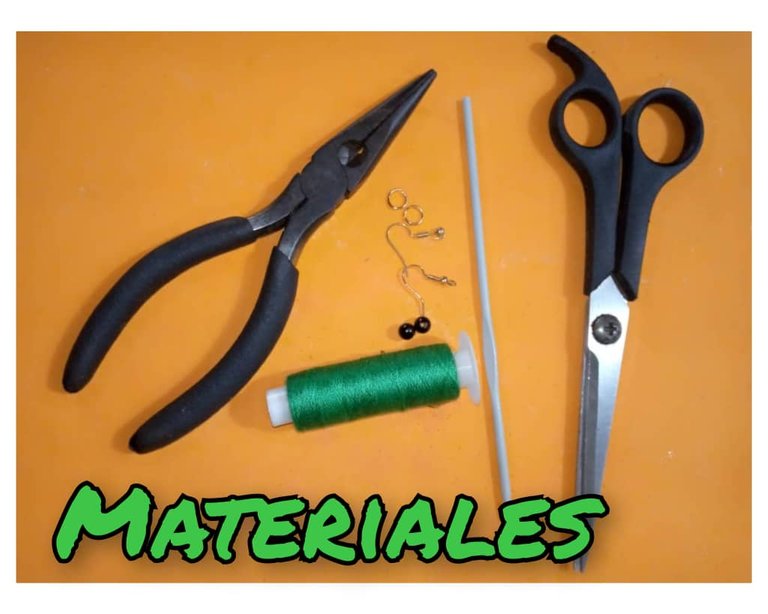
Materiales que necesitamos para la realización de los hermosos aretes a crochet, en forma de búho, son los siguientes:
- Hilo de coser, color verde.
- 4 mostacillas de color negra.
- 1 aguja de tejer, número 4.
- 2 anzuelo de zarcillos, color dorados.
- 1 pinza.
- Tijera,
- 2 aros de color dorado
- 1 aguja de coser.
Materials that we need for the realization of the beautiful crochet earrings, in the shape of owl, are the following:
- Sewing thread, green color.
- 4 black beads.
- 1 knitting needle, number 4.
- 2 tendrils hook, golden color.
- 1 pair of tweezers.
- Scissors,
- 2 gold-colored earrings.
- 1 sewing needle.
Paso a paso para la realización de los aretes en forma de búho:
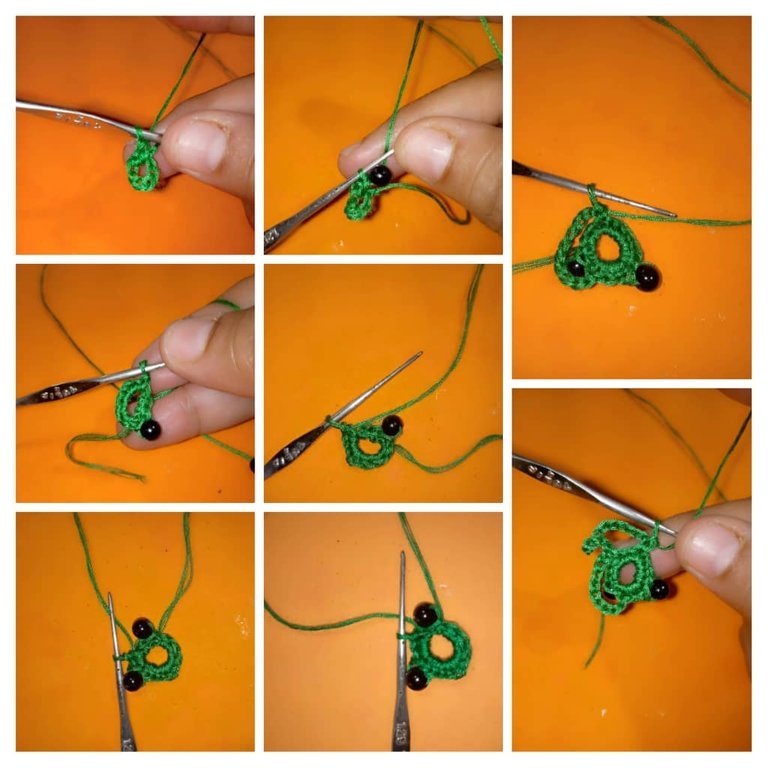
Paso 1:
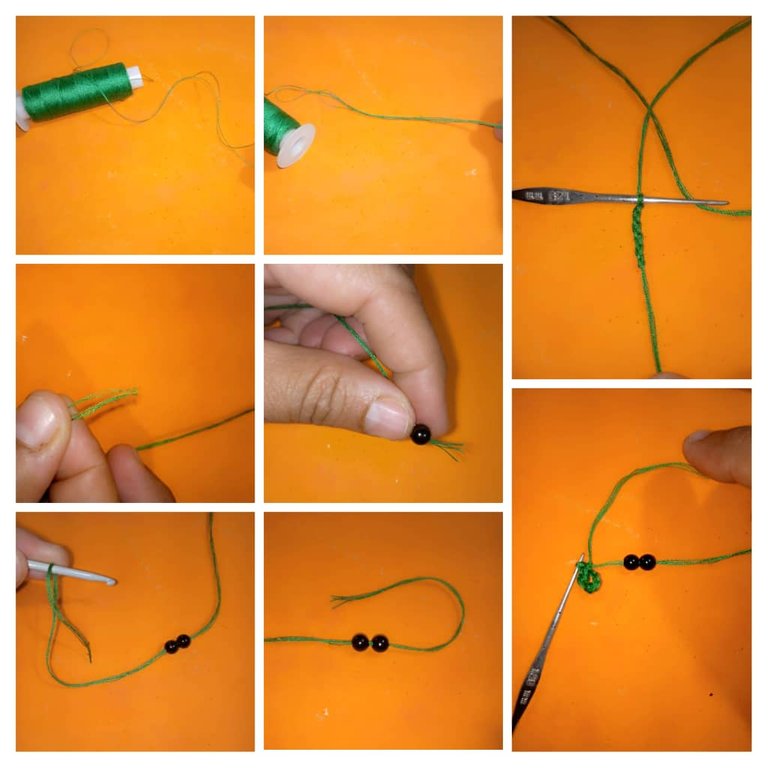
- Tomar el hilo de coser , color verde, colocarlos en 5 hebras, para realizar el tejido.
- Cada uno de los aretes lleva 4 metros de hilo. Por lo tanto debemos colocar el hilo de 8 metros e ir colocando las cinco hebras. Luego enrollar en un carrete para que no se enrede el hilo.
- Para este tejido se utiliza aguja de crochet, número cuatro.
- Antes de comenzar a tejer , debemos meter dentro del hilo las dos mostacillas color negro .
- Ahora hacemos un nudo y levantamos una cadeneta de 6 , luego hacer un punto deslizado en la primera cadeneta que se hizo, es decir en la número 1.Subir una cadeneta y tejer dos puntos bajos. Luego jalamos una mostacilla negra cerca de la cadena de 6 cerrada, pasamos el hilo por encima y hacemos un punto deslizado.
Step by step to make owl earrings:
Step 1:
- Take the sewing thread, green color, place them in 5 strands, to make the weaving.
- Each of the earrings has 4 meters of thread. Therefore we must place the thread of 8 meters and go placing the five strands. Then wind on a spool so that the thread does not tangle.
- For this weaving we use crochet needle, number four.
- Before starting to weave, we must put inside the thread the two black beads.
- Now we tie a knot and pick up a chain of 6, then make a slip stitch in the first chain that was made, that is to say in the number 1.Pick up a chain and knit two single crochet stitches. Then we pull a black stitch close to the closed chain of 6, pass the yarn over it and knit a slip stitch.
Paso 2:
- Aquí ya hemos colocado la mostacilla negra junto con el punto deslizado, continuamos haciendo 10 puntos bajos, jalamos la otra mostacilla negra y hacemos un punto deslizado.
- Luego tejemos dos puntos bajos, debe haber 14 puntos bajos, ahora nos vamos al primer punto que se hizo en esta vuelta y hacemos un punto deslizado.
- Tejemos 10 cadenas, metemos la aguja en el punto 6 y hacemos un punto bajo
Step 2:
- Here we have already placed the black mustard together with the slipped stitch, we continue knitting 10 single crochet stitches, we pull the other black mustard and knit a slipped stitch.
- Then we knit two slip stitches, there should be 14 slip stitches, now we go to the first stitch that was made in this round and make a slip stitch.
- We knit 10 chains, put the needle in stitch 6 and knit a single crochet.
Paso 3:
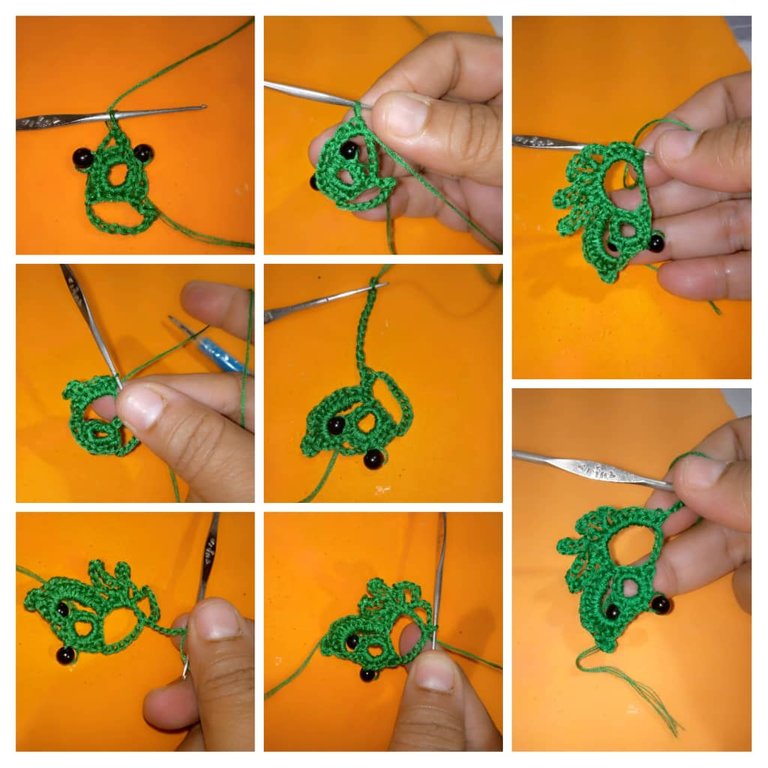
- Continuamos tejiendo 13 cadenas, dejamos dos puntos y en el tercer punto , tejemos un punto bajo. Luego tejer 8 cadenas y en el segundo punto de la cadena hacer un punto deslizado, Subir una cadena, tejer dos medios puntos, subir 5 cadenas, luego tejer 10 medios puntos. Ahora en donde se hizo el primer punto bajo , cerrar con un punto deslizado.
- Tejer dos medios puntos , luego ir tejiendo 12 cadenas, tejemos un medio punto, ahora tejemos 10 cadena y un medio punto.
- Tejemos 8 cadenas y luego medio punto, debemos ir empujando y acomodando el búho , que ya está agarrando forma.
- Nuevamente tejemos 6 cadenas , bajamos y tejemos un medio punto.
- Luego tejemos 6 medios puntos más, ahora 6 cadenas y cerramos con medio punto, subir 6 cadenas y terminamos con medio punto.
- Continuamos tejiendo 10 cadenas, bajamos y tejer un medio punto. Ahora debemos tejer 6 cadenas y luego cerrar con medio punto.
- Tejer 6 medios puntos , ir acomodando el búho.
Step 3:.
- We continue knitting 13 chains, leave two stitches and in the third stitch , knit a single crochet. Then knit 8 chains and in the second stitch of the chain knit a slip stitch, go up one chain, knit two half stitches, go up 5 chains, then knit 10 half stitches. Now where you knit the first single crochet, close with a slip stitch.
- Knit two half stitches, then knit 12 chains, knit one half stitch, now knit 10 chains and one half stitch.
- We knit 8 chains and then a half stitch, we must go pushing and accommodating the owl, which is already taking shape.
- Again we knit 6 chains, go down and knit a half stitch.
- Then we knit 6 more half stitches, now 6 chains and close with a half stitch, go up 6 chains and finish with a half stitch.
- We continue knitting 10 chains, go down and knit a half stitch. Now we must knit 6 chains and then close with half stitch.
- Knit 6 half stitches, and then we will place the owl.
Paso 4:
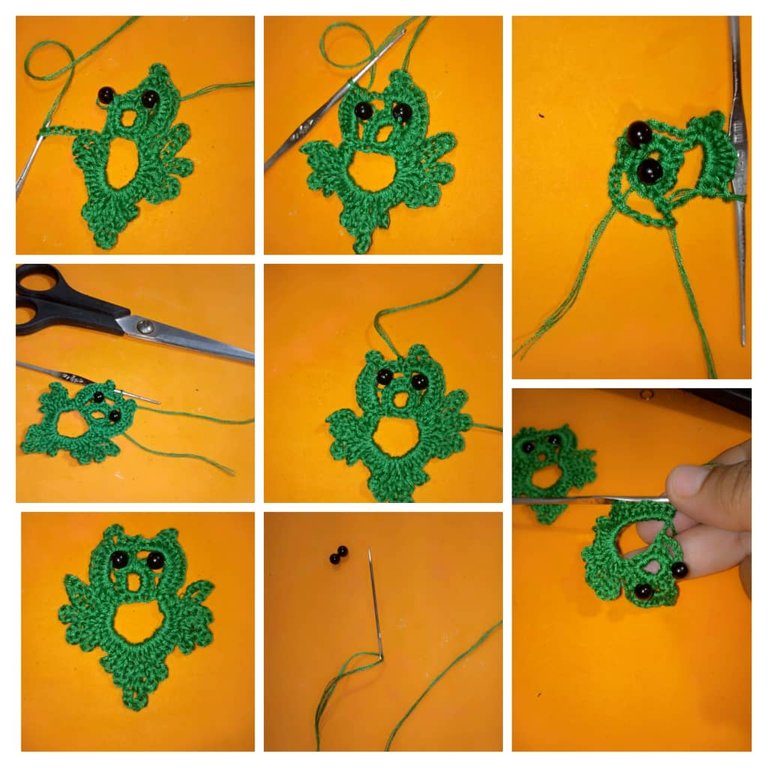
- Ahora repetimos lo mismo que del otro lado, tejer 6 cadenas y luego un medio punto, continuamos con 8 cadenas y un medio punto.
- Tejer 10 cadenas, bajar con un medio punto.
- Ahora tejemos 12 cadenas y bajar para tejer un medio punto, luego tejer dos medios puntos,donde está el punto bajo hacemos un punto deslizado.
- Continuamos tejiendo 10 medios puntos, subir 5 cadenas y tejer 3 medios puntos y por último deslizamos el punto en donde se comenzó la vuelta.
- Levantamos una cadena , cortamos el hilo con la tijera.
- Con la ayuda de la aguja de coser , escondemos el hilo por la `parte trasera del búho, vieron lo lindo que quedó .
- De la misma manera van a realizar y tejer el otro arete.
Step 4:
- Now repeat the same as on the other side, knit 6 chains and then a single crochet, continue with 8 chains and a single crochet.
- Knit 10 chains, go down with a half stitch.
- Now we knit 12 chains and go down to knit a half stitch, then knit two half stitches, where the low stitch is we knit a slip stitch.
- We continue knitting 10 half stitches, go up 5 chains and knit 3 half stitches and finally we slip the stitch where we started the round.
- Pick up a chain, cut the yarn with the scissors.
- With the help of the sewing needle, we hide the thread on the back of the owl, you saw how nice it looked.
- In the same way you are going to make and weave the other earring.
Paso 5:
- Con la ayuda de la pinza , colocamos el aro y el anzuelo , cerramos con la pinza, ya tenemos listo los hermosos aretes.
Step 5:
- With the help of the clamp, place the ring and the hook, close with the clamp, and we have ready the beautiful earrings.
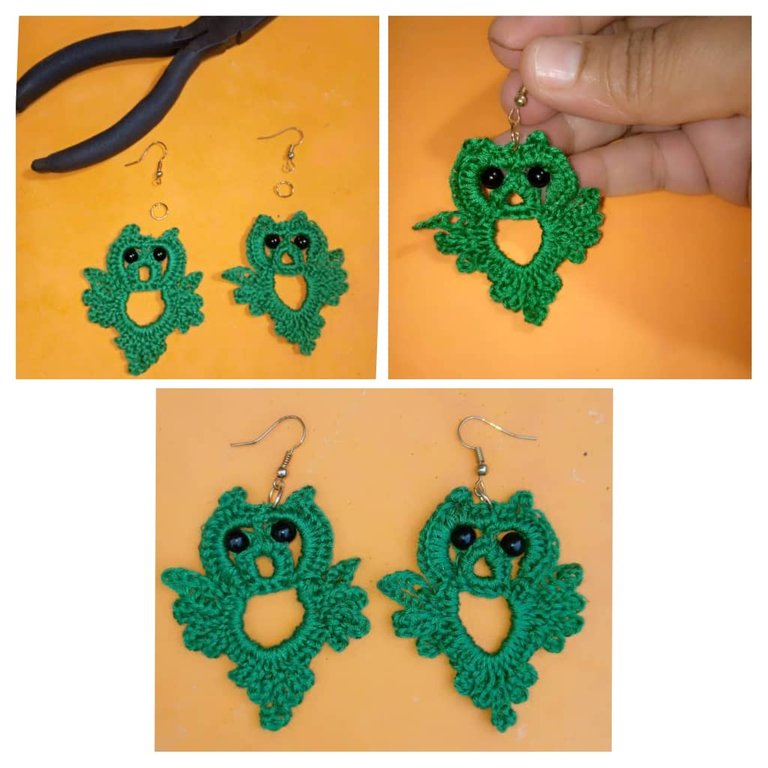
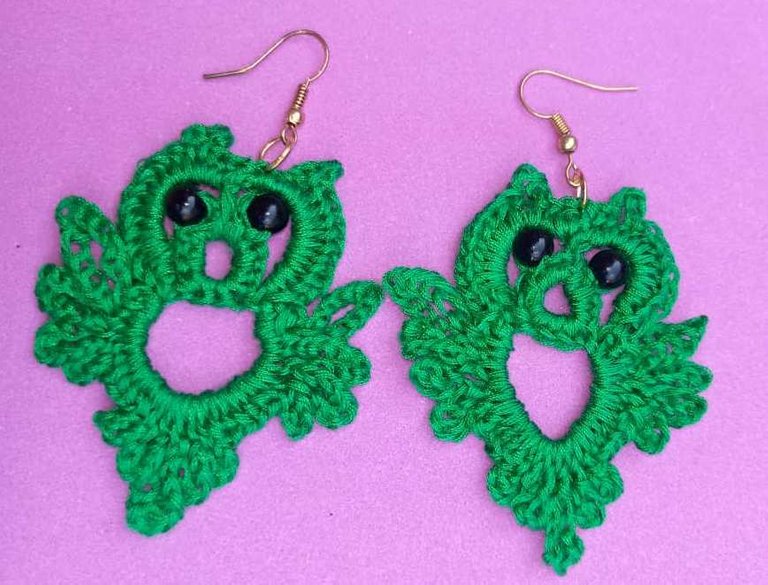
Aquí el resultado final de los hermosos aretes a crochet en forma de búho.
Here is the final result of the beautiful crochet earrings in the shape of an owl.
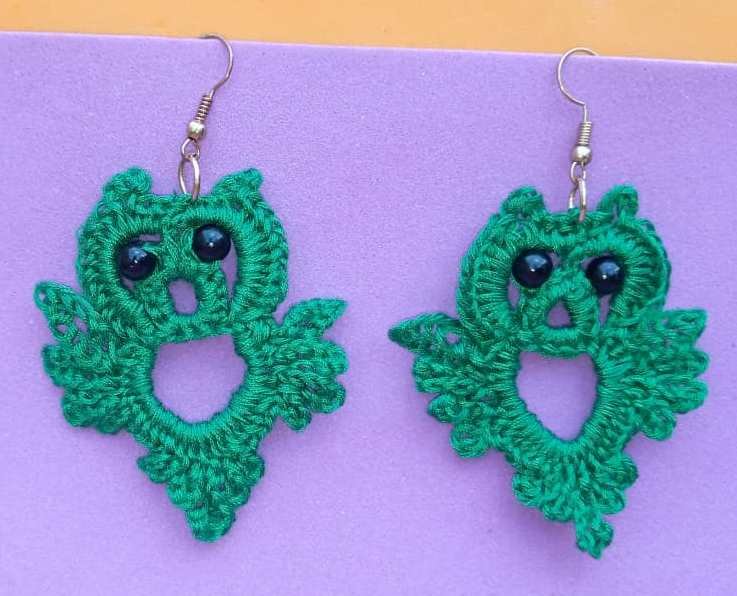
Luciendo mis hermosos aretes.
Wearing my beautiful earrings.

Espero que le guste, muchas bendiciones.
I hope you like it, many blessings.

Las fotos son mías , tomadas con telefono Infinix, editadas con incollage y traducidas con DEEPL.
The photos are mine, taken with Infinix phone, edited with incollage and translated with DEEPL.
Que bonito amiga
Congratulations @josdelmi! You have completed the following achievement on the Hive blockchain And have been rewarded with New badge(s)
Your next target is to reach 72000 upvotes.
You can view your badges on your board and compare yourself to others in the Ranking
If you no longer want to receive notifications, reply to this comment with the word
STOPTo support your work, I also upvoted your post!
Check out our last posts:
Hola, es fantástico y muy original, me agrada mucho la forma, se ve que se requiere de paciencia y precisión lograr darle forma. Buen trabajo
!PIZZA
$PIZZA slices delivered:
@darwinjj(2/5) tipped @josdelmi
Pretty cool! Like the color and design. It takes creativity and talent to make something like this. Keep up the great work!
Me encantaron esos aretes podría lucirlos muy bien en mi emprendimiento verde 🌿 saludos querida @josdelmi