Esp/ Eng) Tutorial: Crea unos hermosos aretes con cola de ratón y brillantes / Tutorial: Create beautiful earrings with mouse tails and rhinestones
INGLÉS:
Bienvenidos a mi blog , queridos amigos que forman parte de esta linda comunidad #jewelry
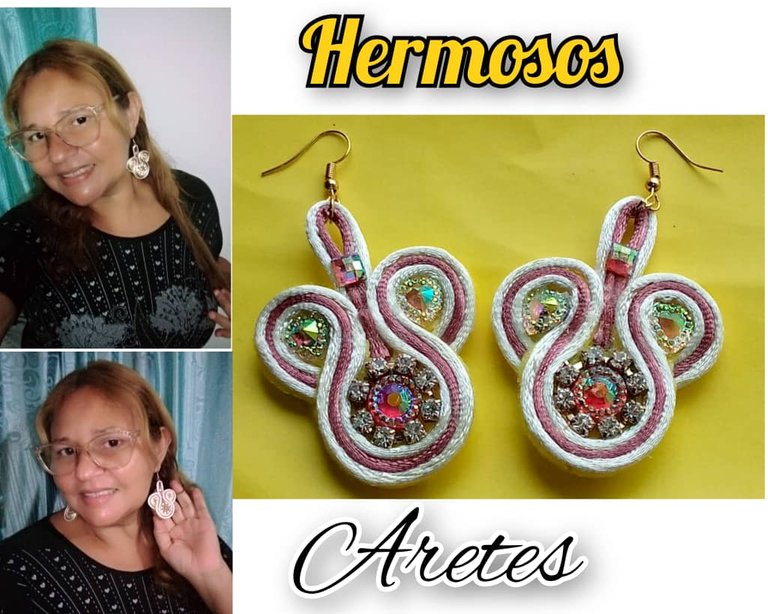
Felíz día martes , deseo que estén bien,Dios los bendiga.
Hoy feliz de realizar mi post, ya que haciéndolo me olvido de todo, del estrés, de la situación , en fin de todo.
El día de hoy quiero mostrar a través de un tutorial,como realizar unos hermosos aretes , elaborados con cola de ratón y brillantes.
Estos aretes se hacen con hilo llamado soutache, lo estuve buscando pero no lo encontré, entonces decidí realizar los zarcillos con hilo cola de ratón.
Los aretes son fácil de hacer, lo que se requiere es de paciencia para que quede muy lindo. Aunque los hilos cola de ratón se utilizan más que todo para nudos macramé, también sirven para la realización de estos aretes.
¡Sin mas que decir manos a la obra!
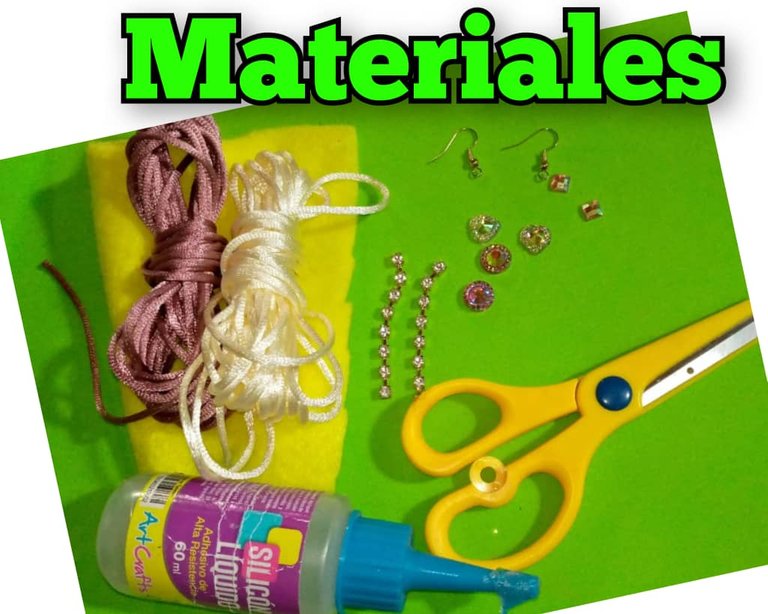
¿Qué se necesita para la realización de estos hermosos zarcillos elaborados con cola de ratón y brillantes?
Materiales como:
- 50 centímetros de cola de raton colores: beige y morado claro
- Tijeras.
- Silicona líquida.
- 4 brillantes en forma de corazón.
- 2 brillantes redondos.
- 2 brillantes cuadrados.
- 2 anzuelas de zarcillos.
- 2 argollas.
- 2 strap de cadenas con 8 brillantes.
- 1 pedazo de fieltro.
Paso a paso de la realización de los aretes:
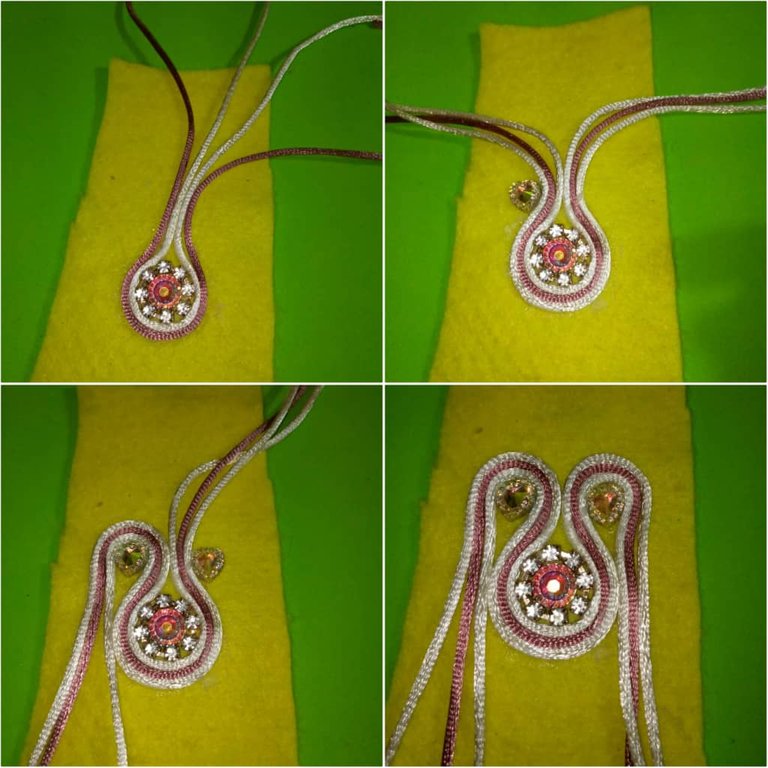
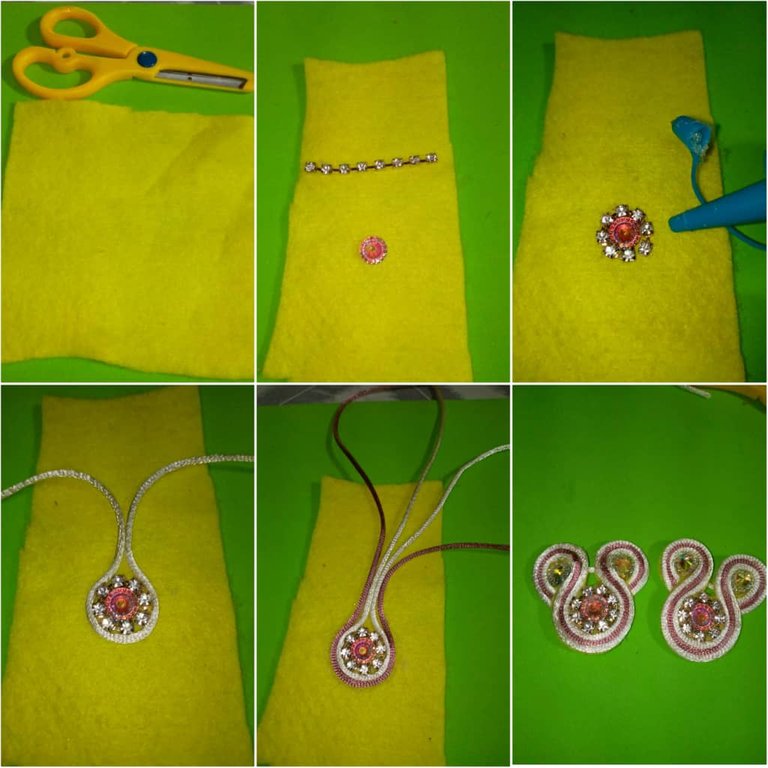
- Para comenzar a realizar los aretes, colocamos el brillante redondo sobre el fieltro y le echamos silicona líquida para pegarlo, esperamos un rato a que se pegue.
- Luego tomamos el strap de cadena con los brillantes, también colocamos silicona líquida y lo `pegamos alrededor del brillante redondo.
- Recortamos un pedazo de hilo cola de ratón (25 centímetros) de color beige y lo colocamos por todo el borde del strap de cadena.
- Así mismo recortamos con las tijeras un pedazo de cola de ratón (25 centímetros) color morado claro y agregamos pega , tambien lo colocamos alrededor de los demás.
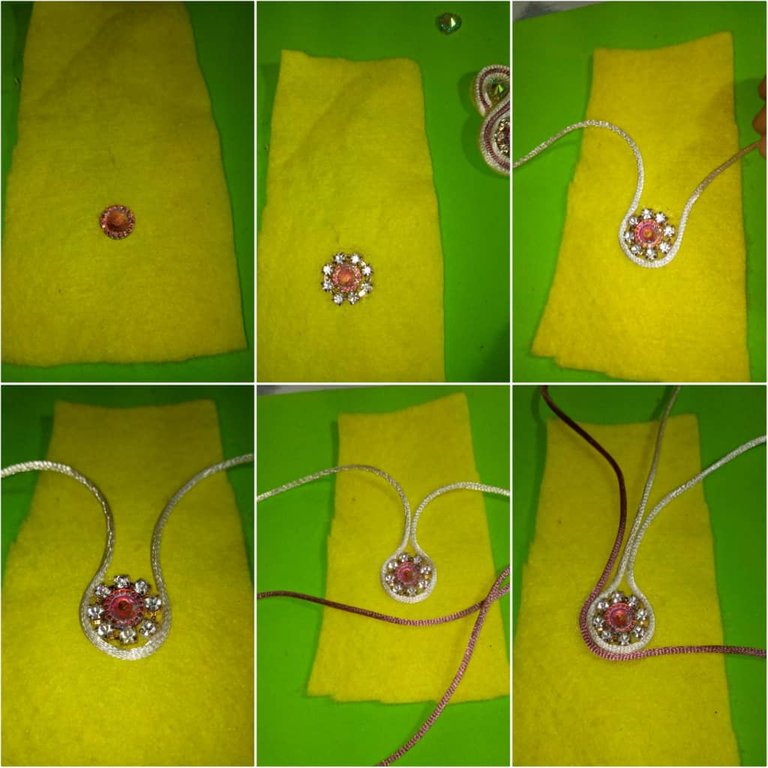
- Colocamos alrededor otro pedazo de hilo cola de ratón (25 centímetros) de color beige, agregamos silicona para que pegue.
- Esperamos un buen rato para esperar que peguen bien los hilos.
- Procedemos a colocar los brillantes en forma de corazón , en ambos lados del arete, igualmente le echamos silicona y lo pegamos en ambos lados, ahora vamos pegando poco a poco los hilos cola de ratón , de color beige, morado claro y el beige y lo colocamos en un lado, por allí no le agregamos pega todavía.
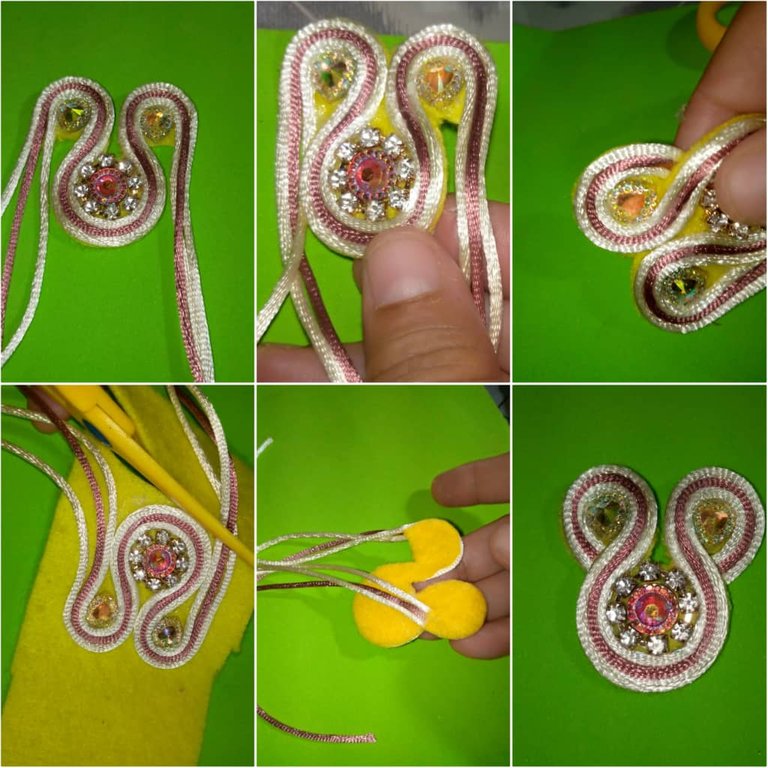
- Continuamos con la realización de los aretes, con las tijeras recortamos todo el fieltro sobrante con mucho cuidado , tratando de no romper el hilo cola de ratón.
- Después de recortar todo el fieltro con las tijeras, procedemos a pegar por la parte de atrás los hilos por los lados.
- Aquí pueden ver como va quedando el arete, muy hermoso.
- Para realizar el segundo arete , hacemos el mismo procedimiento que hicimos con el primero.
- Luego continuamos con la parte de arriba de los aretes, recortamos 4 pedazos de cola de ratón de 15 centímetros , 2 pedazos beige y dos morado claro.
- Ahora doblamos el hilo morado claro , le echamos silicona por los lados , pegamos el hilo beige, luego hacemos lo mismo con el otro.
- Pueden guiarse con la imagen.
- Además pegamos sobre el brillante cuadrado.De una vez con una pinza colocamos los aros y los anzuelos.
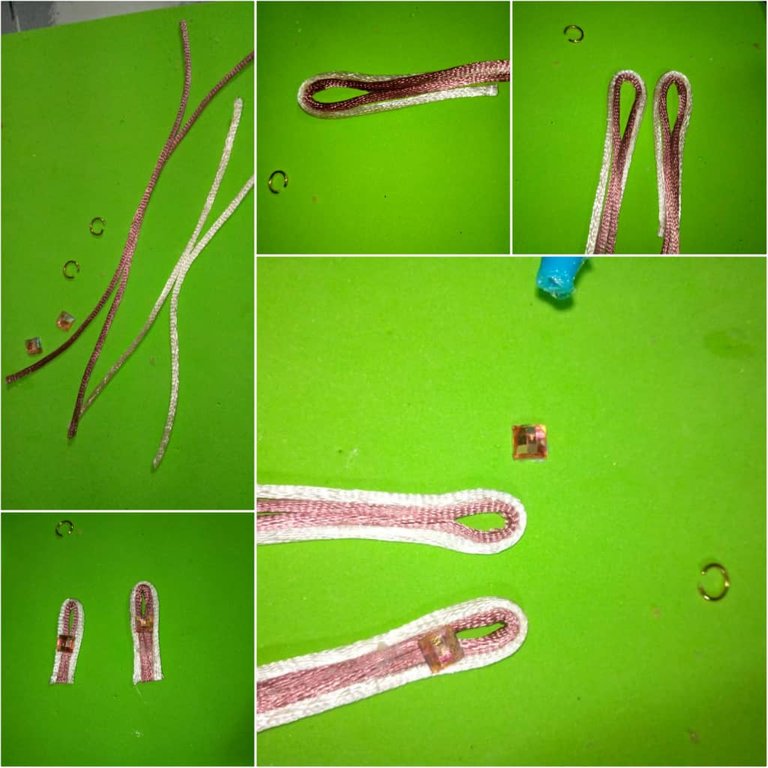
- Luego le echamos silicona y lo pegamos del aretes.
- Además tomamos un pedazo de fieltro , le echamos pega y colocamos el arete, esto para que se vea bonito por la parte trasera.
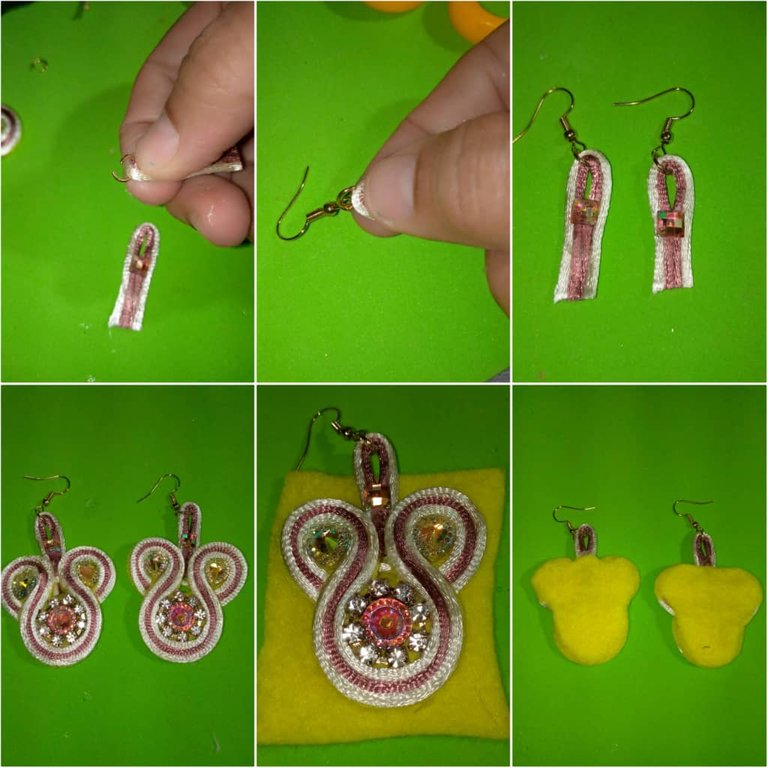
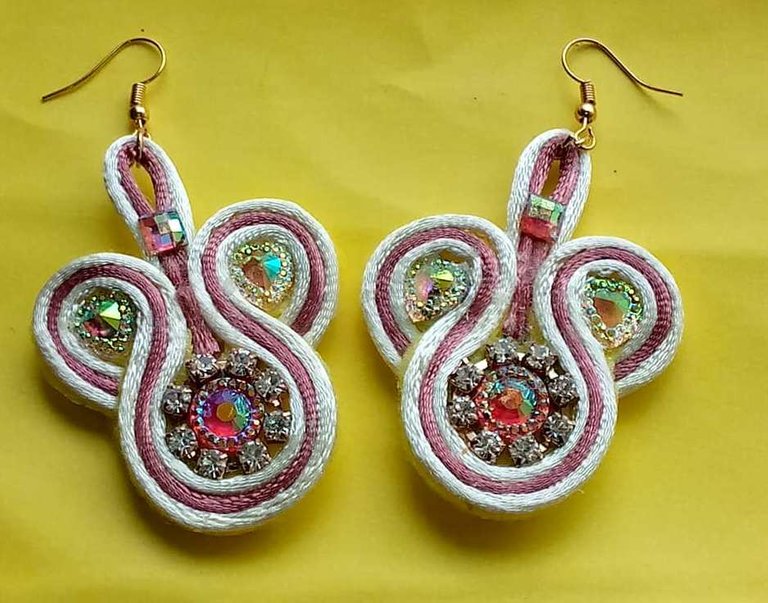
Aquí podemos ver el resultado final de los hermosos aretes.
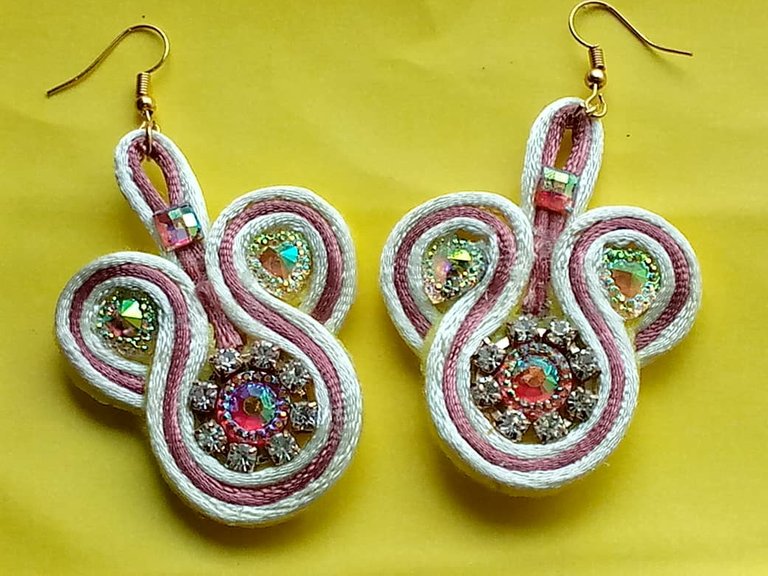
Miren lo hermosos que se ve.

Espero que sea de su agrado, muchas bendiciones , hasta la próxima.

Las foto son mías , tomadas con teléfono Infinix, editado con incollage y traducido con DEEPL.
ESPAÑOL
Welcome to my blog , dear friends who are part of this beautiful #jewelry community.

Happy Tuesday, I hope you are well, God bless you.
Today happy to make my post , because doing it I forget everything , stress , situation , in short everything.
Today I want to show through a tutorial, how to make beautiful earrings, made with mouse tail and rhinestones.
These earrings are made with thread called soutache, I was looking for it but did not find it, then I decided to make the earrings with mouse tail thread.
The earrings are easy to make, what is required is patience to make them very pretty. Although the mouse tail yarns are mostly used for macramé knots, they can also be used to make these earrings.
Without further ado, let's get to work!

What is needed for the realization of these beautiful tendrils made with mouse tail and rhinestones?
Materials such as:.
- 50 centimeters of mouse tail colors: beige and light purple.
- Scissors.
- Liquid silicone.
- 4 heart-shaped rhinestones.
- 2 round rhinestones.
- 2 square rhinestones.
- 2 tendrils hooks.
- 2 rings.
- 2 strap of chains with 8 rhinestones.
- 1 piece of felt.

Step by step of the realization of the earrings:
- To start making the earrings, we place the round shiny on the felt and pour liquid silicone to glue it, we wait a while for it to stick.
- Then we take the chain strap with the rhinestones, we also put liquid silicone and glue it around the round rhinestone.
- We cut a piece of mouse tail thread (25 centimeters) of beige color and we put it all around the edge of the chain strap.
- We cut with the scissors a piece of mouse tail (25 centimeters) light purple color and add glue, we also place it around the others.

- Place another piece of beige mouse glue thread (25 centimeters) around it, add silicone to make it stick.
- We wait a long time to wait for the threads to stick well.
- We proceed to place the heart-shaped rhinestones, on both sides of the earring, we also add silicone and glue it on both sides, now we are gradually gluing the mouse tail threads, beige, light purple and beige and place it on one side, there we do not add glue yet.

- We continue with the realization of the earrings, with the scissors we cut all the excess felt very carefully , trying not to break the mouse tail thread.
- After trimming all the felt with the scissors, we proceed to glue the threads on the back of the sides.
- Here you can see how the earring is coming out, very beautiful.

- To make the second earring , we do the same procedure that we did with the first one.

- Then we continue with the top of the earrings, we cut 4 pieces of mouse tail of 15 centimeters , 2 pieces beige and two light purple.
- Now we fold the light purple thread, we put silicone on the sides, we glue the beige thread, then we do the same with the other one.
- You can be guided by the picture.
- We also glue on the shiny square.At once with a clamp we place the hoops and hooks.

- Then we put silicone on it and glue it to the earrings.
- We also take a piece of felt, glue it and place the earring, this to make it look nice on the back.

Here we can see the final result of the beautiful earrings.

Look how beautiful they look.

I hope it is to your liking, many blessings , until next time.

The photos are mine , taken with Infinix phone, edited with incollage and translated with DEEPL.
0
0
0.000
Felicidades amiga muy lindo estos aretes. Creo que el cordón cola de ratón es uno de los materiales más lindo y noble con el que podemos hacer cosas bellas, a la muestra un botón un lindo trabajo terminado. Saludos
Gracias amiga @yanethstars , me emociona mucho que te haya gustado, saludos.
Bello trabajo amigo muy hermosos estos aretes 👏👏💞💞. Saludos 🤗
Gracias amiga @delvallecedeno . Si los aretes quedaron lindos. Bendiciones. Saludos.
Hermoso trabajo @josdelmi, me encanto el diseño los detalles, y la combinación de colores. Te lucen espectaculares puestos 💗
Que tengas un hermoso día ✨
Ay gracias amiga @dayadam me alegra que te haya gustado. Saludos y muchas bendiciones.
Excellent work, these earrings were very beautiful, the finish you gave them plus the detail make them look great. Good step by step. Congratulations @josdelmi : ) // Excelente trabajo, quedaron muy hermosos estos pendientes, el acabo que le diste mas lo detalle los hacen lucir muy bien. Buen paso a paso. Felicidades @josdelmi : )
Gracias @diyhub , muchas gracias por la insignia. Agradecida por su apoyo siempre. Bendiciones.
Hermoso trabajo @josdelmi 🤩 ame todo, su diseño y color.
!discovery 35
Si amiga @mili2801 ,los aretes quedaron lindo. Anímate y realizas el tuyo.
This post was shared and voted inside the discord by the curators team of discovery-it
Join our Community and follow our Curation Trail
Discovery-it is also a Witness, vote for us here
Delegate to us for passive income. Check our 80% fee-back Program
Gracias por compartir y votar mi post. Saludos.
Hermoso trabajo amiga @josdelmi te quedaron muy hermosos, un paso a paso bien realizado y prolijo, felicidades 👏
Gracias , muchas gracias.
Bonito diseño @josdelmi, te quedaron hermosos esos aretes, me gustaron mucho, saluditos 🤗
Que bueno, me alegra que te hayan gustado amiga @nhaydu , bendiciones.
Hermoso, los cristales estas espectaculares, y la forma de arabesco es fantástica, Toda la pieza luce muy llamativa y exclusiva.
Gracias por cada detalle que nos presentas en su elaboración.
Están radiante estos zarcillos con estas piedras qué le dan vistocidad por su brillo, además adore esta linda combinación de colores están divinos ✨💮✨💮💡 Felicidades @josdelmi