This is how you draw a realistic fox. {Esp-Eng}
Hello @Sketchbook community! If you want to learn how to draw a realistic fox, whether to hang it on your wall, do an art assignment, or just practice, here's how I did it. And you can see the process in the video.

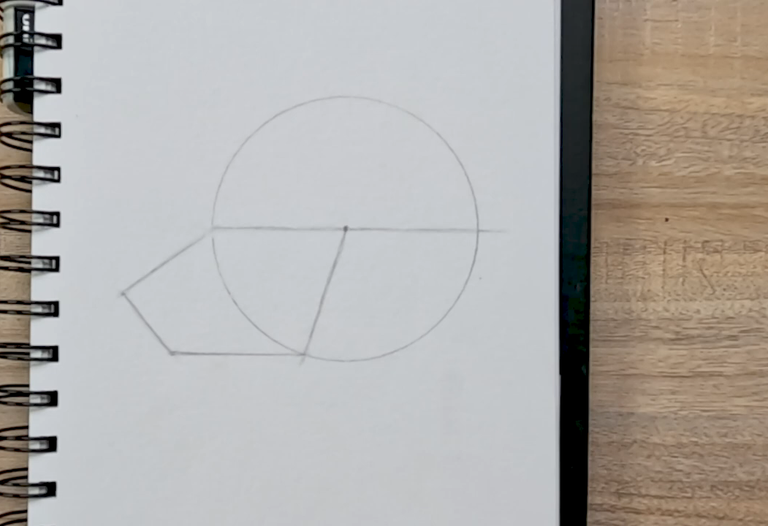
To start this beautiful drawing, the first thing I did was draw a circle slightly to the right of the sheet of paper. Then, I drew a horizontal line that split it in half. From there, I drew a diagonal line that ran from the center of the circle down. Then, from the vertex generated by the horizontal line, I drew another diagonal line and connected the two diagonals pointing downwards with a horizontal line. This created an irregular pentagon, which I then used to draw the snout, mouth, nose, and part of the jaw.
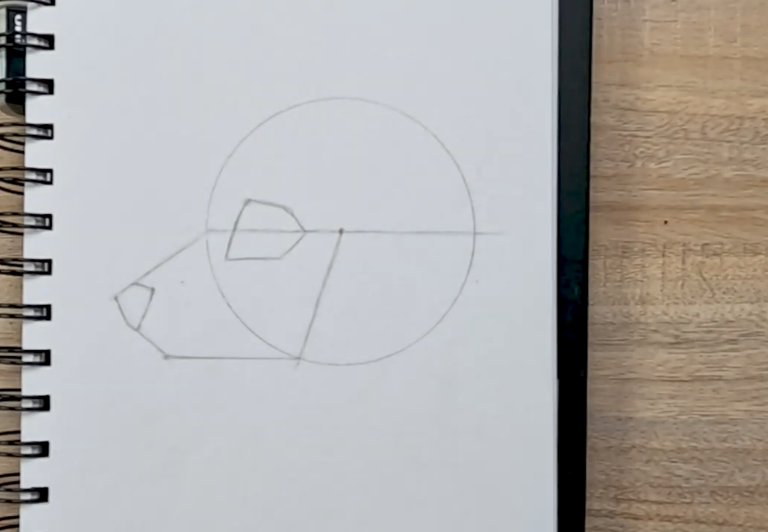
To draw the nose, I erased the line I had previously drawn and made the necessary breaks to form a smaller shape that simplified the shape of the nose. At a glance, the fox's position was already visible thanks to the procedure I followed. Then, to draw the eye, I drew another irregular pentagon, which helped me understand the shape of the eye socket, known as the orbital cavity.
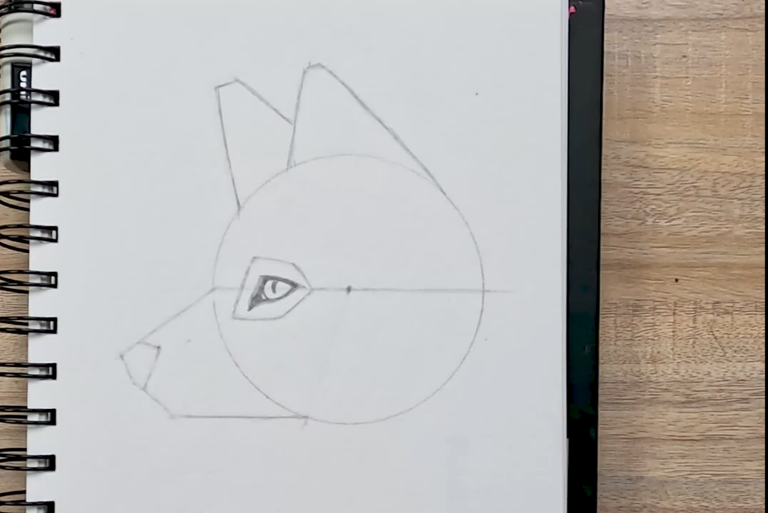
The lines on the farthest left represented the farthest ear, while the lines to the right or above the circle corresponded to the closest ear. After erasing a small line that I initially thought would mark the jawline, I continued sketching. I drew the eye in a shape similar to the pentagon surrounding it, detailing parts like the tear duct and the eye rim, and I also drew the pupil, which was further to the left.
Next, I continued with the fox's nose, which I decided to name Lemon. After drawing the nostril, I shaded it to make shading easier later. As I moved away from the head, the fur became fuller, so the lines I drew were longer, more angular, and more pointed. I did the same with the ear and began shading these parts to better guide me when shading the entire drawing.
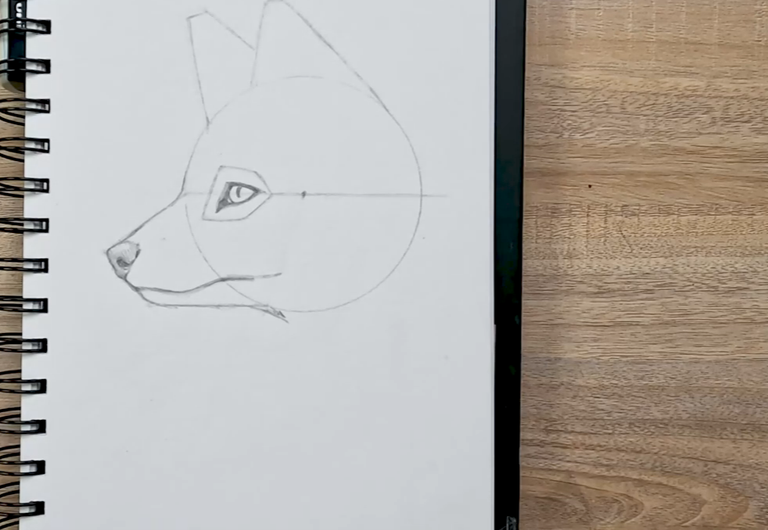
I continued with the fur under the lip and muzzle, using long, pointed lines. Then, I erased the bases of the sketch, such as the circle and the lines. Once I had the drawing like this, I began shading in layers. For the first layer, I used long, soft strokes, marking the darker areas. On the second layer, I used a darker pencil, like a 3B or 4B, to highlight the edges of the mouth, ears, and the darker parts of the fur.
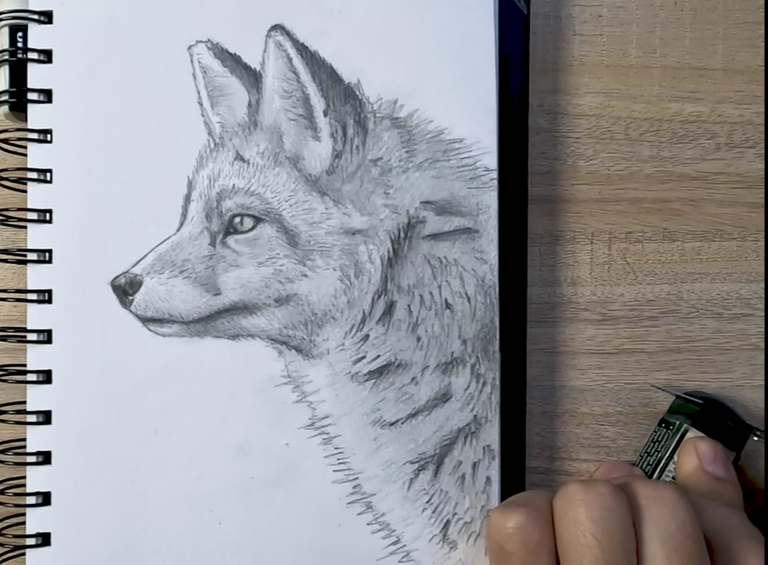
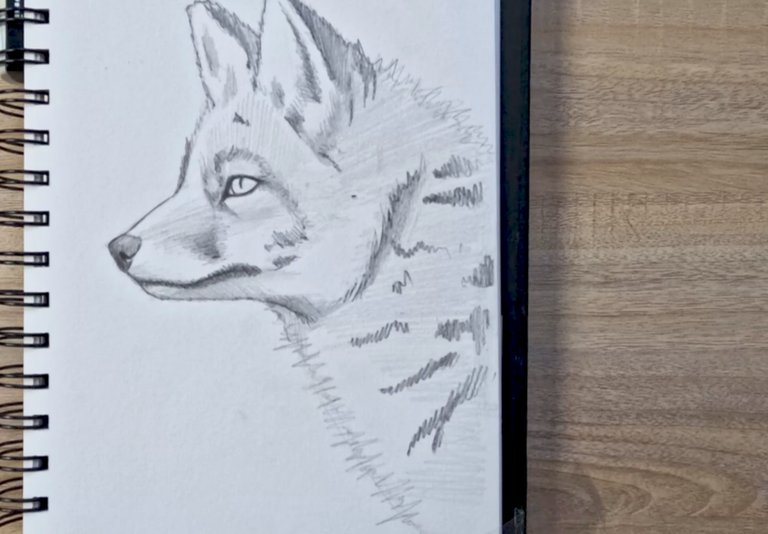
For the third layer, I drew hairs one by one with a sharp pencil, adjusting the pressure according to the darkness of each area. If I felt some areas were missing shading, I darkened those areas with softer strokes. To touch up the fur and make it look softer, I used a blending pencil, although a small piece of toilet paper can also be used. After blending, I used a sharp eraser to lighten the highlighted areas and create lighter strands of fur.
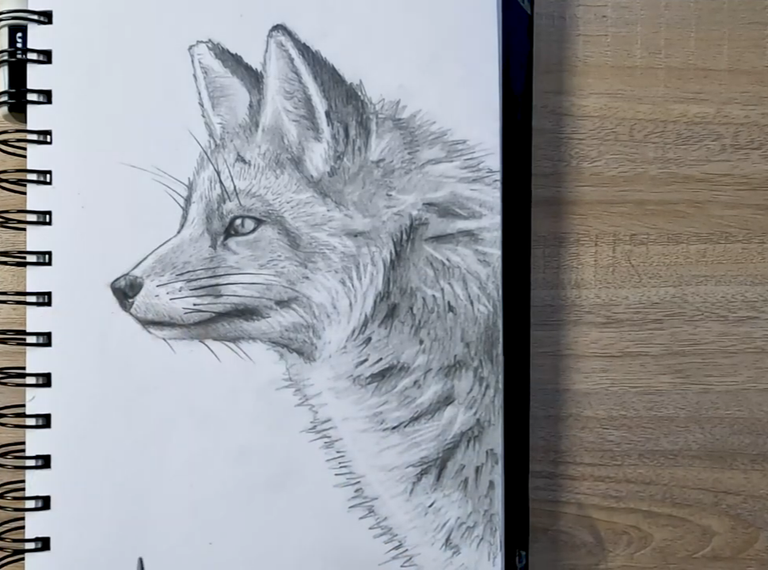
Finally, I drew the fox's long hairs, such as the whiskers and eyebrows, using a sharp, dark pencil. I didn't forget to add the characteristic whisker dots next to the nose.
If you enjoyed this tutorial, please feel free to leave me a comment about what other animal or body part you'd like me to draw.

Created: blog gif
Photos were taken with a Samsung Galaxy A10
Materials:
160-gram Fabriano lead
Faber Castell 9000 pencils
___________________
Versión Español
___________________
Hola comunidad @Sketchbook Si deseas aprender a dibujar un zorro realista, ya sea para colgarlo en tu pared, hacer una tarea de arte o simplemente practicar, aquí te explico cómo lo hice. Y en el video puedes ver el proceso
Para comenzar con este bello dibujo, lo primero que hice fue dibujar un círculo un poco a la derecha de la hoja. Luego, tracé una línea horizontal que lo partía por la mitad. A partir de ahí, tracé una línea diagonal que iba desde el centro hacia abajo del círculo. Posteriormente, desde el vértice que generaba la línea horizontal, tracé otra línea diagonal y conecté las dos diagonales que apuntaban hacia abajo con una línea horizontal. Así se formó un pentágono irregular que luego utilicé para dibujar el hocico, la boca, la nariz y parte de la mandíbula.
Para dibujar la nariz, borré la línea que había trazado anteriormente y realicé los quiebres necesarios para formar una figura más pequeña que simplificara la forma de la nariz. A simple vista, ya se podía notar la posición del zorro gracias al procedimiento que seguí. Luego, para dibujar el ojo, tracé otro pentágono irregular que me ayudó a entender la forma del orificio del ojo, conocido como la cavidad orbital.
Las líneas más a la izquierda representaban la oreja que estaba más lejos, mientras que las líneas a la derecha o por encima del círculo correspondían a la oreja más cercana. Después de borrar una pequeña línea que inicialmente pensé que marcaría el límite de la mandíbula, continué bocetando. Dibujé el ojo con una forma similar al pentágono que lo rodeaba, detallando partes como el lagrimal y el borde del ojo, y también dibujé la pupila, que estaba más hacia la izquierda.
A continuación, continué con la nariz del zorro, a la que decidí ponerle el nombre de Limón. Después de dibujar la fosa nasal, la sombreé para facilitar el sombreado posterior. A medida que me alejaba de la cabeza, el pelaje se volvía más voluminoso, así que las líneas que dibujé fueron más largas, esquinadas y puntiagudas. Hice lo mismo en la oreja y comencé a sombrear estas partes para guiarme mejor al sombrear el dibujo completo.
Continué con el pelaje debajo del labio y el hocico, utilizando líneas largas y puntiagudas. Luego, borré las bases del boceto, como el círculo y las líneas. Cuando tuve el dibujo así, comencé a sombrear en capas. Para la primera capa, utilicé trazos largos y suaves, marcando las zonas más oscuras. En la segunda capa, usé un lápiz más oscuro, como el 3B o el 4B, para remarcar los bordes de la boca, las orejas y las partes del pelaje que eran más oscuras.
Para la tercera capa, dibujé pelitos uno a uno con un lápiz afilado, ajustando la presión según la oscuridad de cada zona. Si consideraba que faltaba sombrear algunas partes, oscurecía esas áreas con trazos más suaves. Para retocar el pelaje y que se viera más suave, utilicé un esfumino, aunque también se puede usar un pedacito de papel higiénico. Después de difuminar, utilicé un borrador afilado para aclarar las partes iluminadas y crear mechones de pelo más claros.
Finalmente, dibujé los pelos largos del zorro, como los bigotes y las cejas, utilizando un lápiz afilado y oscuro. No olvidé agregar los puntitos característicos del bigote al lado de la nariz
Si te ha gustado este tutorial, no dudes en dejarme un comentario sobre qué otro animal o parte del cuerpo te gustaría que dibujara.
__________________
Gracias por Leer
__________________
Fotos tomadas con un Samsung Galaxy A10
Materiales:
Mina Fabriano de 160 gramos
Lápices Faber Castell 9000
Congratulations @johayron! You have completed the following achievement on the Hive blockchain And have been rewarded with New badge(s)
Your next target is to reach 1000 upvotes.
You can view your badges on your board and compare yourself to others in the Ranking
If you no longer want to receive notifications, reply to this comment with the word
STOP