Amigurumi pastel (Paso a paso)
Greetings dear community, the end of the year has passed and it is time to return to work and what we are passionate about, that is why I am very happy to bring you the first tutorial of the year, it is quite simple and at the same time it is very fun to do, it is about a cake-shaped amigurumi, this is a beautiful detail to use as a keychain or simply as a gift to someone special. Hope you like
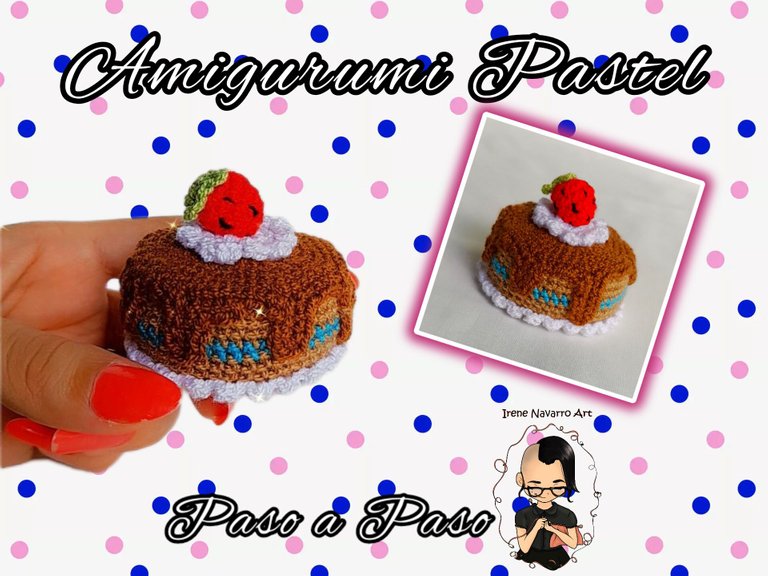

Materiales / Materials
- Hilo acrílico para crochet: marrón claro, marrón oscuro, turquesa, rojo, verde, blanco y negro.
- Ganchillo #4 y #3 (Usar el ganchillo # 3 para el pastel, el ganchillo 4 solo se usará para hacer la fresa.)
- Relleno
- Tijera
- Aguja de ojal grande.
- Acrylic yarn for crochet: light brown, dark brown, turquoise, red, green, white and black.
- Hook #4 and #3 (Use hook #3 for the cake, hook 4 will only be used to make the strawberry.)
- filler
- scissors
- Large buttonhole needle.

Proceso / Process
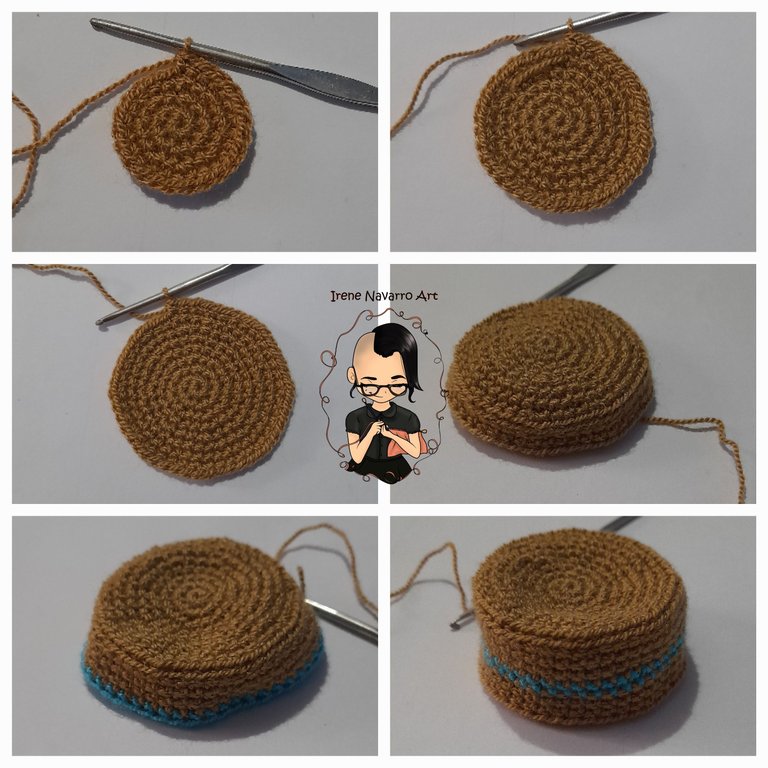
Para el pastel con el hilo marrón claro hacer 8 puntos bajos.
Hilera 1: 8 aumentos. Total de puntadas: 16
Hilera 2: (1 punto bajo, 1 aumento) X 8. Total de puntadas: 24
Hilera 3: 24 puntos bajos
Hilera 4: (1 punto bajo, 1 aumento, 1 punto bajo) X 8. Total de puntadas: 32
Hilera 5: (3 puntos bajos, 1 aumento) X 8. Total de puntadas: 40
Hilera 6: 40 puntos bajos
Hilera 7: (2 puntos bajos, 1 aumento, 2 puntos bajos) X 8. Total de puntadas: 48
Hilera 8: Tomando solo el lado de atrás hacer 48 puntos deslizados.
Hilera 9: Tomando solo el lado de atrás hacer 48 puntos bajos.
Hileras 10 y 11: 48 puntos bajos
Hilera 12: Con hilo turquesa hacer 48 puntos bajos
Hileras 13-15: Con hilo marrón claro hacerlo 48 puntos bajos.
Finalizar esta parte con un punto deslizado.
For the cake with the light brown thread make 8 single crochets.
Row 1: 8 increases. Total stitches: 16
Row 2: (1 single crochet, 1 increase) X 8. Total stitches: 24
Row 3: 24 single crochet
Row 4: (1 single crochet, 1 increase, 1 single crochet) X 8. Total stitches: 32
Row 5: (3 single crochets, 1 increase) X 8. Total stitches: 40
Row 6: 40 single crochet
Row 7: (2 single crochets, 1 increase, 2 single crochets) X 8. Total stitches: 48
Row 8: Taking only the back side make 48 slip stitches.
Row 9: Taking only the back side make 48 single crochets.
Rows 10 and 11: 48 single crochet
Row 12: With turquoise thread make 48 single crochets
Rows 13-15: With light brown yarn make 48 single crochets.
Finish this part with a slip stitch.

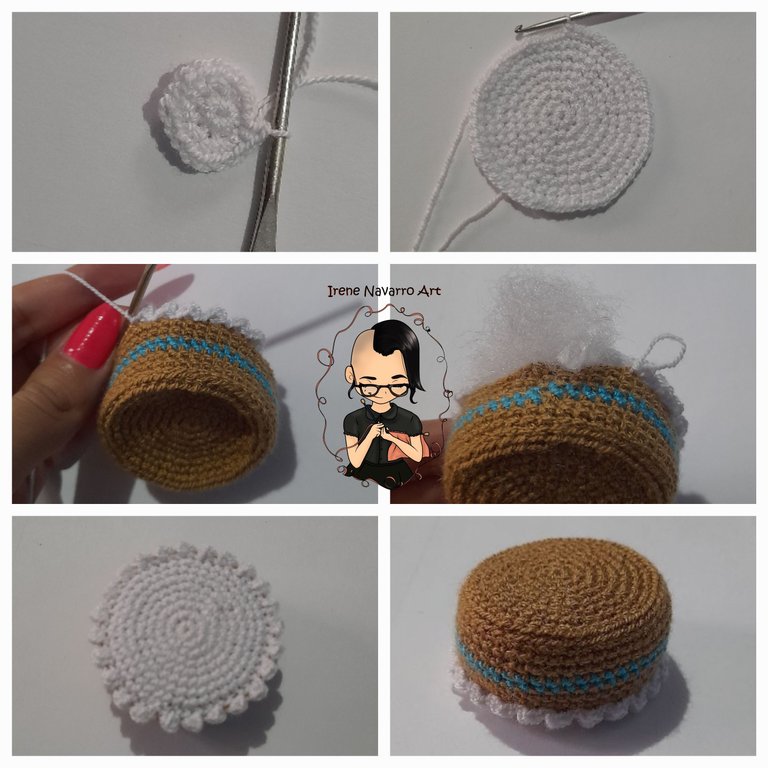
Para la parte de abajo del pastel con hilo blanco hacer 8 puntos bajos en un anillo. Seguir el mismo procedimiento de la primera parte hasta la hilera 7.
Hilera 8:Tomando el lado frontal de ambas partes hacer (1 punto deslizado y 2 puntos medios altos juntos, 1 punto deslizado) X 24.
Rellenar antes de cerrar por completo y esconder la hebra por dentro. Recomiendo opcionalmente colocar dos círculos de plástico por dentro si desean obtener una superficie plana.
For the bottom part of the cake with white thread make 8 single crochets in a ring. Follow the same procedure of the first part until row 7.
Row 8:Taking the front side of both parts make (1 slip stitch and 2 half double crochet together, 1 slip stitch) X 24.
Fill before closing completely and hide the strand inside. I recommend optionally placing two plastic circles inside if you want to get a flat surface.

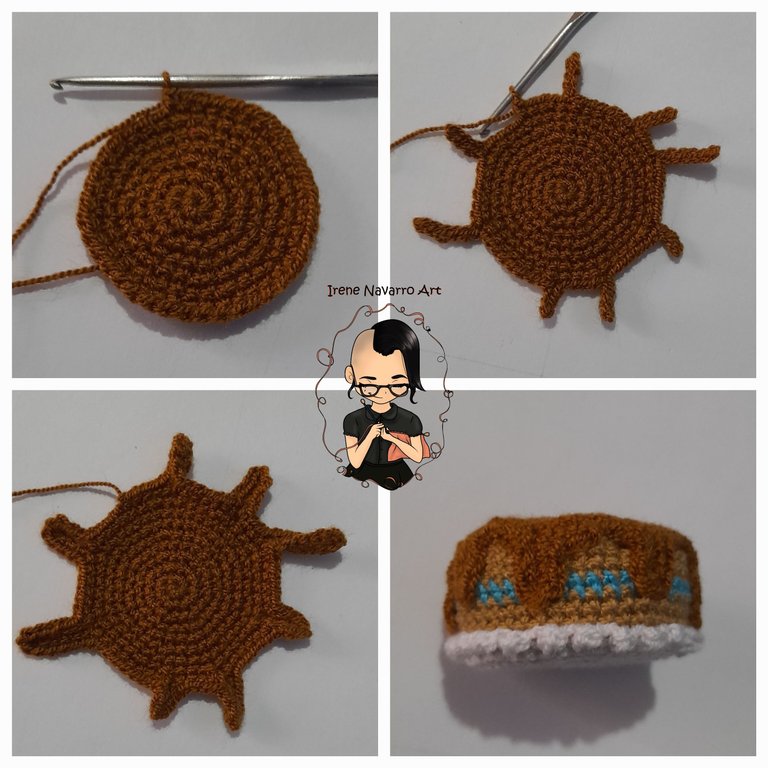
Para la cubierta de chocolate del pastel con hilo marrón hacer 8 puntos bajos en un anillo, seguir el procedimiento de la primera parte hasta la hilera 6.
Hilera 7: (2 puntos bajos, 1 aumento, 2 puntos bajos) X 8.
Nota en esta hilera se hacen igualmente 8 aumentos pero adicionalmente de manera equidistante se hacen cadenas y se hacen puntos deslizados en las cadenas para hacer el chocolate derramado por el borde del pastel, el número de cadenas varía entre 3, 4 o 6.
Hilera 8: puntos bajos en toda la hilera.
Terminar con un puntos deslizado y dejar una hebra larga para coser al pastel.
For the chocolate coating of the cake with brown thread make 8 single crochets in a ring, follow the procedure of the first part until row 6.
Row 7: (2 single crochets, 1 increase, 2 single crochets) X 8.
Note in this row 8 increases are also made but additionally chains are made equidistantly and slip stitches are made in the chains to make the chocolate spill over the edge of the cake, the number of chains varies between 3 , 4 or 6.
Row 8: single crochets across the entire row.
Finish with a slip stitch and leave a long tail to sew to the cake.

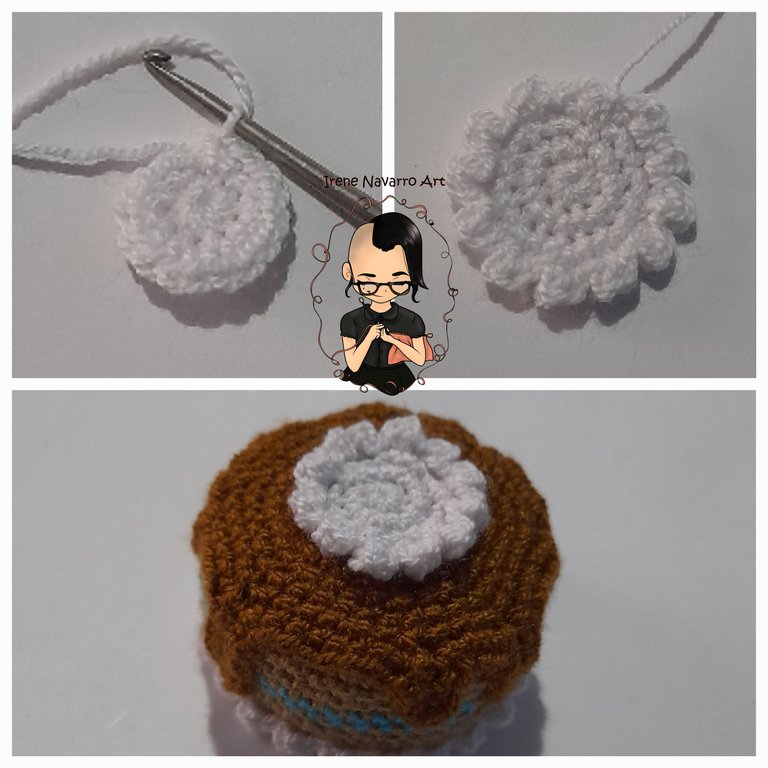
Con hilo blanco hacer 8 puntos bajos en una anillo.
Hilera 1: 8 aumentos. Total de puntadas: 16
Hilera 2: (1 punto bajo, 1 aumento) X 8. Total de puntadas: 24
Hilera 3: (1 punto deslizados y 2 puntos medios altos juntos, 1 punto deslizado) X 12.
Dejar una hebra larga para coser al pastel.
With white thread make 8 single crochets in a ring.
Row 1: 8 increases. Total stitches: 16
Row 2: (1 single crochet, 1 increase) X 8. Total stitches: 24
Row 3: (1 slip stitch and 2 half double crochet together, 1 slip stitch) X 12.
Leave a long tail to sew to the cake.

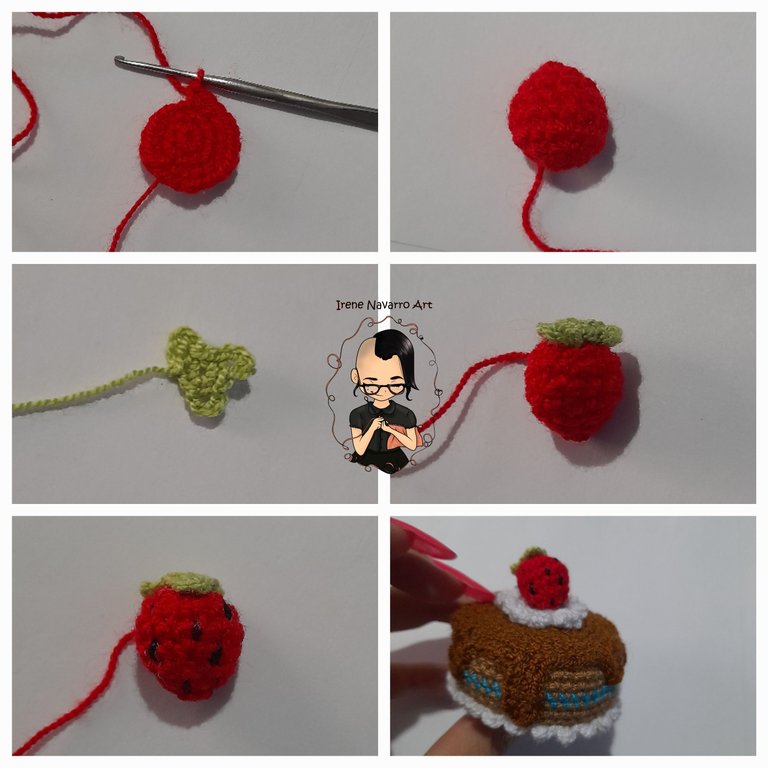
Para la fresa cambiamos a ganchillo # 4.
Con hilo rojo hacer 6 puntos bajos en un anillo.
Hilera 1: 6 aumentos. Total de puntadas: 12
Hilera 2: (1 punto bajo, 1 aumento) X 6. Total de puntadas: 18
Hilera 3: (2 puntos bajos, 1 disminución, 2 puntos bajos) X 3. Total de puntadas: 15
Hilera 4: (3 puntos bajos, 1 disminución) X 3. Total de puntadas: 12
Hilera 5: (1 punto bajo, 1 disminución, 1 punto bajo) X 3. Total de puntadas: 9
Hilera 6: (1 punto bajo, 1 disminución) X 3. Total de puntadas: 6
Terminar con un punto deslizado. Y dejar una hebra larga. Rellenar. Tomar la hebra con la aguja de ojal grande y pasarla por los puntos y fruncir para cerrar.
Con hilo verde hacer 6 puntos bajos en un anillo.
Hacer (1 punto deslizado, 4 cadenas, 1 punto deslizado) X 3.
Dejar una hebra larga paga coser a la fresa.
Con hilo negro bordar las semillas de la fresa.
Coser la fresa al tope del pastel.
For the strawberry we change to crochet # 4.
With red thread make 6 single crochets in a ring.
Row 1: 6 increases. Total stitches: 12
Row 2: (1 single crochet, 1 increase) X 6. Total stitches: 18
Row 3: (2 single crochets, 1 decrease, 2 single crochets) X 3. Total stitches: 15
Row 4: (3 single crochets, 1 decrease) X 3. Total stitches: 12
Row 5: (1 single crochet, 1 decrease, 1 single crochet) X 3. Total stitches: 9
Row 6: (1 single crochet, 1 decrease) X 3. Total stitches: 6
Finish with a slip stitch. And leave a long strand. Fill out. Take the yarn over with the large buttonhole needle and pull it through the stitches and gather to close.
With green thread make 6 single crochets in a ring.
Make (1 slip stitch, chain 4, 1 slip stitch) X 3.
Leaving a long tail pays to sew the strawberry.
With black thread embroider the strawberry seeds.
Sew the strawberry to the top of the cake.

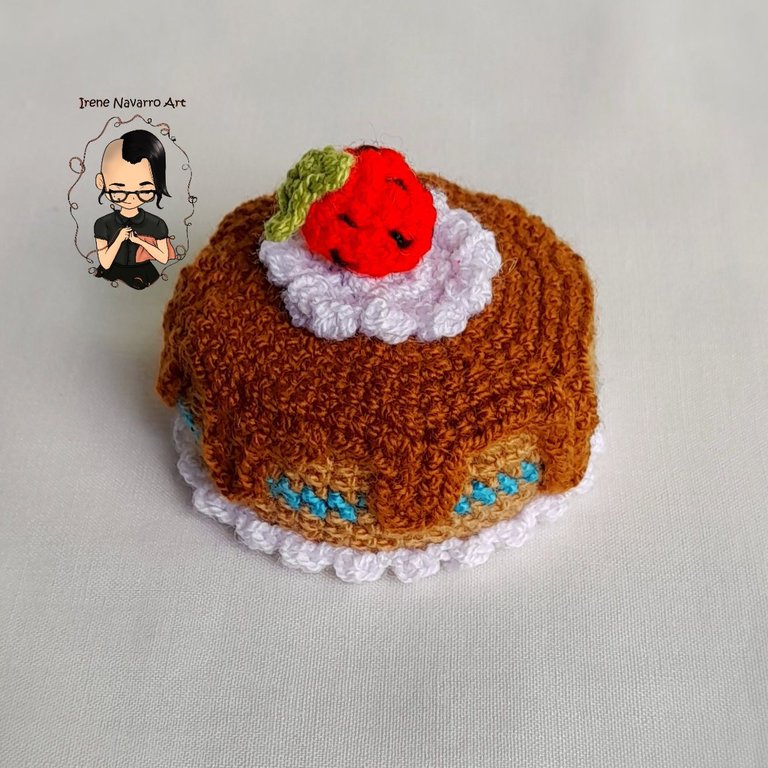
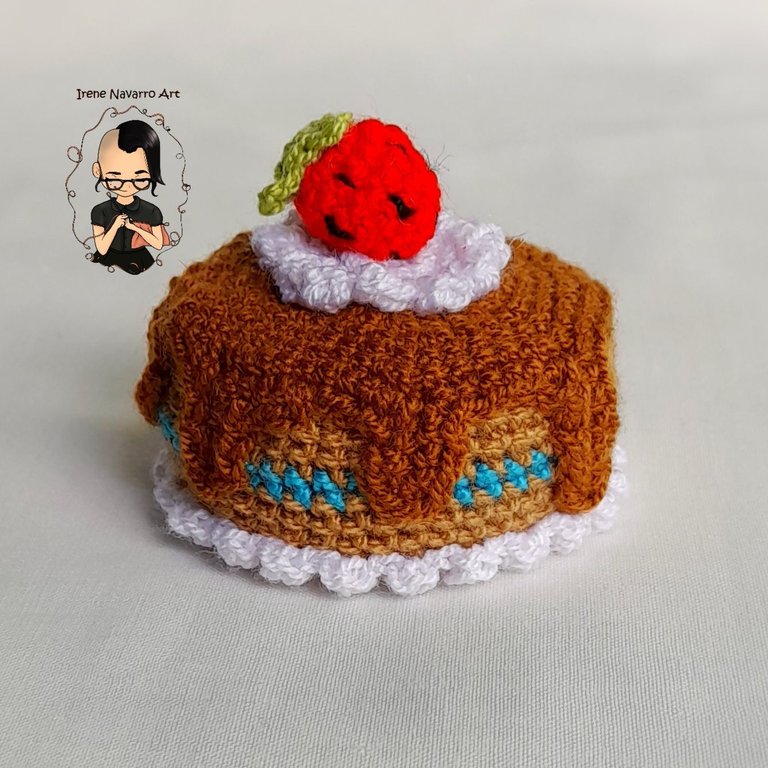
Resultado / Result
I hope you liked this tutorial and find it useful, it fills my heart with happiness when other people have sent me results obtained by following one of my tutorials, I have noticed that this has happened when I publish tutorials like this one that are simple, that's why I will try this new year to make figure tutorials that are easy for all crochet lovers 🥰

Imágenes tomadas con dispositivo Samsung A12. Portada editada en InShot
Pictures taken with Samsung A12 device. Cover edited in InShot
Espero les haya gustado. Les invito a leer mis próximas publicaciones y siempre estaré dispuesta a responder sus preguntas y comentarios, también pueden seguirme y contactarme en cualquiera de mis redes sociales. ¡Muchas gracias!
I hope you liked it. I invite you to read my next publications and I will always be willing to answer your questions and comments, you can also follow me and contact me on any of my social networks. Thank you!
https://twitter.com/2471487180/status/1610682769000075264
The rewards earned on this comment will go directly to the people( @irenenavarroart ) sharing the post on Twitter as long as they are registered with @poshtoken. Sign up at https://hiveposh.com.
Increíble trabajo porque es pequeñito pero muy bonito y super detallado. 😍😍 me encanta!!
Muchas gracias 😁
que lindo te ha quedado.! felicidades.!!
Muchas gracias 🤗
Gracias por el apoyo 🤗
Esta muy hermoso ese pastel, ideal para regalárselo a los cumpleañeros. De verdad que te quedó hermoso, te felicito, gracias por compartir.
Muchas gracias esa es la idea, dedicarle nuestro arte a alguien querido por su cumpleaños. Abrazos
Congratulations, your post has been upvoted by @dsc-r2cornell, which is the curating account for @R2cornell's Discord Community.
Enhorabuena, su "post" ha sido "up-voted" por @dsc-r2cornell, que es la "cuenta curating" de la Comunidad de la Discordia de @R2cornell.
Thanks for the support 😊
Thank you for sharing this post on HIVE!
Your content got selected by our fellow curator ashikstd & you just received a little thank you upvote from us for your great work! Your post will be featured in one of our recurring compilations which are aiming to offer you a stage to widen your audience within the DIY scene of Hive. Stay creative & HIVE ON!
Please vote for our hive witness <3
Thanks for the support 😊
Hi @irenenavarroart this keychain is very nice, but you shouldn't leave it near the sweets people can eat it.
🤣🤣 thank you very much