Guide on How to Make the Mouth and Lips
Hello to all lovers of online art, drawing and those who are learning to draw to become great artists ^_^
I was marathoning some series that I wanted to watch, and other distractions (like a certain pet bunny that demands a lot of attention from me), but mainly not being able to turn on my computer due to sudden blackouts, some of which occurred 3 times a day and lasted for hours T_T, the good thing is that little by little I made time to be able to sit down and write, when I saw that it was safe to turn on my PC, I was also organizing classes for my students, I am close to organizing my time management to return to artistic activities, which I'm going to take advantage when Easter arrives, but I was finally able to share another drawing guide on one of the most expressive parts of the face.
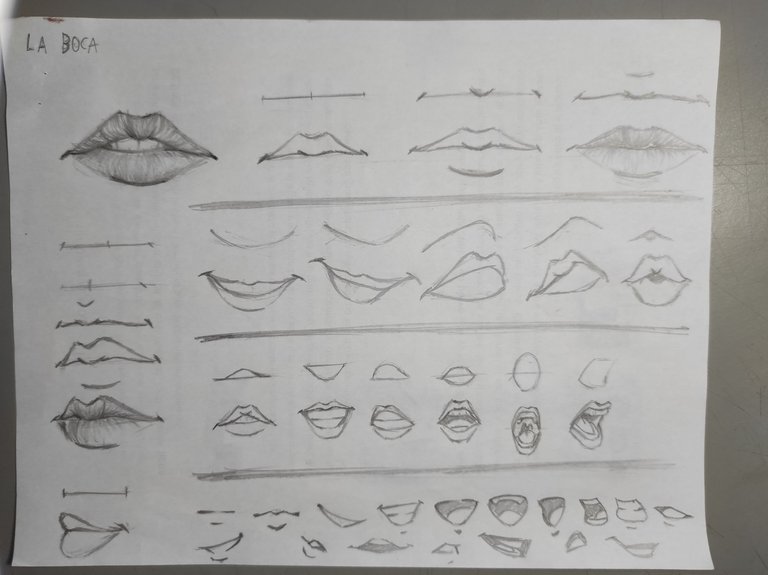
Sketch made in pencil from my guide

Parts of the Nose
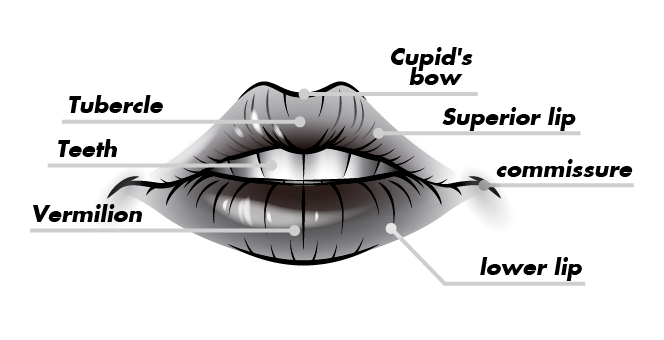
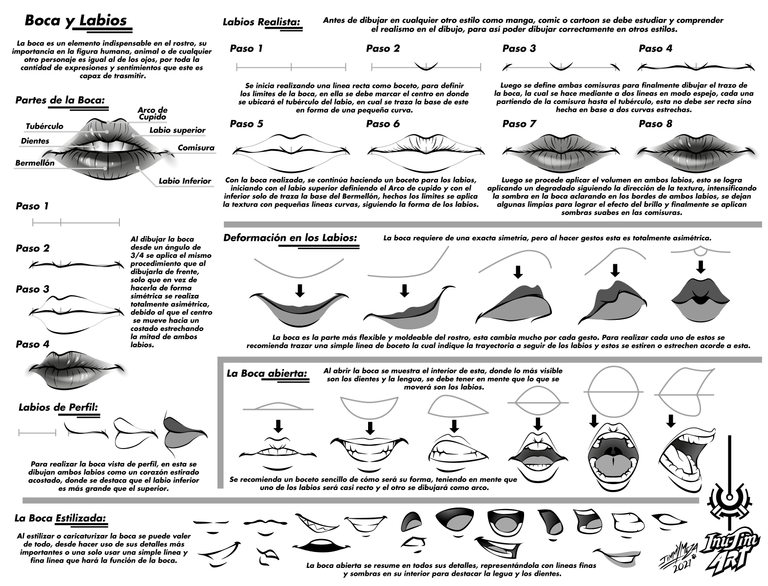
Before you can draw any part of the human anatomy, you must first know it in order to draw it correctly.
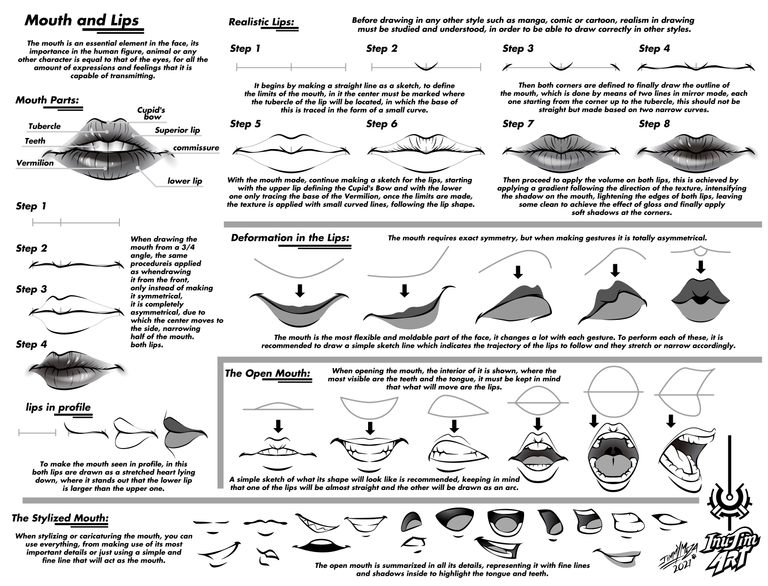
Before drawing in any other style such as manga, comic or cartoon, realism in drawing must be studied and understood, in order to be able to draw correctly in other styles.
It begins by making a straight line as a sketch, to define the limits of the mouth, in it the center must be marked where the tubercle of the lip will be located, in which its base is drawn in the form of a small curve.

Then both corners are defined to finally draw the outline of the mouth, which is done by means of two lines in mirror mode, each one starting from the corner up to the tubercle, this should not be straight but made based on two narrow curves.
With the mouth made, continue making a sketch for the lips, starting with the upper lip defining the Cupid's Bow and with the lower one only tracing the base of the Vermilion, once the limits are made, the texture is applied with small curved lines, following the shape of the lips, then proceed to apply the volume on both lips, this is achieved by applying a gradient following the direction of the texture, intensifying the shadow on the mouth, lightening the edges of both lips, leaving some clean to achieve the effect of the brightness and finally soft shadows are applied in the corners.
lips in ¾

When drawing the mouth from a 3 / 4 angle, the same procedure is applied as when drawing it from the front, only instead of making it symmetrical, it is completely asymmetrical, due to which the center moves to the side, narrowing half of the mouth. both lips.
lips in profile

To make the mouth seen in profile, in this both lips are drawn as a stretched heart lying down, where it stands out that the lower lip is larger than the upper one.
Deformation in the Lips
The mouth requires exact symmetry, but when making gestures it is totally asymmetrical.

The mouth is the most flexible and moldable part of the face, it changes a lot with each gesture.

To perform each of these, it is recommended to draw a simple sketch line which indicates the trajectory of the lips to follow and they stretch or narrow accordingly.
Open Mouth
When opening the mouth, the interior of it is shown, where the most visible are the teeth and the tongue, it must be kept in mind that what will move are the lips.

A simple sketch of what its shape will look like is recommended, keeping in mind that one of the lips will be almost straight and the other will be drawn as an arc.

The Stylized Mouth
When stylizing or caricaturing the mouth, you can use everything, from making use of its most important details or just using a simple and fine line that will act as the mouth.
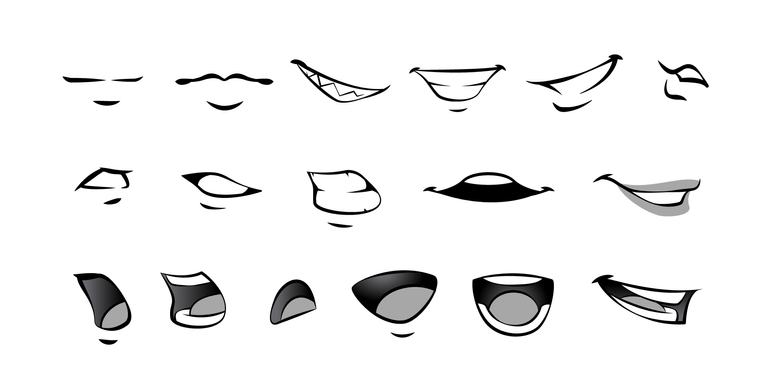
The open mouth is summarized in all its details, representing it with fine lines and shadows inside to highlight the tongue and teeth.
Technical information:
Vector digital drawing
Program used Adobe Illustrator CC 2015
Full resolution 4724 x 3602px at 300dpi
Spanish version

My previous published Guides

Thank you very much for reading my post
I hope you liked my Guide and that it is very useful for you
See you in a future publication
Inu-Jim
Copyright @inu-jim – All rights reserve
Art /oc /palnet /appreciator / creativecoin /neoxian /drawing / posh / sketchbook
I hope you liked my Guide and that it is very useful for you
See you in a future publication
Inu-Jim

Copyright @inu-jim – All rights reserve
Art /oc /palnet /appreciator / creativecoin /neoxian /drawing / posh / sketchbook
https://twitter.com/1267870977788166144/status/1636843640948416513
The rewards earned on this comment will go directly to the people sharing the post on Twitter as long as they are registered with @poshtoken. Sign up at https://hiveposh.com.
!discovery 30
I needed this type of tutorial.
This post was shared and voted inside the discord by the curators team of discovery-it
Join our Community and follow our Curation Trail
Discovery-it is also a Witness, vote for us here
Delegate to us for passive income. Check our 80% fee-back Program
Congratulations @inu-jim! You received a personal badge!
You can view your badges on your board and compare yourself to others in the Ranking
Check out our last posts:
Support the HiveBuzz project. Vote for our proposal!