GROW WITH US SERIES-INDOOR #2
Now that we've configured, assembled, and tested our grow space, lighting, and environmental controls, let's move on.

It's incredibly satisfying to grow your own Connoisseur Quality Cannabis... Delicious Tasting, Incredibly Fragrant, 100% Organic, Clean Green Cannabis.
Good Genetics Are Paramount to produce Good Cannabis. How you grow determines and defines the quality of Good Cannabis you produce. Every grower's goal is to get the most out of the genetics they have to work with.
One of the most important ingredients needed to do so is Living Organic Soil.
There are many advantages to growing Cannabis in Living Soil... A few of these are:
- The complex microbiome in living soil, allows plants to produce optimum quantities of flavonoids, terpenoids, and cannabinoids, resulting in higher-quality flower, with superior flavor and aroma.
- Plants grown in living soil are more resistant to disease and pests.
- Living soil is more forgiving of errors than other growing media.
- Growing in living soil is less labor intensive, as there's no need to add anything but water.
- Living soil has better water holding capacity, allowing growers to water less.
You don't want runoff and never have to flush. - In the long run, Living soil is more cost-effective and sustainable, as it can be re-amended and used again, rather than thrown out after each harvest.
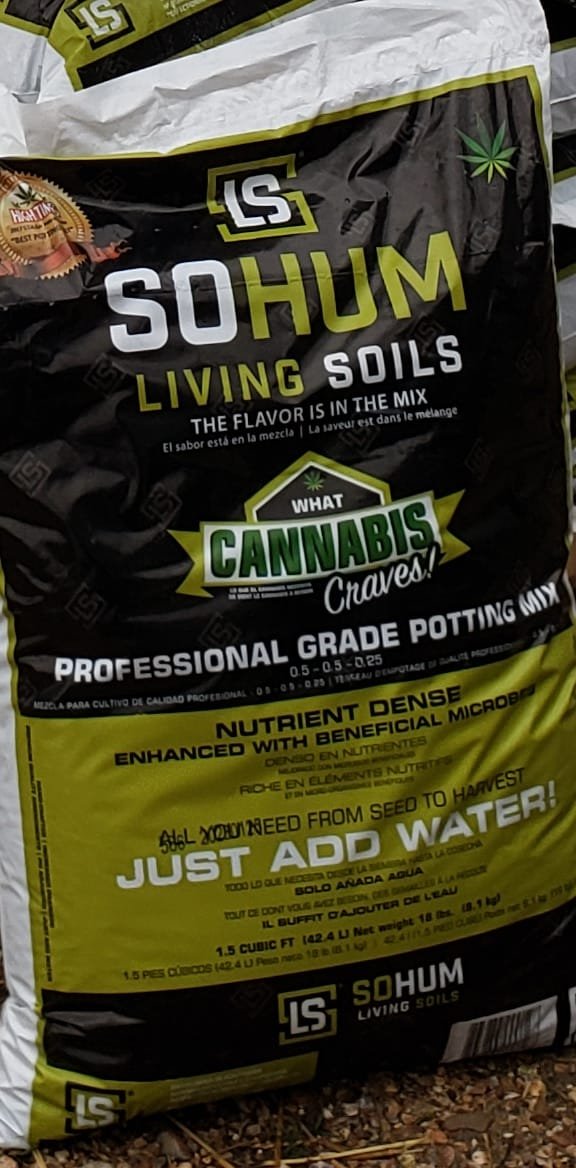
Over the last 4 decades, I've built my own custom super soil many times but the best living soil I've grown in comes "ready to grow" right out of the bag.
I recommend SoHum Living Organic Soil.
SoHum Living Soil is a Cannabis Specific, Triple Organic Certified, Nutrient Dense Living Soil, created by Cannabis Growers, to meet the specific and highly complex requirements Cannabis plants need to grow optimally through the vegetative and flowering cycles of growth, allowing your plants to achieve their full potential. No mixing, No cooking, No top dressing or teas... ALL YOU ADD IS WATER.
Your roots “pick and choose” which nutrients to uptake, so your plant gets exactly the right nutrients at the right time.
It doesn't get any easier.
As with any living soil, volume is key to a successful crop... You need enough soil to provide for the plant's needs, throughout its lifespan, without gassing out... SoHum has a chart in their best practices section on their website, that shows veg/flower time per volume of soil... For example, a 10-gallon pot of SoHum will provide your plant with everything it needs for 4 weeks of vegetative growth and 8 weeks of flowering.

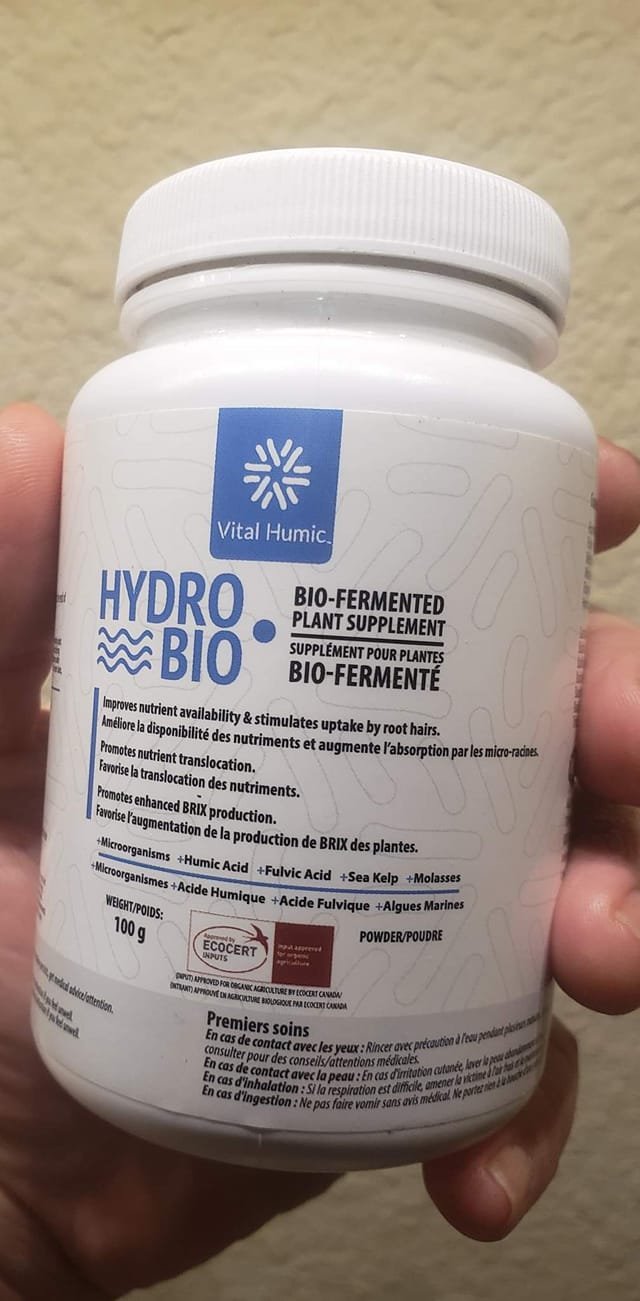
We add Vital Humic™ Hydro-Bio at 0.3g per gallon of water, in veg and 0.6g per gallon in flower.
Hydro-Bio is ECOCERT Input Approved for Organic Agriculture, Hydro-Bio is a Bio-fermented cultivation supplement that's suitable for all outdoor and indoor crops in soil, hydroponics, aeroponics, and drip systems.
Comprised of Microorganisms + Humic Acids + Fulvic Acids + Sea Kelp + Molasses
Hydro-Bio
- Improves the health of your soil and crops.
- Increases nutrient availability & stimulates uptake by root hairs.
- Promotes nutrient translocation.
- Promotes enhanced BRIX production.
- Improves water holding capacity.
- Heightens cation exchange capacity.
- Increases organic matter content.
- Enhances soil permeability.
- Increases vigor, immunity, and yield.
- Escalates cannabinoids and terpenes
intensifying the aroma, flavor, and potency profiles of your flower. - Reduces costs by decreasing fertilizer and herbicide/pesticide dependency.
We'll need a series of pots to go from start to finishing
We recommend flowering to finish in cloth pots... Cloth pots allow more air circulation to the root zone, this free flowing air helps prevent overwatering and overheating through the process of evaporative cooling. It also air prunes the roots, preventing the root bound circling you see with plastic pots, while encouraging a robust and expansive root system, resulting in vigorous healthy plants.
We've had excellent results with affordable, quality constructed pots from
Vivosun and AC Infinity... Visit the Vivosun Site Here.
Now that we have everything needed to grow good Cannabis, we need good Cannabis to grow.
No matter how advanced your set up, Genetics are THE contributing factor that determines the quality of your finish.
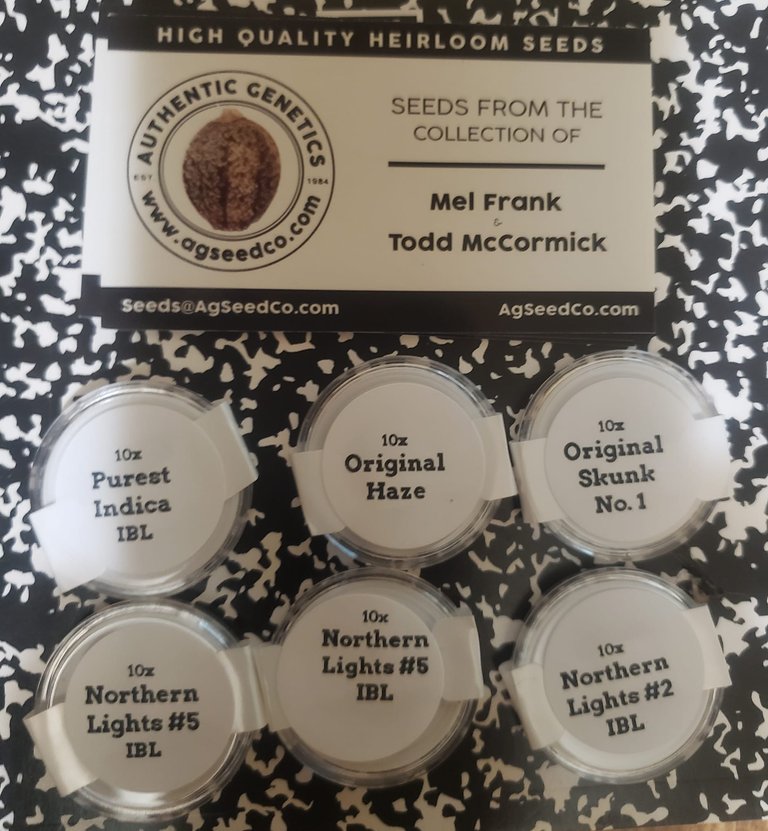
For this run, we are going back to the well, growing Authentic Genetics
Northern Lights #5
Northern Lights # 2
Purest Indica
These are The Original Authentic Genetics, procured from Original breeders that created the strains and sold them to Nevil at the Holland Seed Bank.
To my knowledge, Todd McCormick is the only breeder to obtain these genetics directly from the breeders of their origin.
When you purchase Authentic Genetics, you get the best hand-selected seeds, directly from the breeder, rather than wholesale seeds, sourced from unnamed locations.
As a breeder myself, I HIGHLY recommend Authentic Genetics.
Tell Todd, Randall at High Hopes sent you. AGSeedCo.com
Let's get Growing!
Starting Seeds
There are as many techniques growers use to start seeds, as there are varieties of seeds to start... Some are universal, the standard... while others are unique to their originated source... I will not attempt to sway anyone's opinion or claim to have the "best" method.
But in our Grow With Us series, I will share with you the simple method I've used successfully for nearly four decades, that's always delivered good results.
There are a lot of available products you can buy to make starting your seeds easier... I don't use them... Many of these products weren't widely available during prohibition, I managed then, as I do now... If it ain't broke, don't fix it... Besides there's always something to spend money on when cultivating, I try to focus that spending on areas of HIGH return.
So my seed starting kit consists of:
- Ziplock bags
- Paper towels
- 9 oz Solo cups / comparatively small pots.
- An OMRI certified, organic starting mix.
- SoHum Living Organic Soil
- Water
Notes on water: Many growers recommend using Distilled or RO (Reverse Osmosis) water...Checking the EC (Electrical Conductivity) etc..While all of the above are fine and even important to Hydroponic growers... We are growing in Living Organic Soil, so readily available tap water will work fine... Some tap water contains chlorine, which can kill beneficial bacteria in the soil, If your tap water contains chlorine or you're not sure, simply leave your water sit in an open container for 24 hours, allowing the chlorine to evaporate, and it will be suitable for all your watering needs.
How about pH?
Living Organic Soil is more tolerant than other growing media, theoretically, if you're doing an organic, water-only grow, you shouldn't have to pH anything. As long as it's between 4.0-8.0, the Microbes do most of the work when it comes to managing pH in living soil...That said, I like a more definitive approach than "theoretically shouldn't" I pH my well water to a range between 6.5 and 7.0 organically with Earth Juice Crystal pH down.
Now that we've discussed water, let's get to sprouting our seeds.
Wet your paper towel, fold it over, and lightly squeeze out some of the water, leaving it a little more wet than damp but not saturated.
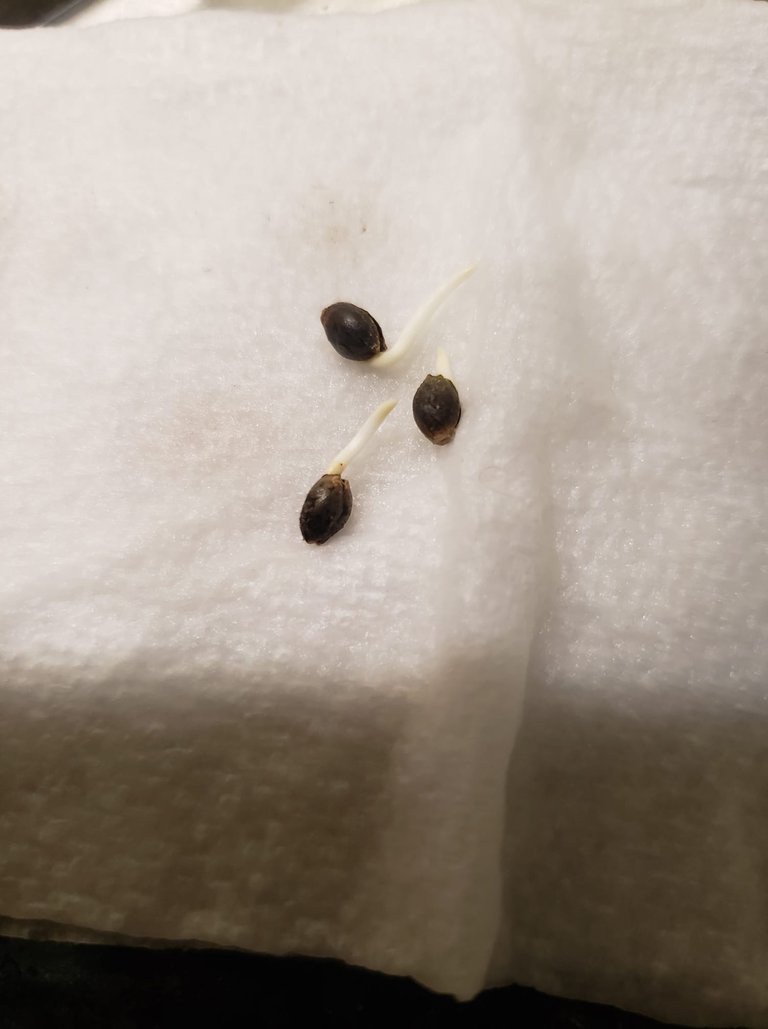
Place your seeds on the wet paper towel and fold it over them... Fold it in such a way that you have a few layers above and below your seeds... Leave some space between the seeds so they aren't crowded and keep your strains separated in their own paper towels.
Place your wet paper towels/seeds in a sandwich bag...I label the bag with the strain, date, and number of seeds. Leave a corner of the bag open and fold it over.
Place your bagged, labeled seeds in a dark, undisturbed location... Some growers use heat mats to speed up germination... I place my seeds in a cabinet that has an LED light strip attached to the underside... This slightly raises the temperature, accelerating germination, without any chance of overheating the seeds.
Now that your seeds are set to germinate,
It's time to prepare your cups...I prepare a cup for every seed I've set to sprout.
(You can skip this step if you're using ready-made pots) If you're using Solo cups,
you will need drainage holes in the bottom of the cups, I add holes to the bottom and the lowest point on the sides to ensure good drainage and aeration.
Fill your cups with starting mix.
In the past, I have used 3 parts Pro-Mix to 1 part worm castings, with good results.
For this run, I'm using 3 parts OMRI seed starting mix and 1 part SoHum Living Soil...This 3/1 mix safely provides your seedlings with everything they need for a healthy, balanced start, without the risks of burning your seedlings.
I like to mix my seed starting mix in a single large pot..Example: If you're starting 8 plants, add 6 solo cups of starting mix, then add 2 solo cups of SoHum and blend... This will give you enough 3/1 mix to fill 8 prepared solo cups... I find it easier to lightly water the mix, in the big pot, prior to filling the cups..you want the starting soil evenly moist but not saturated.
Sit your prepared, filled cups aside until your seeds have sprouted and are ready to plant.
Check your seeds every 24 hours, by gently unfolding the paper towel for observation.
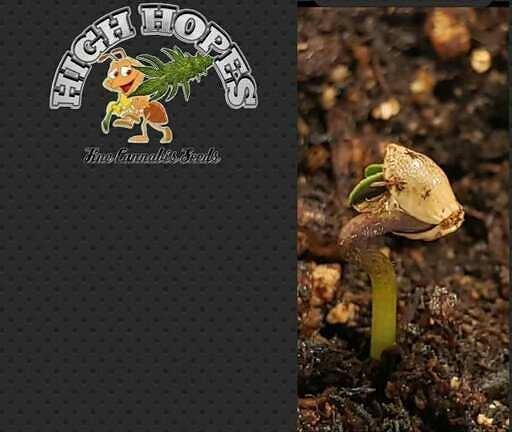
When the shells have split and the white sprout has emerged, it's time to plant.
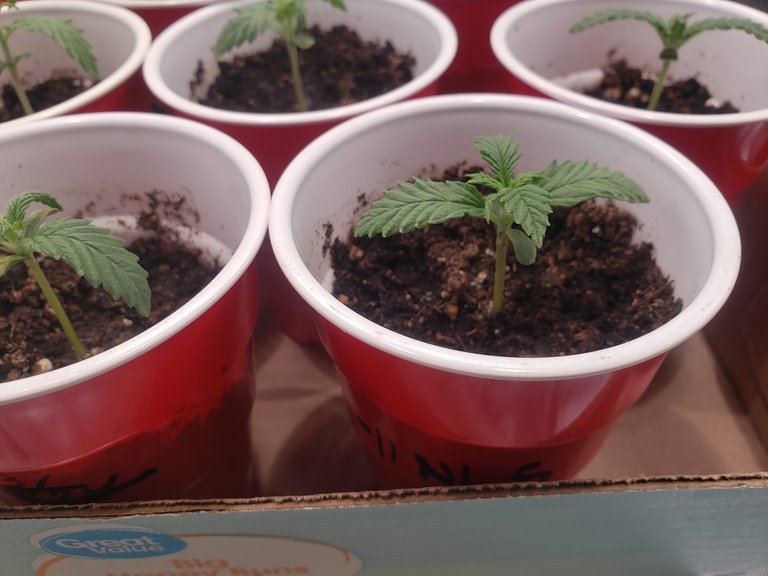
Planting
Start by making a depression or hole in the soils surface about a 1/4" to a 1/2" deep.
Place your seed in the hole with the sprout pointed down and gently pinch the soil together over the seed, being careful not to disrupt the seed's placement or position.
Add just enough water to settle the soil and eliminate any pockets around the seed... Your soil is already evenly moist so it doesn't take much, I do this by squeezing the wet paper towel we sprouted in, over the planted seed.
Label your cup with the strain/date.
Take note of the weight of the watered cup, you can use this as a comparative reference to know when to water.
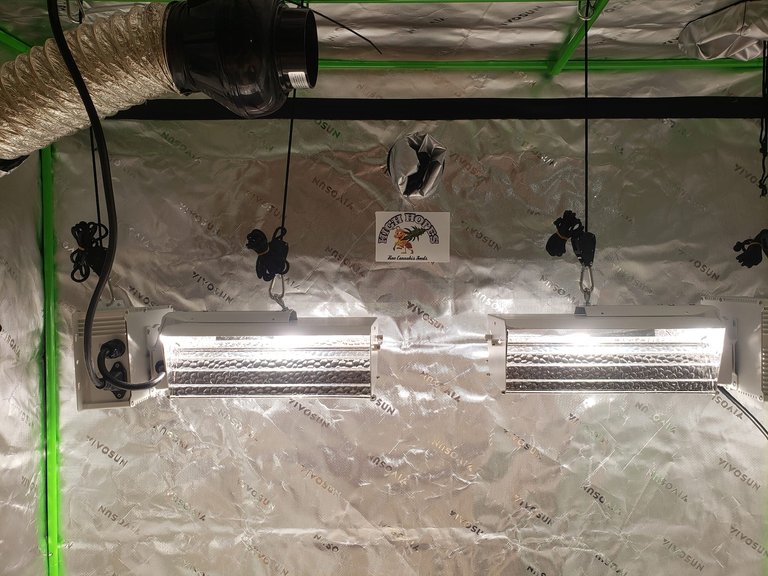
I start my seedlings under the same lights that will grow and flower them to finish.
I hang the CMH lamps about 30" above the seedlings, decreasing the distance as they grow.
This method hardens them off from birth to handle the environment..The bright light prevents the seedling from stretching and ensures tightly stacked growth.
I do not recommend using any kind of humidity dome over your seedlings.
It's important to monitor the soil and water accordingly.
When you water, avoid watering directly on the stem or overly saturating the soil, your goal is to have evenly moist soil, without any excess or runoff.
You should allow the soil to dry out somewhat between watering, as doing so, encourages the roots to span out in search of moisture....Remember the weight of your fully watered cups, allow them get considerably lighter in between waterings.
If your soil dries out more than it should, it will become hydrophobic and will not readily absorb water..the solution to this situation is watering slowly, in small increments, until the soil regains its wicking abilities...Adding too much water too quickly to hydrophobic soil, results in immediate runoff, leaving your soil dry.
In addition to good light and watering techniques, seedlings need a breeze on them, enough to keep them moving, as this strengthens the stem enough to support the weight of the new growth stacking on.
The Solo cups will carry your plants through the first couple of weeks known as the seedling stage.
In our next installment, we'll be discussing Transplants and Vegetative Growth.
STAY TUNED
Same Bud Time Same Bud Channel
Good Growing and Happy Harvest.

All photos taken with Samsung Galaxy S9. Dividers and Banners created by @the13anarchist and @jonyoudyer
Graphics/Photos edited with: PixelLabs | LunaPic
...𝔻𝕀𝕊ℂ𝕆𝕍𝔼ℝ𝕐 𝟛𝟝...
...!discovery 35...
This post was shared and voted inside the discord by the curators team of discovery-it
Join our Community and follow our Curation Trail
Discovery-it is also a Witness, vote for us here
Delegate to us for passive income. Check our 80% fee-back Program
Congratulations @highhopesfcs! You have completed the following achievement on the Hive blockchain And have been rewarded with New badge(s)
Your next target is to reach 900 upvotes.
You can view your badges on your board and compare yourself to others in the Ranking
If you no longer want to receive notifications, reply to this comment with the word
STOPCheck out our last posts:
!LOL
lolztoken.com
Blue paint
Credit: reddit
@highhopesfcs, I sent you an $LOLZ on behalf of holovision.hypno
(1/8)
Farm LOLZ tokens when you Delegate Hive or Hive Tokens.
Click to delegate: 10 - 20 - 50 - 100 HP
Wow my friend, what a great summary to start the journey of learning to plant. If I had known before I went into some details I would have done it differently, haha you learn from everything! Let's live the experimentation and the selfless help of others while we learn how to do the tarting correctly!
I expect the next installment of vegetation and transplants!