Temperature sensor LM34/LM35
I still have memories of the electronics laboratory in my student days, those memories in which we were taught how a heat source was able to disturb the electronic behavior of a BJT transistor, I would say that heat is one of the easiest energy sources to detect but also one of the most difficult to control.
The two electronic components presented in this article are very similar to a transistor in terms of physical structure, but they are structured in such a way that they respond to temperature variations by producing a voltage variation at the output which makes them ideal sensors for temperature control at certain ranges.
Aun tengo recuerdos del laboratorio de electronica en mis tiempos de estudiantes, esos recuerdos en los que se nos enseñaba como una fuente de calor era capaz de perturbar el comportamiento electrónico de un transistor BJT, diría que el calor es una de las fuentes de energía más fáciles de detectar pero también una de las más difíciles de controlar.
Los dos componentes electrónicos que se presentan en este artículo son muy similares a un transistor en cuanto a estructura física, pero están estructurados de forma tal que responden a las variaciones de temperatura produciendo una variación de voltaje en la salida lo que los convierte en sensores ideales para control de temperatura a ciertos rangos.

In both cases we have a 3-terminal device that produces a variation of 10mV for each degree that the temperature varies... Degrees what? that is where the difference is, in the case of the LM34 the variation is produced for each degree Fahrenheit and in the case of the LM35 for each degree Celsius.
Since physically the devices are similar and from 34 to 35 there is only one number difference some tend to mistakenly believe that one can be a replacement for the other without problems.
The LM34 has a measuring range of -50 to 300 °F while the LM35 has a measuring range of -55 °C to 150 °C. The choice between one or the other will depend on the measurement system used in the area where it is implemented, although it is not a limitation because conversions can be made by means of circuits (if the electronics is purely analog) or programs (in the case of microcontrollers).
En ambos casos tenemos un dispositivo de 3 terminales que produce una variación de 10mV por cada grado que varía la temperatura... ¿Grados qué? es ahí donde está la diferencia, en el caso del LM34 la variación se produce por cada grado Fahrenheit y en el caso del LM35 por cada grado Celsius.
Ya que físicamente los dispositivos son similares y de 34 a 35 solo hay un número de diferencia algunos tienden a creer de forma equivocada que el uno puede ser reemplazo del otro sin problemas.
El LM34 posee un rango de medición de -50 a 300 °F mientras que el LM35 desde -55 °C hasta 150 °C. La selección entre uno y otro dependerá del sistema de medición usado en el área donde se implementa, aunque no es una limitante porque se pueden hacer conversiones mediante circuitos (si la electrónica es puramente analógica) o programas (en el caso de microcontroladores)
If we know that there will be an equivalent in mV for each amount of degrees present we can make circuits as simple as a comparator with operational amplifiers that can activate an alarm or an output capable of activating a mechanism that takes action in the process, it would be enough to take a reference value and make the comparison between the two values as shown in the following circuit.
Si sabemos que habrá un equivalente en mV para cada cantidad de grados presentes podemos hacer circuitos tan simples como un comparador con amplificadores operacionales que pueda activar una alarma o una salida capaz de activar un mecanismo que tome acciones en el proceso, bastaría tomar un valor de referencia y hacer la comparación entre los dos valores como se muestra en el siguiente circuito.

We can appreciate that the voltage at the inverting input is the activation reference, if we divide this by 10 we will know the equivalent value in the corresponding degrees remembering that for each degree the increase is 10mV, for example for a setpoint of 100° a reference of 100x10=1000mV or 1V is set.
The circuit is only the beginning of many functions that can be implemented in a purely analog electronics, as the answers will depend on the process we can not cover them in this article but an overview of the operation.
On the other hand if we switch to digital electronics we can use a microcontroller to carry out the actions and an LCD to display temperature values.
Podemos apreciar que el voltaje en la entrada inversora es la referencia de activación, si dividimos esto entre 10 sabremos el valor equivalente en los grados correspondientes recordando que por cada grado el incremento es de 10mV, por ejemplo para un setpoint de 100° se ajusta una referencia de 100x10=1000mV o 1V.
El circuito solo es el principio de muchas funciones que se pueden implementar en una electrónica puramente analógica, como las respuestas dependerá del proceso no podemos cubrirlas en este artículo sino una vista general del funcionamiento.
Por otro lado si cambiamos a electrónica digital podemos usar un microcontrolador para llevar a cabo las acciones y una LCD para mostrar valores de temperatura.

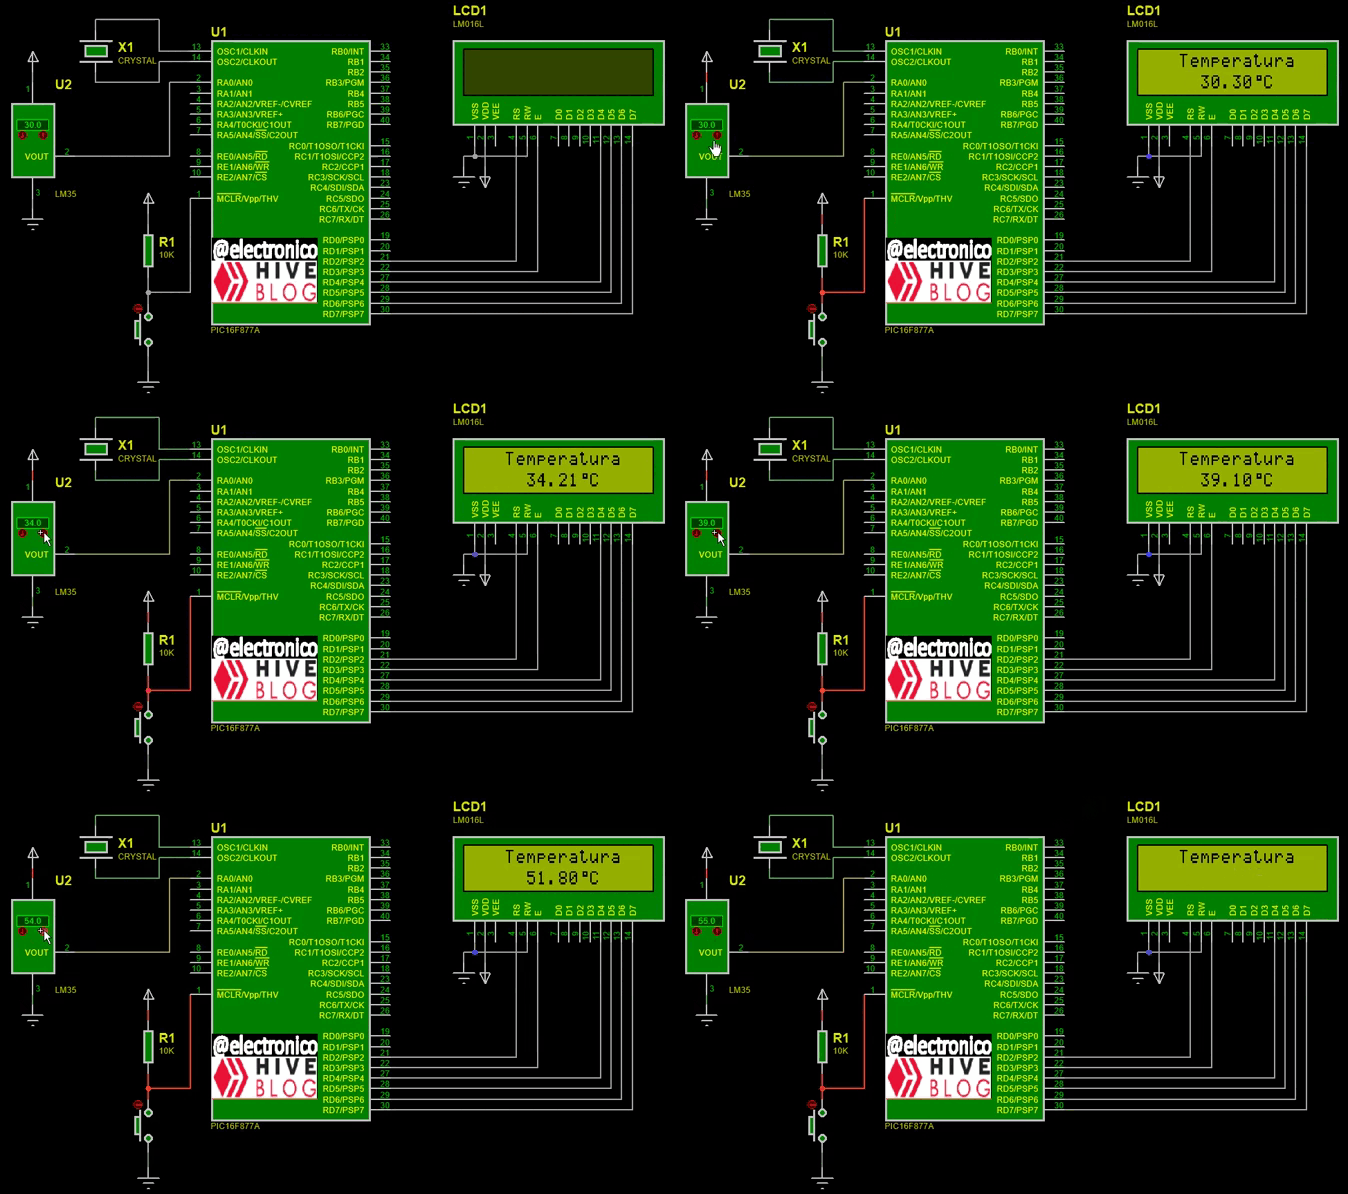
We can notice that it is a quite simple circuit, we only take the output of the sensor and we make it enter through some ADC channel of the microcontroller, knowing the Voltage/Temperature equivalence described in previous paragraphs we can establish in the programming a few lines loop able to convert the measured value in its equivalent in temperature and display it on the LCD.
Podemos notar que es un circuito bastante simple, solo tomamos la salida del sensor y la hacemos entrar por algún canal ADC del microcontrolador, sabiendo la equivalencia Voltaje/Temperatura descrita en párrafos anteriores podemos establecer en la programación un bucle de pocas líneas capaz de convertir el valor medido en su equivalente en temperatura y mostrarlo por la LCD.
 while(true)
   {
      set_adc_channel(0);
      delay_us(20);
      float adc_value = read_adc();
      float celsius = (adc_value*500.0)/1023.0;

      lcd_clear();
      lcd_gotoxy(4,1);
      lcd_putc("Temperatura");
      lcd_gotoxy(6,2);
      printf(lcd_putc,"%0.2f C", celsius);
      delay_ms(150);
   }
}
We could then read the temperature value, display it on an LCD and depending on the process take the required temperature control measures.
Podríamos entonces leer el valor de la temperatura, mostrarlo en un LCD y según el proceso tomar las medidas que se requieran para el control de temperatura.


If you want to give an extra boost to the blog with a donation you can send it to the addresses:
Si quieres darle un impulso extra al blog con una donación puedes enviarla a las direcciones:
BEP-20: 0x5Aee5e3e3ED3203e77eF0d8Bb3E3a420E5229Ce0
ERC-20: 0x5Aee5e3e3ED3203e77eF0d8Bb3E3a420E5229Ce0
Arbitrum One: 0x5Aee5e3e3ED3203e77eF0d8Bb3E3a420E5229Ce0
Polygon: 0x5Aee5e3e3ED3203e77eF0d8Bb3E3a420E5229Ce0
Avalanche: 0x5Aee5e3e3ED3203e77eF0d8Bb3E3a420E5229Ce0
Yay! 🤗
Your content has been boosted with Ecency Points, by @electronico.
Use Ecency daily to boost your growth on platform!
Thanks for your contribution to the STEMsocial community. Feel free to join us on discord to get to know the rest of us!
Please consider delegating to the @stemsocial account (85% of the curation rewards are returned).
Thanks for including @stemsocial as a beneficiary, which gives you stronger support.
Gracias