String splitting EN/ES
The topic of communication between devices has already occupied us several articles and it is not for less, through this we can create more powerful and attractive projects. That's why I have taken the time to explain each thing as detailed as possible in the simplest way but without losing the quality and usefulness of the content.
Today we move on to an important thread such as splitting for strings, we will understand the need for this practice and we will communicate a Human Machine Interface (HMI) created in LabView with our design to test results. Although I will not go into details about the creation of the HMI because I cannot demand the reader knowledge about this as I have never written an article about LabView (I promise we will learn about this in the future).
El tema de comunicación entre dispositivos nos ha ocupado ya varios artículos y no es para menos, por medio de esto podemos crear proyectos más potentes y atractivos. Por eso me he tomado el tiempo para explicar cada cosa lo mas detallado posible de la forma más simple pero sin perder la calidad y utilidad del contenido.
Hoy avanzamos a un hilo importante como lo es la división para cadenas de caracteres, entenderemos la necesidad que hay para esta práctica y vamos a comunicar una Interfaz Humano Máquina (HMI) creada en LabView con nuestro diseño para comprobar resultados. Aunque no entraré en detalles sobre la creación del HMI porque no puedo exigir al lector conocimientos sobre este pues nunca he escrito un artículo sobre LabView (prometo que aprenderemos sobre esto en el futuro).

String transmission |
|---|
When transmitting in the RS232 protocol using asynchronous USART we require one line for transmitting data and another for receiving, that implies that all data to one direction travels on the same line. Now I want us to consider two conditions.
- Manual data transmission: For this transmission we write the data and press enter to send it, what the other device receives is just what we sent and in this type of situation there is no major problem.
Cuando transmitimos en el protocolo RS232 usando USART asíncrono requerimos una línea para la transmisión de datos y otra para la recepción, eso implica que todos los datos hacia una dirección viajan por la misma línea. Ahora quiero que consideremos dos condiciones.
- Transmisión de datos de forma manual: Para esta transmisión nosotros escribimos los datos y pulsamos enter para que se envíen, lo que recibe el otro dispositivo es justo lo que enviamos y en este tipo de situaciones no existe mayor problema.
- Automatic data transmission: This case occurs when we want to monitor the value of one or more variables, we must be transmitting the data at all times, for this we use an infinite repetition while.
- Transmisión de datos de forma automática: Este caso sucede cuando deseamos monitorear el valor de una o más variable, debemos estar transmitiendo el dato en todo momento, para esto usamos un while de repetición infinita.
But when we want to monitor more than one variable the matter becomes a little more complex, the data are often mixed in the transmission and this can lead to errors or simply our device ignores the received data as they do not represent any value associated with its control logic.
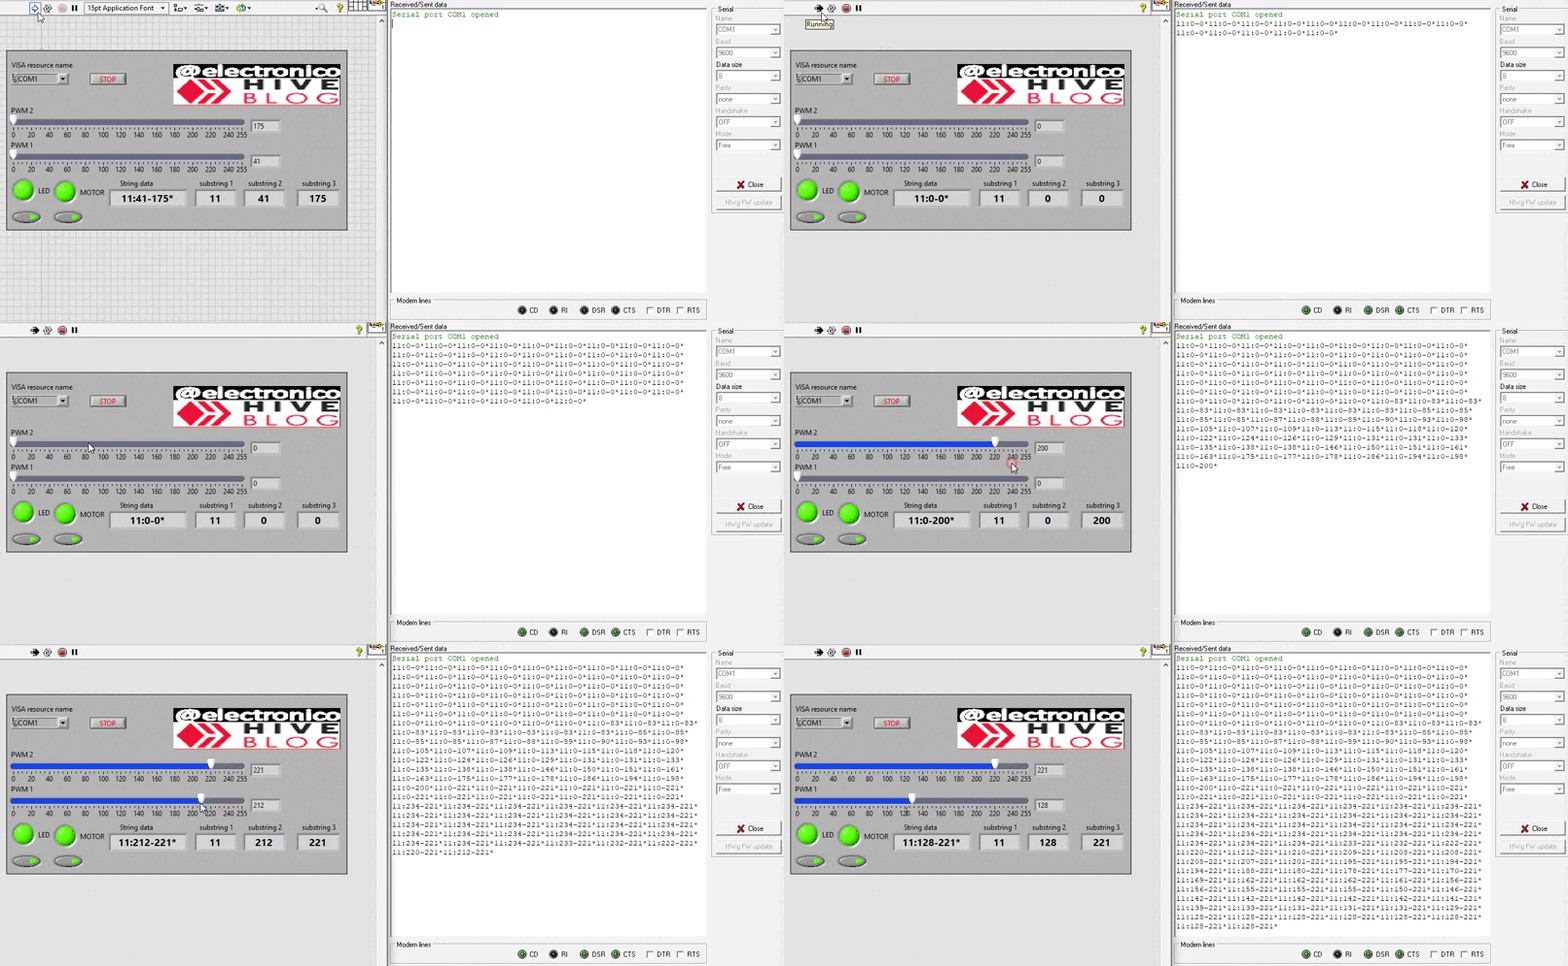
When this is the case all the character strings are linked and the data is converted into a single string which is the combination of all of them. For the purposes of this article I have created an application in LabView that allows us to generate data for the control of certain variables that I will explain a few paragraphs later. For now we are only going to monitor with the Hercules program the format in which the data is transmitted.
Pero cuando deseamos monitorear más de una variable el asunto se vuelve un poco más complejo, los datos suelen mezclarse en la transmisión y esto puede dar lugar a errores o simplemente nuestro dispositivo ignora los datos recibidos al no representar estos ningún valor asociado a su lógica de control.
Cuando es el caso todas las cadenas de caracteres se ligan y se convierten los datos en una sola cadena que es la combinación de todas. Para efectos de este artículo he creado una aplicación en LabView que nos permita generar datos para el control de ciertas variables que explicare unos párrafos más adelante. Por ahora solo vamos a monitorear con el programa Hércules el formato en el que los datos son transmitidos.
Sub-strings |
|---|
To be able to interpret all these data correctly it is necessary to divide the string of characters in sections which we will call sub strings, there are several techniques to do it but we will focus in the one that I consider more effective and easy to learn that is by means of "stop characters".
For this to apply the message must come encoded with these stop characters and we can decode it with the function read_string_until('x', substrname, n); what this function does is to take a fragment of the string and store it in a variable of the vector type, for this 3 parameters are required.
'x' represents the stop character and we can use symbols such as : * - others. substrname is the name of the vector where the data will be stored and n is the number that defines the size of this vector, if for example we use read_string_until(':', substring_1, 11); we are saying to store in the vector substring_1 the fragment of the string that arrives before receiving the character ':'. That way we will have subtracted from the string the data we are interested in and we will be able to use it to decide actions.
Para poder interpretar todos esos datos de forma correcta es necesario dividir la cadena de caracteres en secciones las cuales llamaremos sub strings, existen varias técnicas para hacerlo pero nosotros nos centraremos en la que considero más eficaz y fácil de aprender que es mediante "caracteres de parada".
Para que esto aplique el mensaje debe venir codificado con estos caracteres de parada y lo podremos decodificar con la función read_string_until('x', substrname, n); esta función lo que hace es tomar un fragmento de la cadena y almacenarlo en una variable del tipo vector, para ello se requieren 3 parámetros.
'x' representa el carácter de parada y podemos usar símbolos como : * - otros. substrname es el nombre del vector donde se almacenarán los datos y n es el número que define el tamaño de dicho vector, si por ejemplo usamos read_string_until(':', substring_1, 11); estamos diciendo que se almacene en el vector substring_1 el fragmento de la cadena que llegue antes de recibir el carácter ':'. De esa forma habremos sustraído de la cadena el dato que nos interese y podremos usarlo para decidir acciones.
Illustrative application |
|---|
I think the best way to learn is to practice, so let's create an example application in which we will have a circuit with a PIC16F877A microcontroller that can only be controlled remotely.
An operator will be able to send commands from a remote HMI interface to control the on and off of a motor, a light bulb or LED and at the same time will be able to send two PWM signals that will facilitate the power control of other equipment. The communication will be received through the serial port via USART.
Creo que la mejor forma de aprender es practicando, así que vamos a crear un ejemplo de aplicación en el que tendremos un circuito con microcontrolador PIC16F877A que solo puede ser controlada de forma remota.
Un operador podrá enviar comandos desde una interfaz HMI remota para controlar el encendido y apagado de un motor, un bombillo o LED y a la vez podrá enviar dos señales PWM que facilitaran el control de potencia de otros equipos. La comunicación se recibirá por el puerto serial mediante USART.

Simulation circuit
Programming |
|---|
As usual we start our code with the basic configuration lines.
Como de costumbre iniciamos nuestro código con las lineas de configuracion basicas.
#include <16f877a.h>

#device PASS_STRINGS = IN_RAM

#fuses HS,NOWDT,NOPROTECT,NOPUT,NOLVP,BROWNOUT

#use delay(clock=20M)

#use RS232(BAUD=9600, BITS=8, PARITY=N, XMIT=PIN_C6,

RCV=PIN_C7)

#use standard_io(D)
We will use the get_string.c library to use the functions that will facilitate the handling of received strings and the integer_serial.c library to convert string type data into int type data and thus be able to use them comfortably in our control logic.
We will connect the motor to pin D0 and the LEDs will be activated by pin D1. We create the vector substr_1 to subtract from the string the instructions that govern the behavior of the LED and the motor, substr_2 to subtract the value that PWM1 should have and substr_3 for the one that PWM2 should have, we also create the vectors motor_led and pwm_value of type int to store the data once they are converted from string to int and from there we will use them to apply the control.
Usaremos la librería get_string.c para usar las funciones que nos facilitaran el manejo de cadena de caracteres recibidas y la librería integer_serial.c para convertir datos del tipo string en datos de tipo int y de esta forma poder usarlos cómodamente en nuestra lógica de control.
Conectaremos el motor en el Pin D0 y los LEDs serán activados por el PIN D1. Creamos el vector substr_1 para a sustraer de la cadena las instrucciones que rigen el comportamiento del led y el motor, substr_2 para sustraer el valor que debe tener PWM1 y substr_3 para el que debe tener PWM2, también creamos los vectores motor_led y pwm_value del tipo int para almacenar los datos una vez sean convertidos de string a int y desde ahí los usaremos para aplicar el control.
#include <get_string.c>

#include <integer_serial.c>

#define motor PIN_D0

#define led   PIN_D1

char substr_1[4];

char substr_2[6];

char substr_3[6];

int motor_led[2];

int pwm_value[2];
In our main program we force to zero the outputs that activate the LEDs and the motor, and we must also configure the CCP modules to use PWM.
En nuestro programa principal forzamos a cero las salidas que activan los leds y el motor, además debemos configurar los módulos CCP para el uso de PWM.
void main()

{

   output_low(motor);

   output_low(led);

   setup_timer_2(t2_div_by_16, 255, 1);

   setup_ccp1(ccp_pwm);

   setup_ccp2(ccp_pwm);

   set_pwm1_duty(0);

   set_pwm2_duty(0);
Now we will use kbhit to check if any data has been received, in case it is true we will proceed to subtract the fragments of the string we are interested in.
Ahora usaremos kbhit para verificar cuando se haya recibido algún dato, en caso de ser verdadero procederemos a sustraer los fragmentos de la cadena que nos interesan.
   while(true)

  {

      if(kbhit() > 0)

      {

         read_string_until(':', substr_1, 4);

         read_string_until('-', substr_2, 6);

         read_string_until('*', substr_3, 6);
Already with the data stored in string format we change them to int to be able to use them comfortably. This is done as follows
Ya con los datos almacenados en formato string los cambiamos a int para poder usarlos cómodamente. Esto lo hacemos de la siguiente forma.
        motor_led[0] = char_to_int(substr_1[0]);

         motor_led[1] = char_to_int(substr_1[1]);

         pwm_value[0] = string_to_int(substr_2, data_8_bit);

         pwm_value[1] = string_to_int(substr_3, data_8_bit);
Now that the data is correctly processed we send it to each microcontroller output for control actions.
Ahora que los datos están procesados correctamente los enviamos a cada salida del microcontrolador que corresponda para las acciones de control.
         output_bit(motor, motor_led[0]);

         output_bit(led, motor_led[1]);

         set_pwm1_duty(pwm_value[0]);

         set_pwm2_duty(pwm_value[1]);

      }

   }

}
Simulation |
|---|
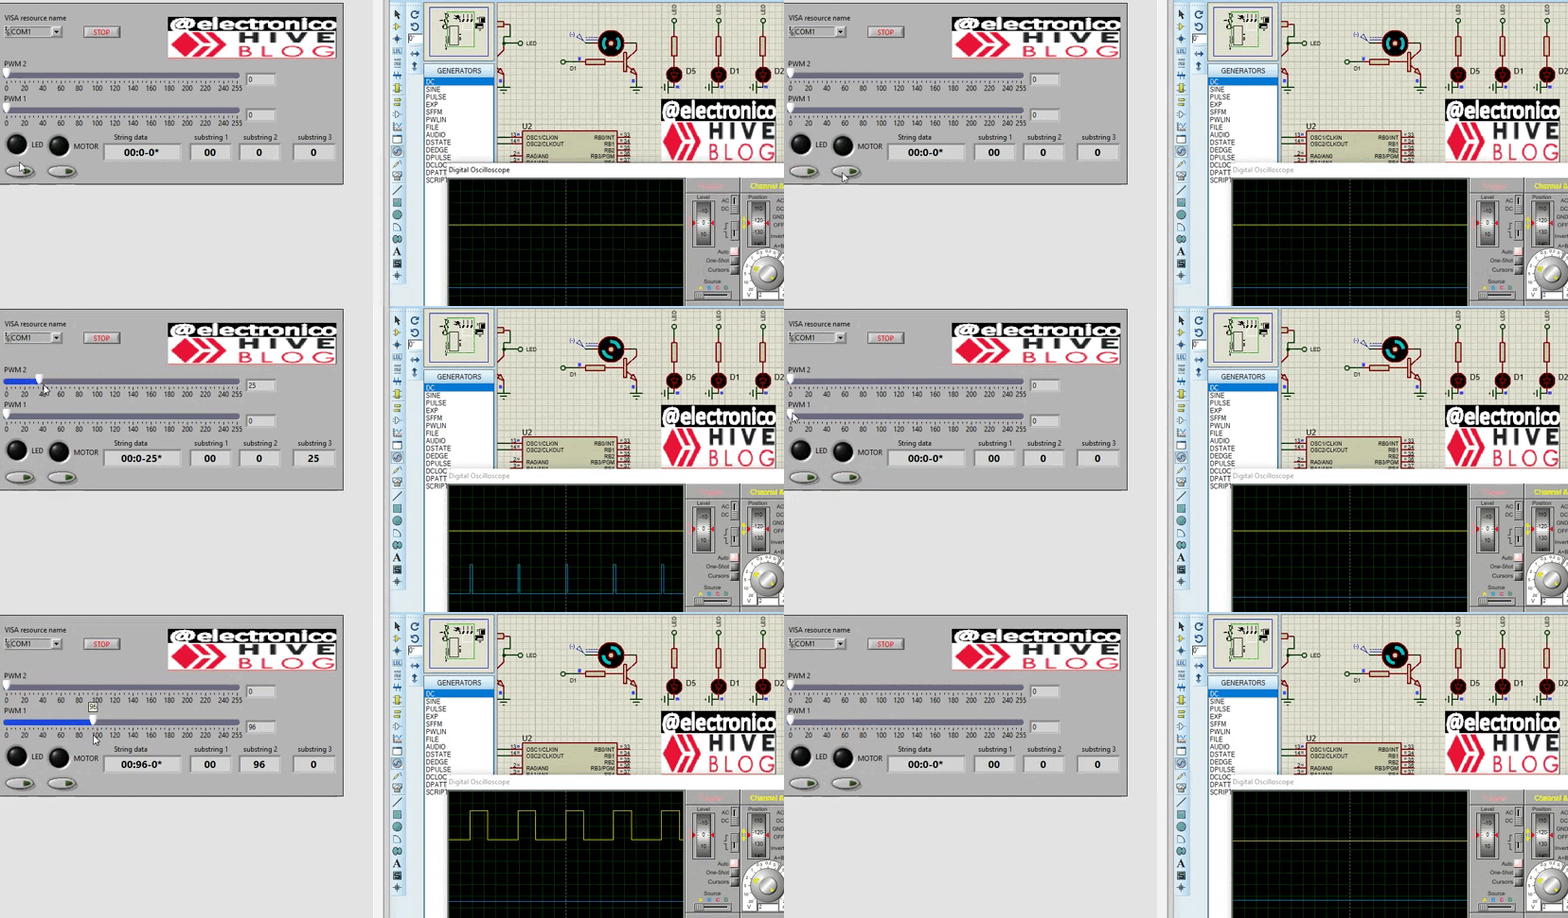
In our simulation the objective is to see how our microcontroller responds to the variations sent from the graphical HMI interface created in LabView for remote computer control.
We are going to turn on and off the motor, the leds and modify the pulse width of both PWM signals, for the latter we will use the Proteus virtual oscilloscope to monitor the behavior of both PWM signals to the variation of the control in the HMI. At the end we will be controlling two discrete variables and two analog variables.
En nuestra simulación el objetivo es ver cómo responde nuestro microcontrolador a las variaciones enviadas desde la interfaz gráfica HMI creada en LabView para el control por computadora de forma remota.
Vamos a encender y apagar el motor, los leds y a modificar el ancho de pulso de ambas señales PWM, para esto último usaremos el osciloscopio virtual de Proteus para monitorear el comportamiento de ambas señales PWM ante la variación del control en el HMI. Al final estaremos controlando dos variables discretas y dos variables analogicas.


Yay! 🤗
Your content has been boosted with Ecency Points, by @electronico.
Use Ecency daily to boost your growth on platform!
Support Ecency
Vote for new Proposal
Delegate HP and earn more
Thank you!!!

Thanks for your contribution to the STEMsocial community. Feel free to join us on discord to get to know the rest of us!
Please consider delegating to the @stemsocial account (85% of the curation rewards are returned).
You may also include @stemsocial as a beneficiary of the rewards of this post to get a stronger support.
Thanks for the post
!1UP
You have received a 1UP from @gwajnberg!
@stem-curator, @vyb-curator, @pob-curator, @neoxag-curator
And they will bring !PIZZA 🍕.
Learn more about our delegation service to earn daily rewards. Join the Cartel on Discord.
I gifted $PIZZA slices here:
@curation-cartel(5/20) tipped @electronico (x1)
Join us in Discord!