Mi propia mesa de Virtual Pinball. Como lo hice paso a paso DIY. (ESP/ENG)
Esta es una publicación que quiero compartir con mucho orgullo y mucha alegría pues es el producto final de mi segundo proyecto DIY. Mi propia mesa de Virtual Pinball

En este proyecto no solo hice carpintería sino que también trabajé muy duro en la programación e instalación del software de emulación, y debo decir que instalé mesa por mesa probando una por una cerciorándome de que todas funcionaran correctamente.
Este proyecto me tomó aproximadamente unos 4 a 5 meses dado que trabajaba solo los sábados de cada fin de semana y todo empezó con ver por internet muchas fotos de referencia de personas que construyen su propia mesa de pinball virtual.
Durante el proceso de investigación fue muy interesante encontrar y descubrir un submundo de personas que les encanta el hobbie del pinball. Encontré grupos y foros con mucha información al respecto. En dichos foros se postean diariamente fotos de personas que van construyendo su proyecto y que me generaban muchas ideas, total que me decidí a comprar la computadora, un monitor de segunda mano que conseguí a muy buen precio, descargue el software de emulación pinball y las mesas.
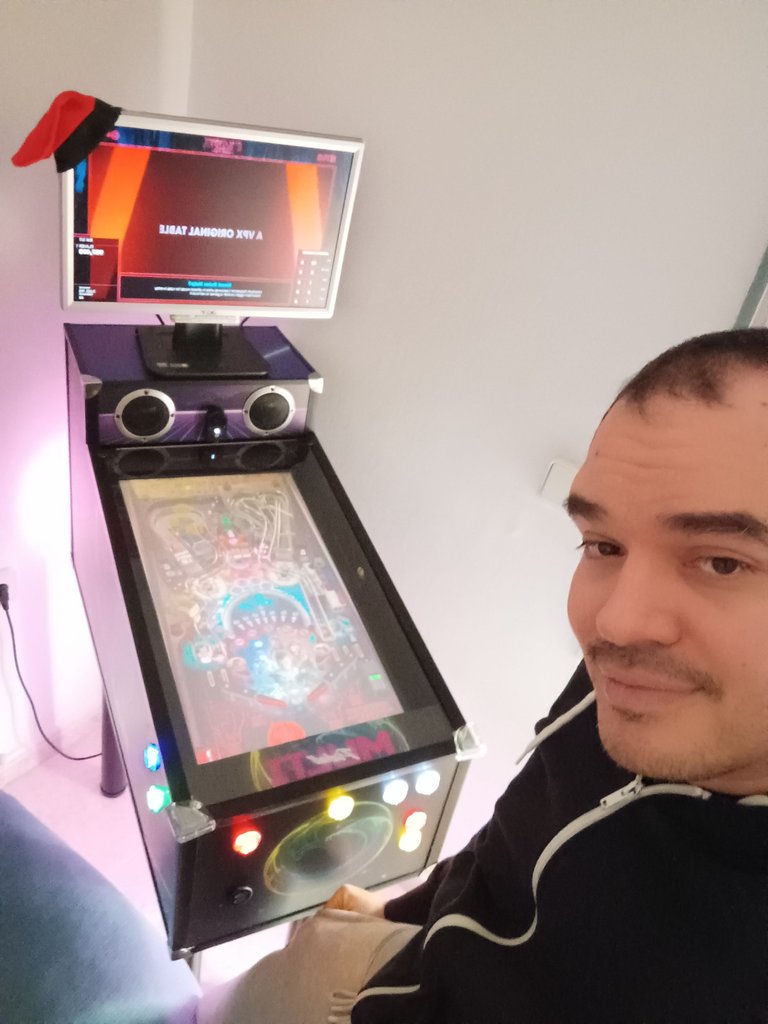
Pero no solo se trata de instalar un software y unas mesas para jugar, también debe existir un programa llamado front end. El front end es un programa que se inicia cómo interface y en este que puedes escoger todas las mesas que tienes instaladas además de ser visualmente muy atractivo.
Este front end se llama Pinup Popper Baller Installer. Lo pueden buscar por Facebook.

Este proceso de instalación y configuración me tardo un mes aproximadamente en realizarlo dado que no es tan sencillo como instalar un videojuego y jugarlo de una sola vez, todo lo contrario, pues es muy personalizado y un tanto robusto, por lo cual tienes que saber paso a paso lo que estás instalando, si la configuración de tu pinball es de una pantalla de dos o hasta tres pantallas y cualquier cambio que pueda suceder modifica la configuración y tienes que iniciar desde cero en algunos casos.
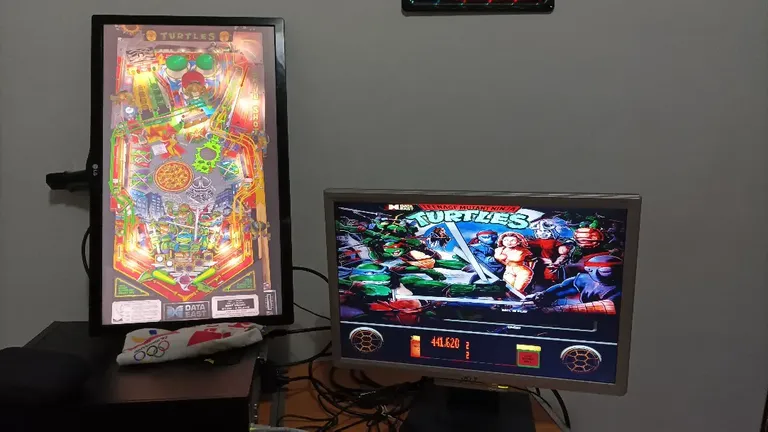
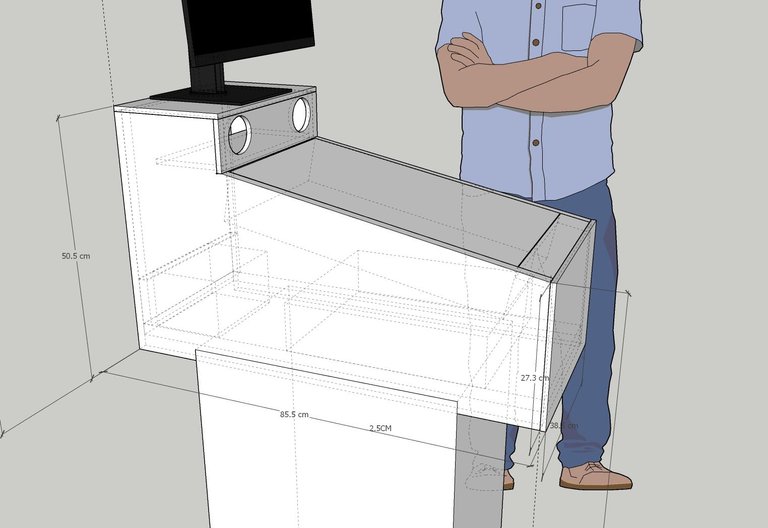
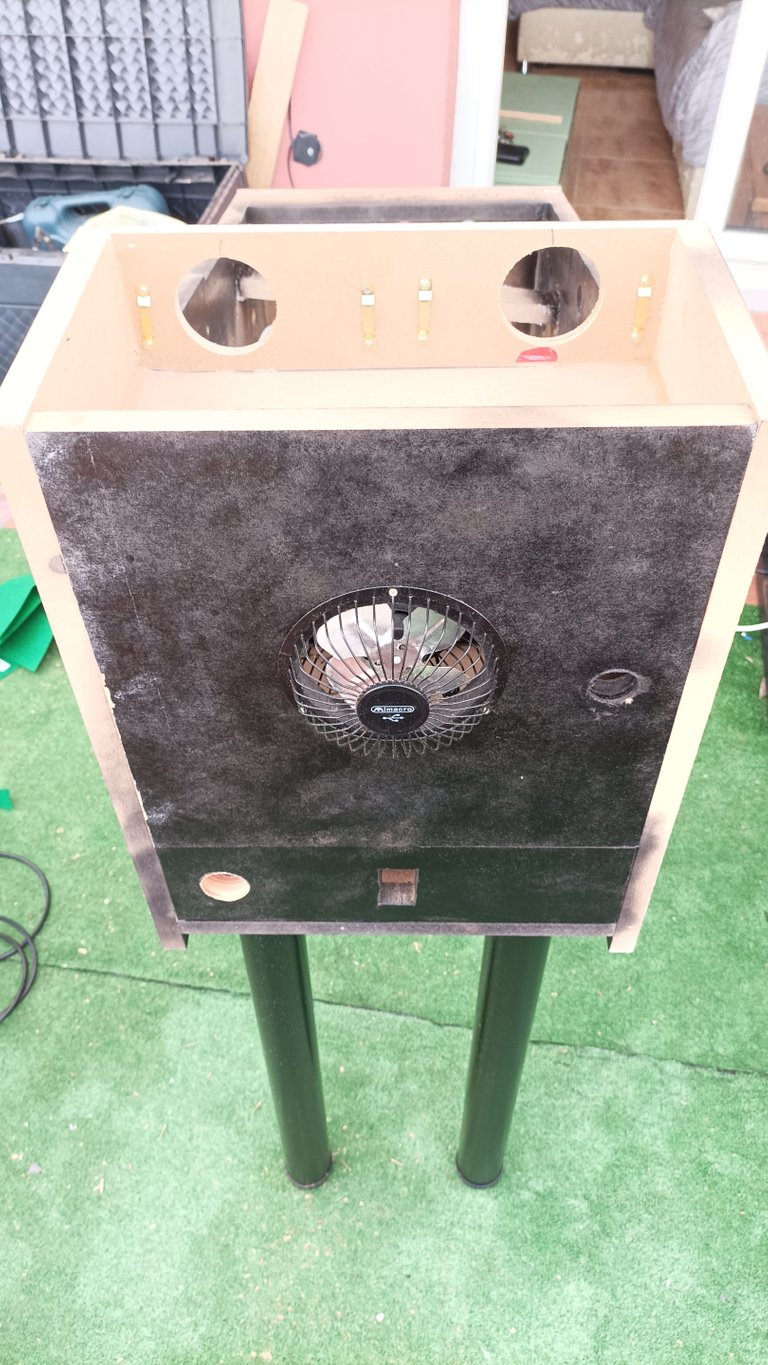
Luego de programar y tener todo configurado con el software viene la parte del diseño gráfico donde toma como medida primordial el monitor del playfield, dónde está la mesa de juego propiamente.
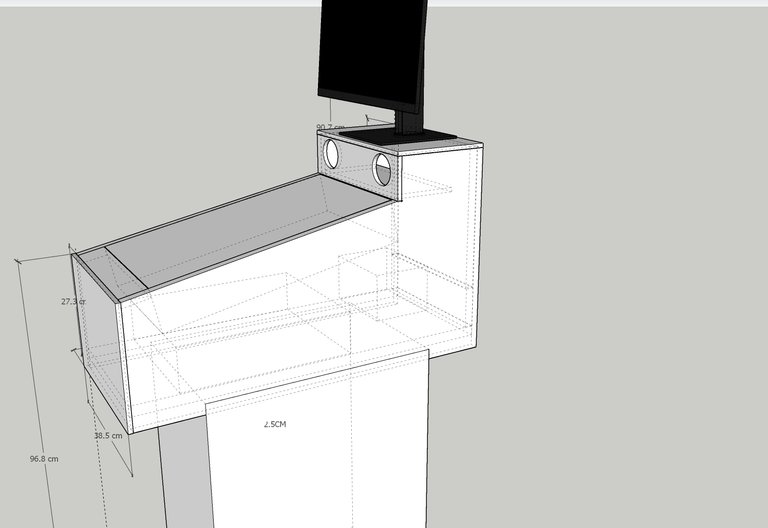
Es un monitor de segunda mano que compre por unos 20 € y es de 24 pulgadas, para definir las medidas del gabinete tome como referencia dicho monitor, además de ver las fotos de referencia que descargue de internet, además tuve que tomar medidas de la computadora para saber su tamaño exacto y su profundidad.
Todos los elementos que podían ir dentro del gabinete fueron medidos y modelados dentro del programa 3D llamado Sketchup, gracias a este programa pude hacer el diseño en 3D y analizar el método de construcción cuando tuviese las maderas terminadas.
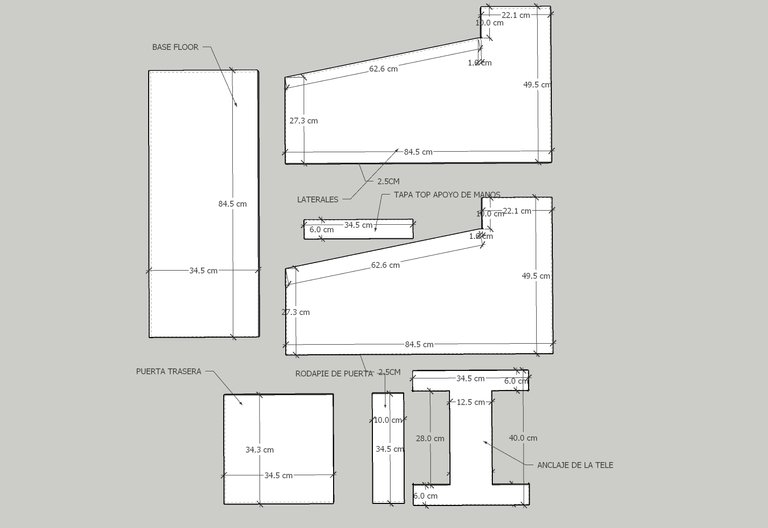
Ya con el modelo en 3D listo y las medidas claramente visibles decidí pedir las maderas cortadas, muchas personas empiezan por comprar la plancha de madera entera y luego picarla a medida. A mí este método no me funciona porque en el lugar en que estaba fabricando la mesa del pinball es un apartamento y eran el último piso en la parte alta por lo tanto transportar una tabla de 4 m x 2 m era una tarea imposible. Pero encontré una empresa que hace los cortes a medida según se lo solicites y es completamente online.
Tomé las medidas del SketchUp hice un proceso de desarmar el modelo en 3D y con este proceso pude obtener todas las medidas tabla por tabla, el servicio que me dieron en la empresa cortemaderas fue excelente porque desde la maderas má pequeña de 2 cm por 15 cm hasta la más grande las cortaron y cumplieron con todos los requerimientos de los cortes que le solicité.
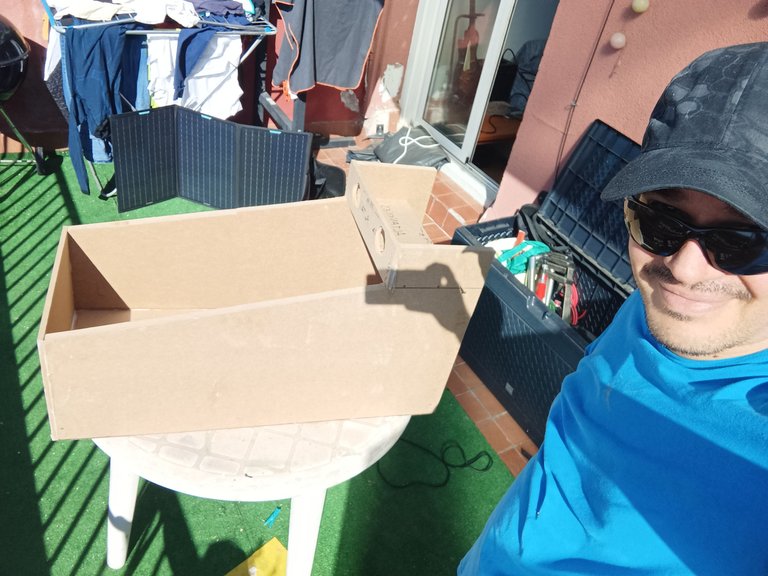
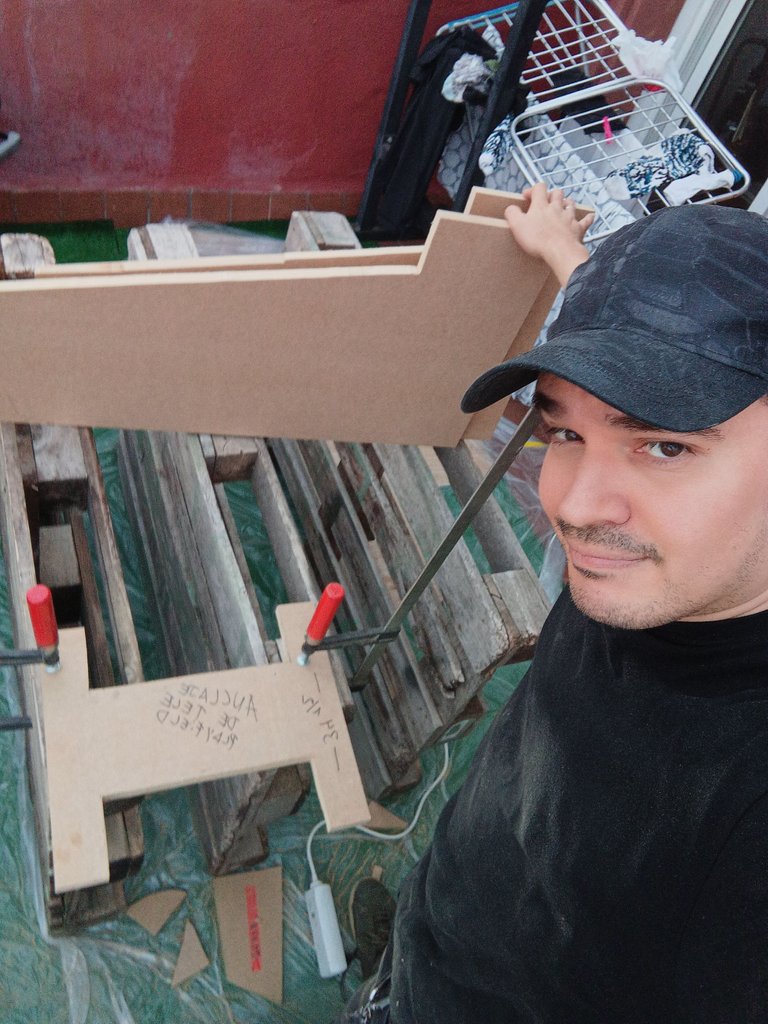
En 2 semanas me llegaron todas las maderas perfectamente a medida para empezar el proceso de ensamblaje sin embargo hubo un par de cortes que tuve que realizar de forma manual por qué son cortes diagonales o de alguna forma irregular.
Cortemaderas también pueden hacer cortes irregulares pero cobran mucho más caro por el tipo de máquina que usan y cómo me iba por el servicio más económico decidí usar solos cortes rectos, es decir maderas cuadradas o rectangulares, por lo tanto tuve que usar una sierra caladora y dibujar con la máxima precisión posible y con el máximo cuidado porque un error de un centímetro puede estropear todo el proceso de ensamblaje en este tipo de proyectos.

Los vinilos puedo decir orgullosamente que también fueron hechos desde cero por mí persona, la experiencia que obtuve haciendo la máquina de arcade me permitió tener más claro el proceso de el diseño e impresión y fijación de los vinilos.
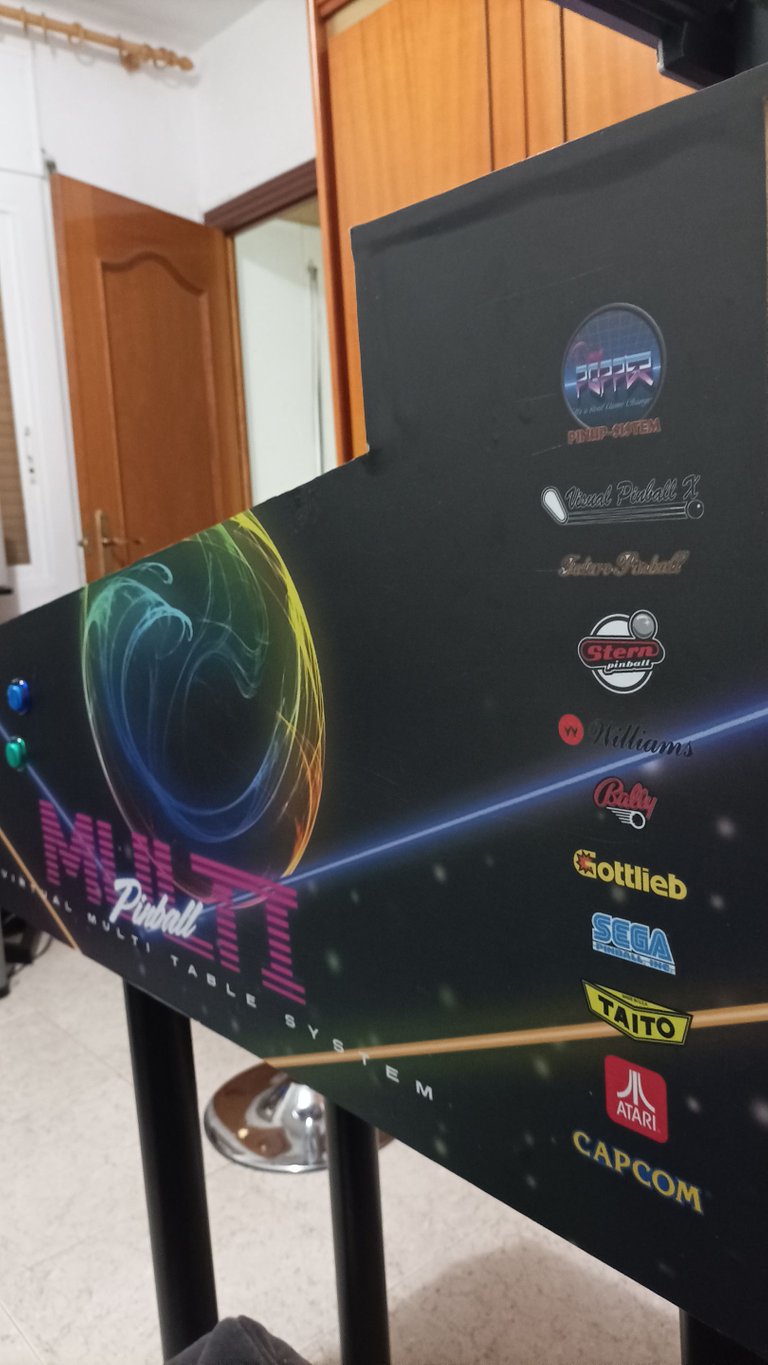
Al principio pensé en hacer un vinilo temático, probablemente de Batman o de la película Tron por tener un aire retro futurista pero considerando que iba a ser una máquina de múltiples mesas y es obvio que es una emulación de las máquinas electromecánicas decidí irme por algo más genérico que te permitiera comprender qué es una máquina de mesas múltiples y que hace muchas cosas a la vez.
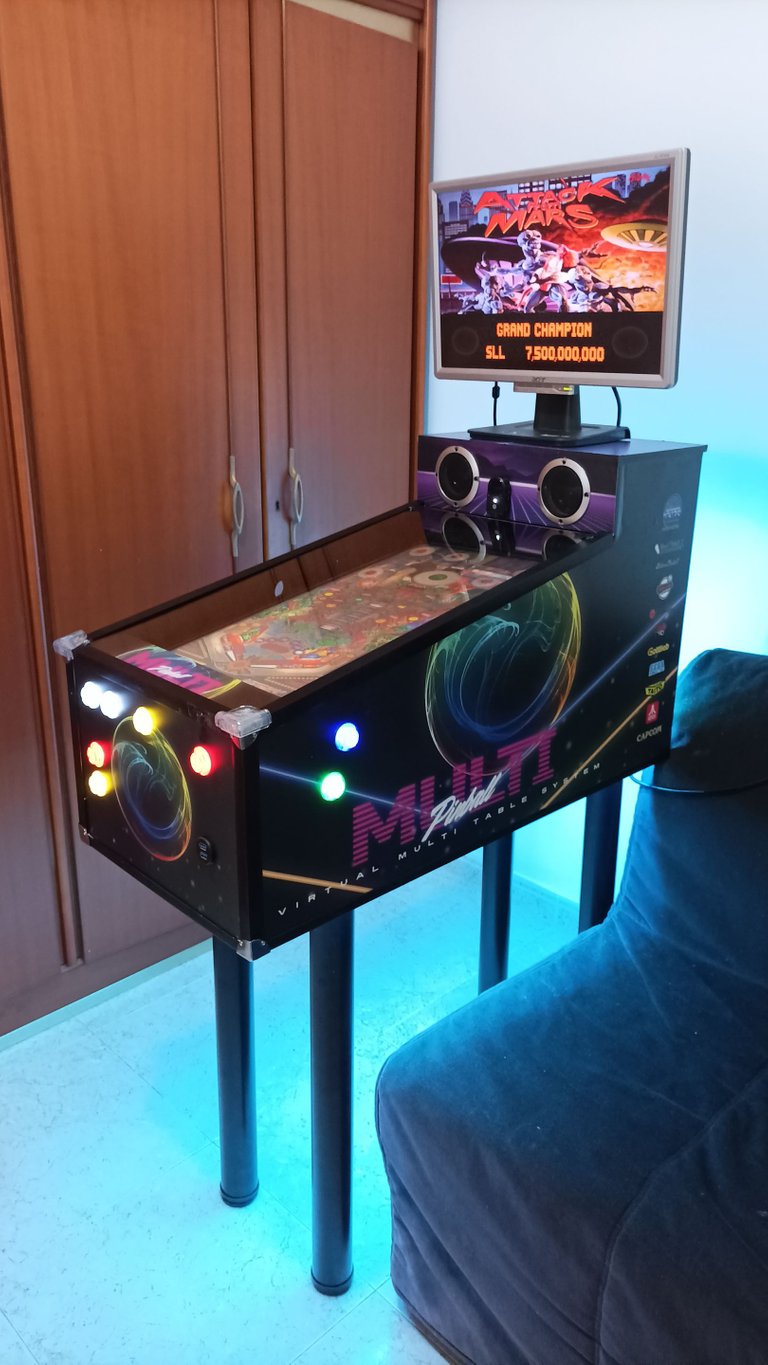
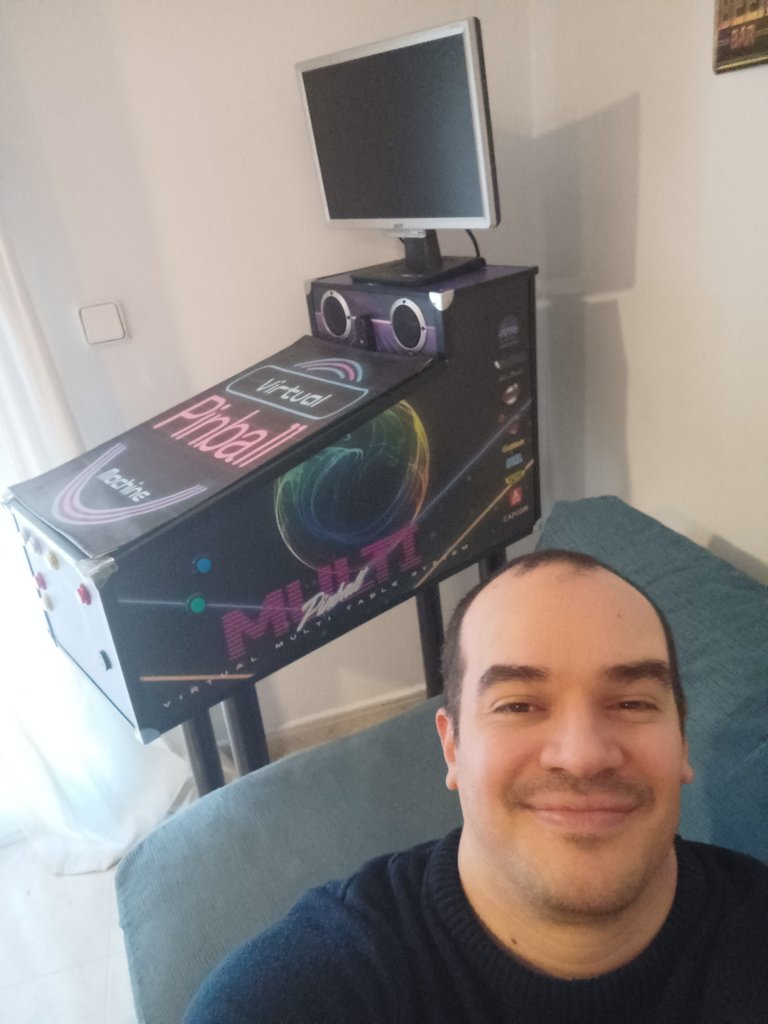
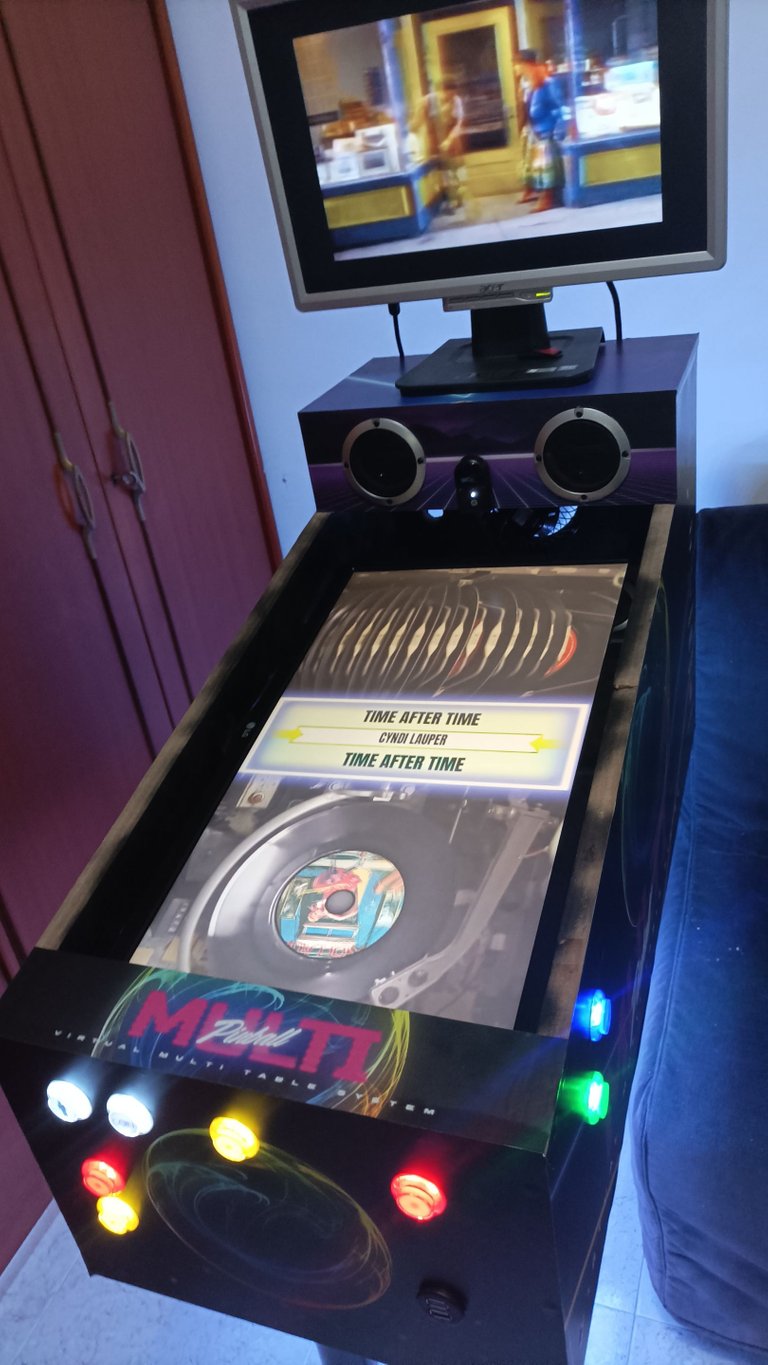
Como ya había hecho el diseño del arcade con un estilo retro futurista de los 80, me fui más o menos por la misma línea, simplemente encontré un fondo abstracto de color negro con colores intensos le agregué unas líneas de neón naranja y azul, luego trabajé la fuente para darle ese toque retro de los 80 con bastante iluminación tipo neón y colores bastante vivos y terminé nombrando el gabinete como el “multi pinball”, cosa que describe perfectamente lo que es capaz de hacer la máquina.
Pegar el vinilo sobre la madera tiende a ser un poquito delicado o hasta engorroso al principio, pero cuando tienes un poco de práctica, y como hice el proyecto arcade ya tengo cierto nivel de experiencia con esto de pegar vinilos así que se me hizo bastante sencillo y rápido.

Luego de pegarlo se quitan los excedentes en los bordes con un cutter y se cortan en cruz las partes me tapan los huecos que es donde van los botones, una vez que pegamos el vinilo hay que ser muy cuidadoso de no dañarlo, hay que manipular con cuidado el gabinete para cambiarlo de posición y así seguir trabajando en otras cosas que están pendientes, como por ejemplo ponerlo boca abajo para fijar las patas.
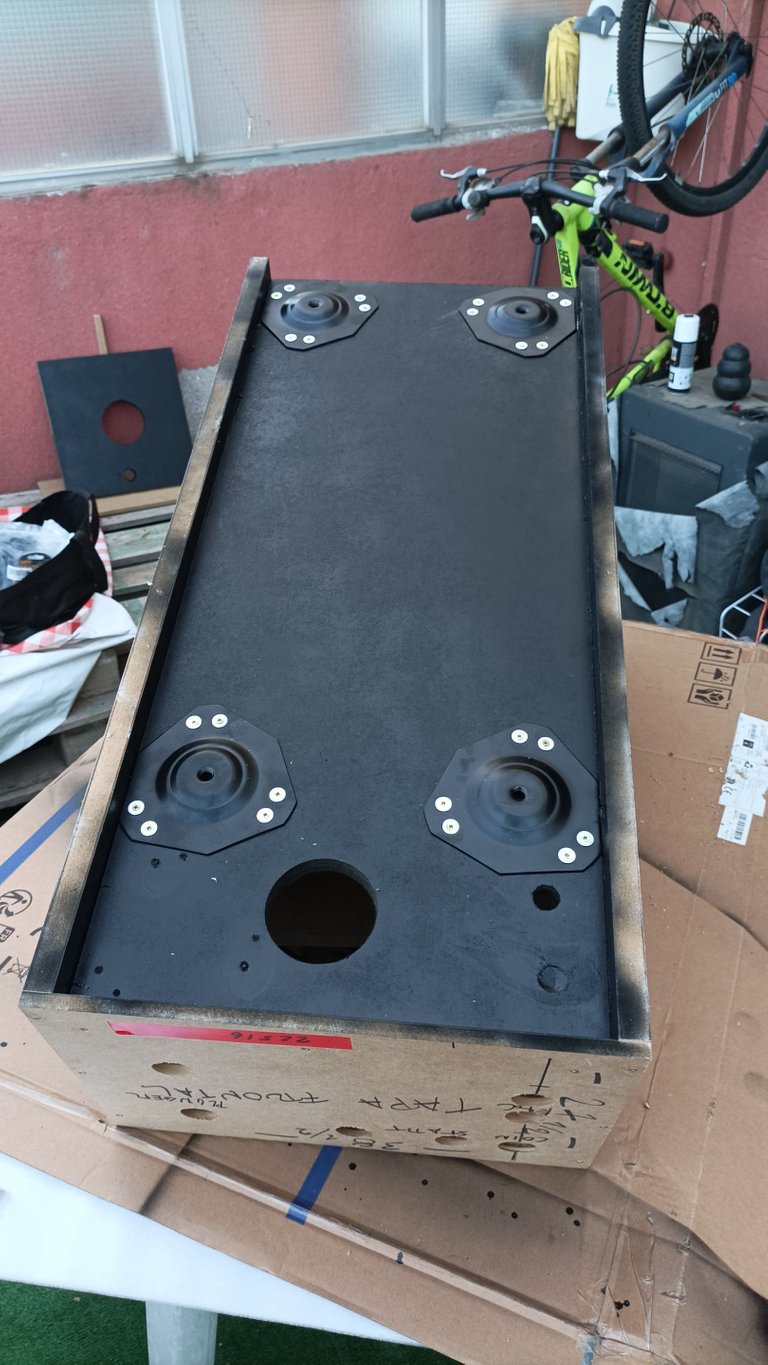
Las patas son desmontables y tienen una base que van atornilladas fijas a la parte de abajo del gabinete pero las patas en sí tienen un tornillo en el medio que se enrosca a dicha base.
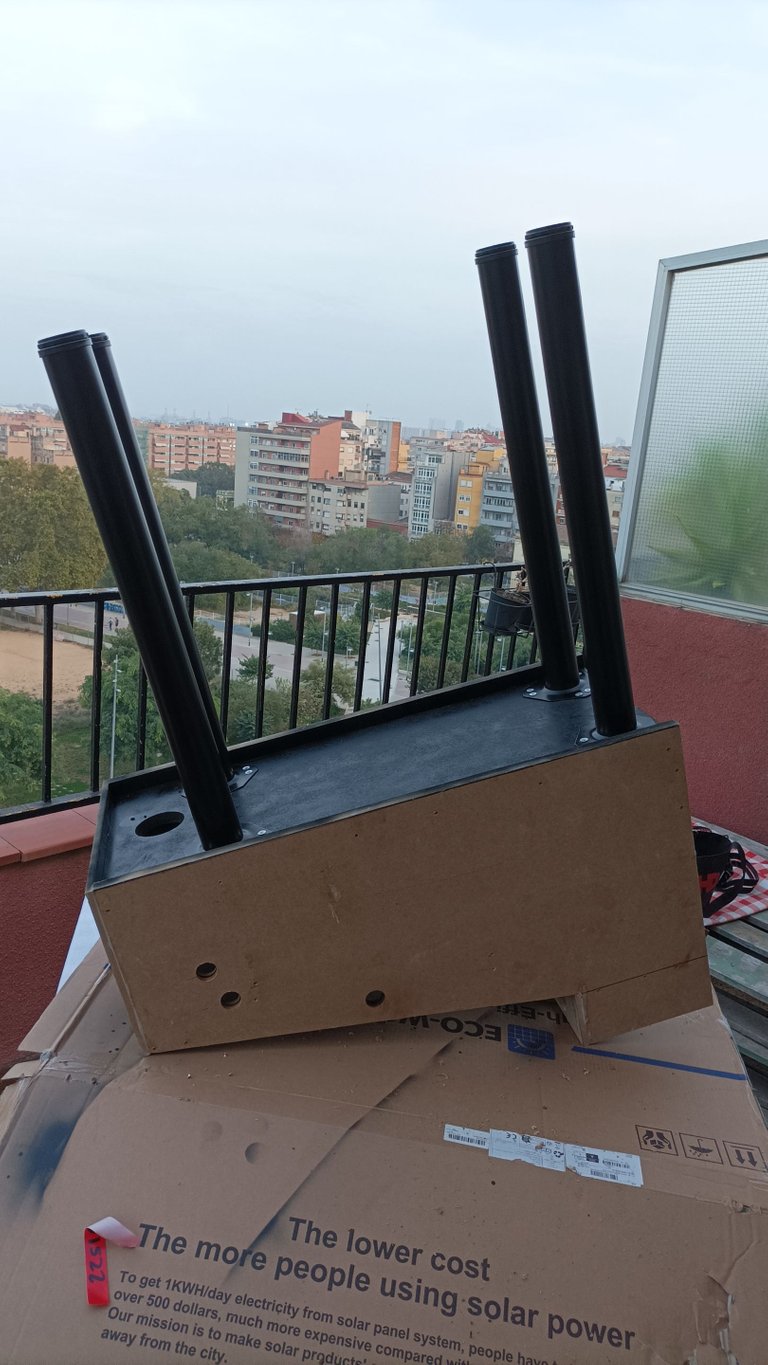
Estás patas son patas de mesa normal y común, dado que las patas originales de los pinball van por fuera del gabinete como si fueran ángulos, pero no encontré ningún tipo de pata de ese tipo y a pesar de que son más simples en su estructura tienden a ser bastante costosas porque son específicas de pinball.
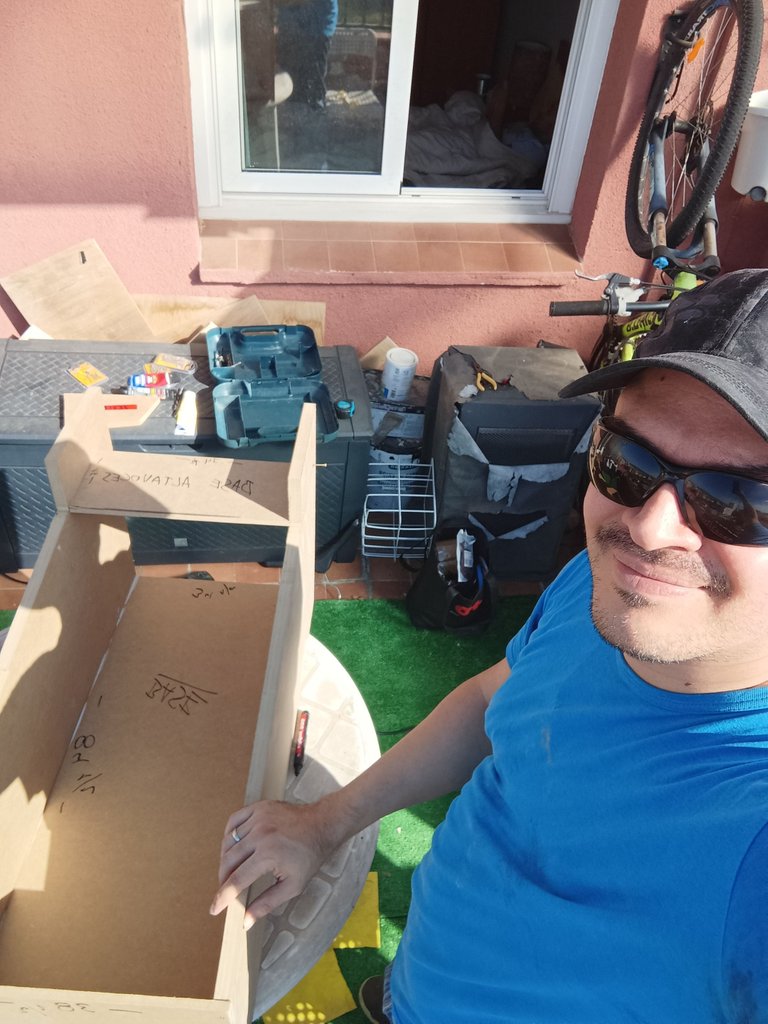
Para fijar la computadora en la parte interna utilice T-Racks o bridas para que al transportar el gabinete nada se mueva por dentro, es importante que nada quede bailando dentro o haciendo sonidos raros.
Los altavoces son unos altavoces 2.1 HP que compré de segunda mano por unos 15 € sino más recuerdo, la idea de este proyecto siempre fue comprar cosas de segunda mano lo más económicas posibles dado que no estoy haciendo el proyecto al tope de las capacidades de un virtual pinball, por ejemplo no estoy agregando solenoides para simular impactos de piezas electromecánicas ni estoy agregando un plunger tirador. Con los botones tengo para hacer todas las funciones.
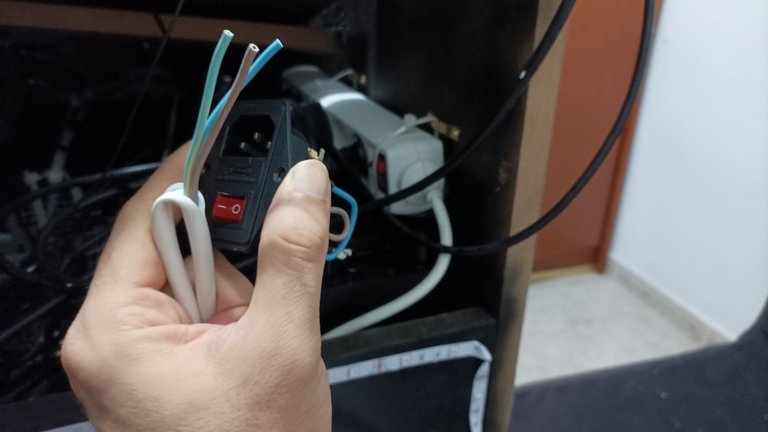
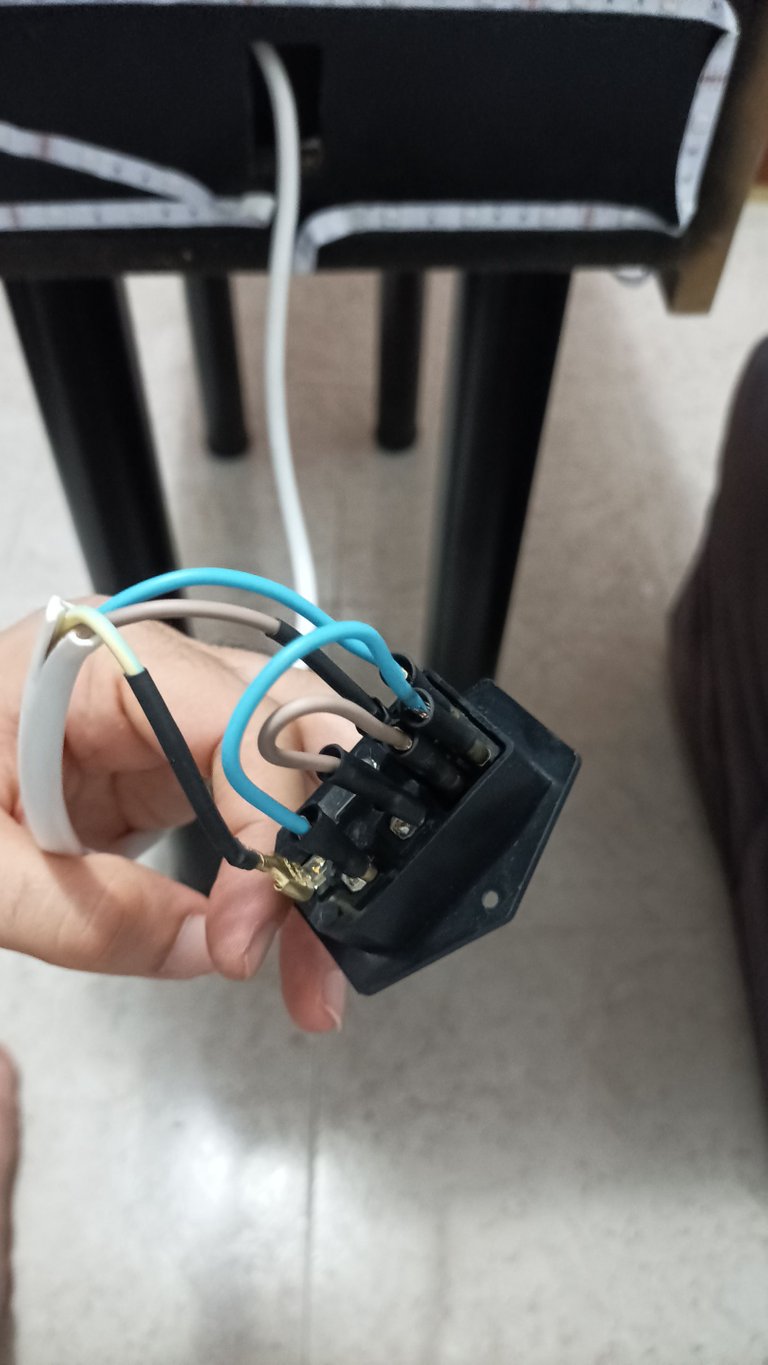
La parte eléctrica de la cual enciende toda la máquina no es otra cosa que una regleta de 6 tomas, a esta regleta le corté el cable y le puse al gabinete una toma de corriente IEC empotrada con su cable externo, este enchufe empotrado tiene un switch y un fusible
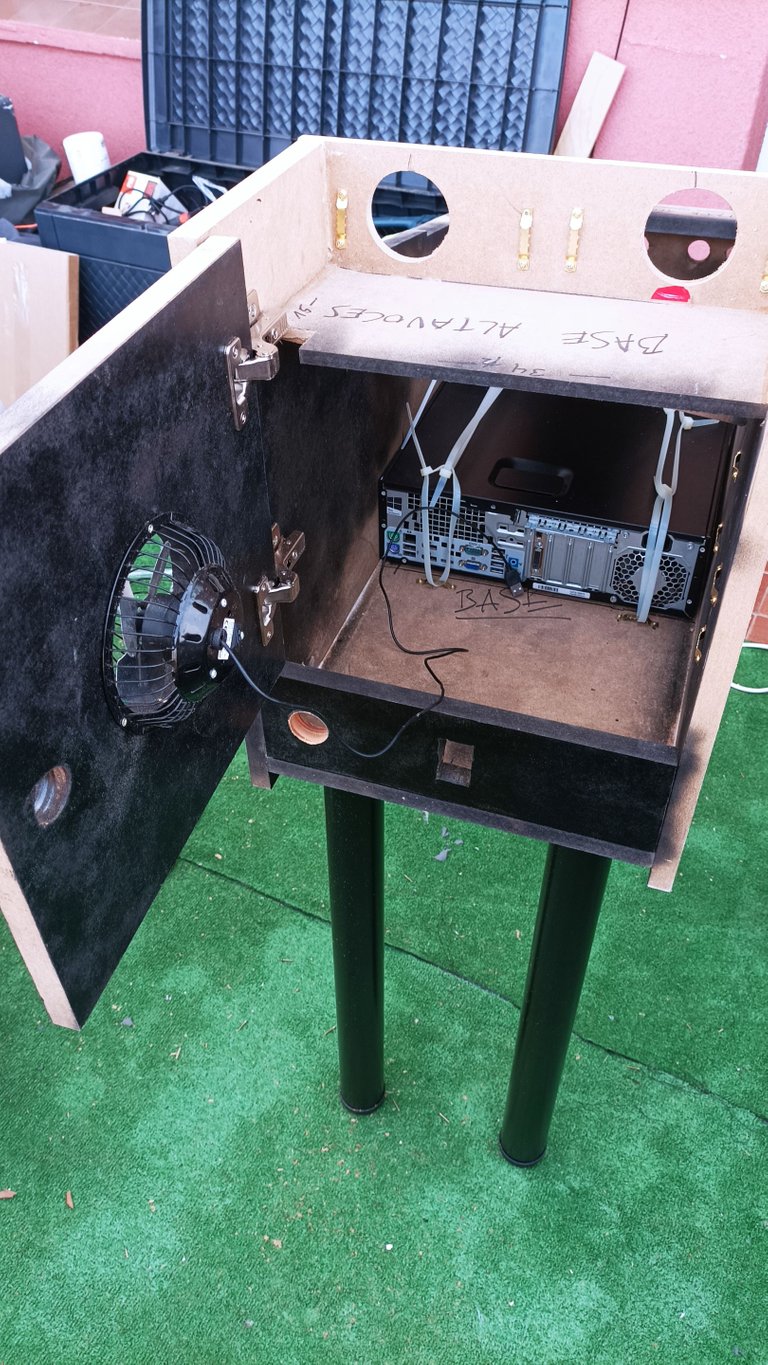
Como extractor de aire utilice un ventilador de estos USB normal de computadora, de los que se ponen en el escritorio para refrescarse en verano, yo simplemente lo saque de su rejilla protectora y lo atornille directamente a la puerta trasera del gabinete y el USB que alimenta el ventilador se lo conecté a la computadora, de esta manera cuando enciendo la computadora el ventilador se enciende
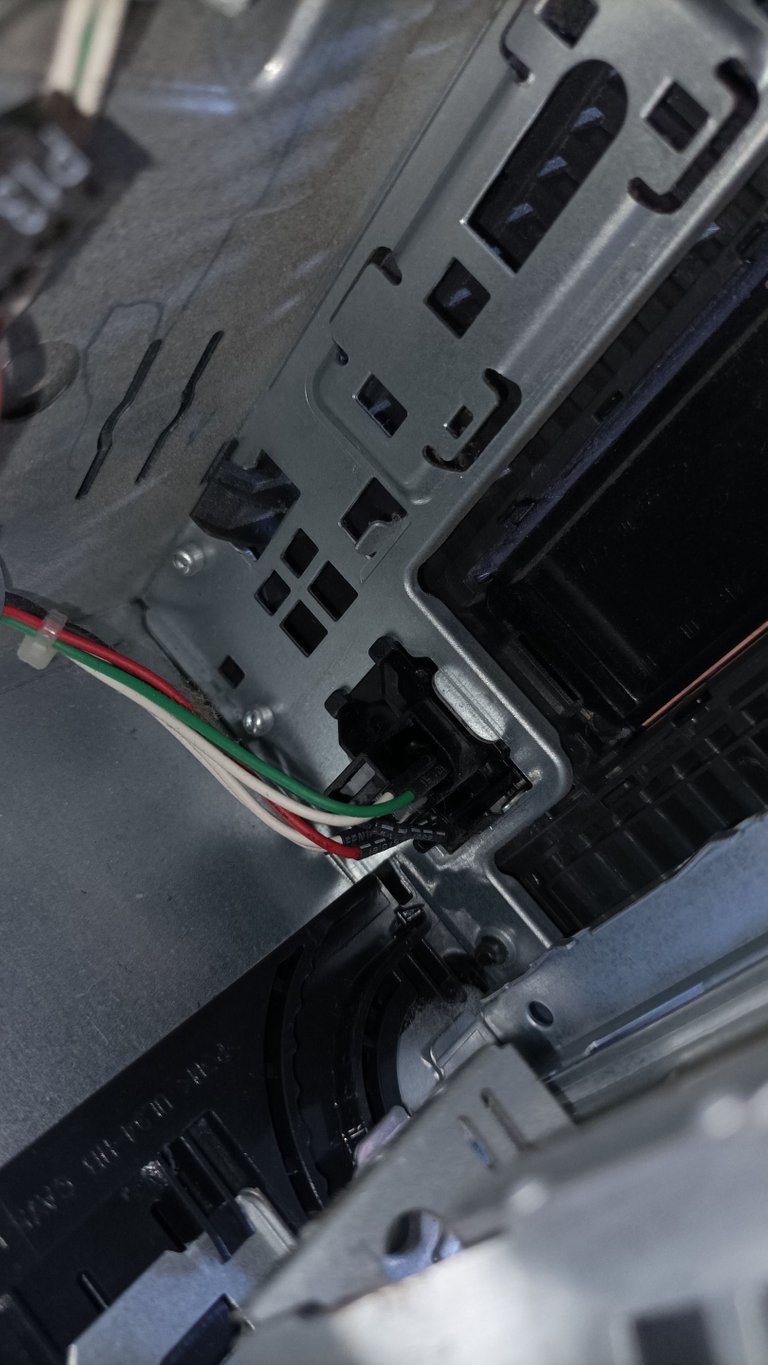
Utilice un switch externo para encender la computadora, es decir, todos sabemos que computadora tiene su botón de encendido en el case, yo me fui a la tarjeta madre y le quite el switch de encendido que va en el case, compré un switch externo por Amazon que tiene un cable de 1 m aproximadamente, este switch lo empotré en el gabinete y el cablecito llega hasta la tarjeta madre y así enciendo y apago la computadora sin necesidad de acceder a la parte interna del gabinete.
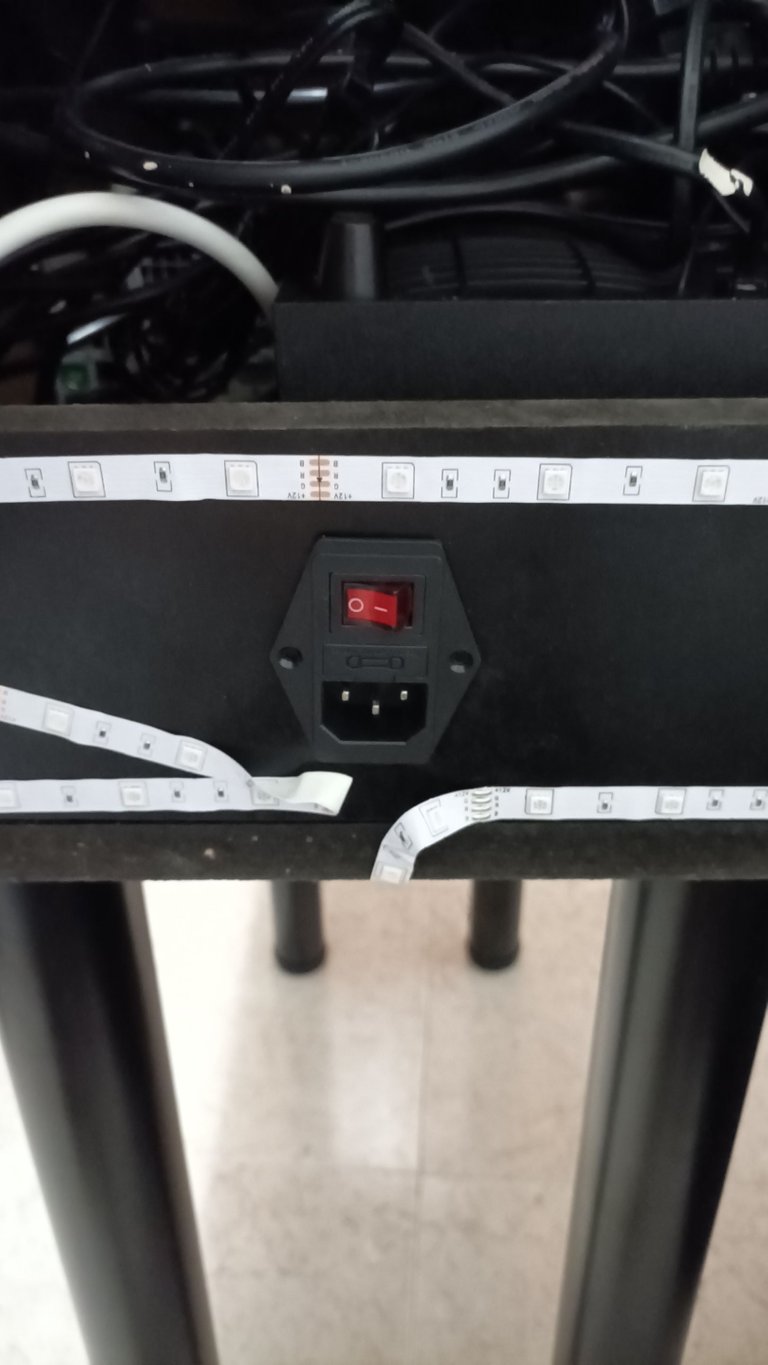
Instalé una cinta de 5 m de luces LED, esto es decorativo, no es necesario pero me gusta muchísimo cuando enciendes el gabinete e ilumina el piso y la parte trasera. Esto también lo hice con el proyecto arcade y de verdad me gusta mucho como se ve.
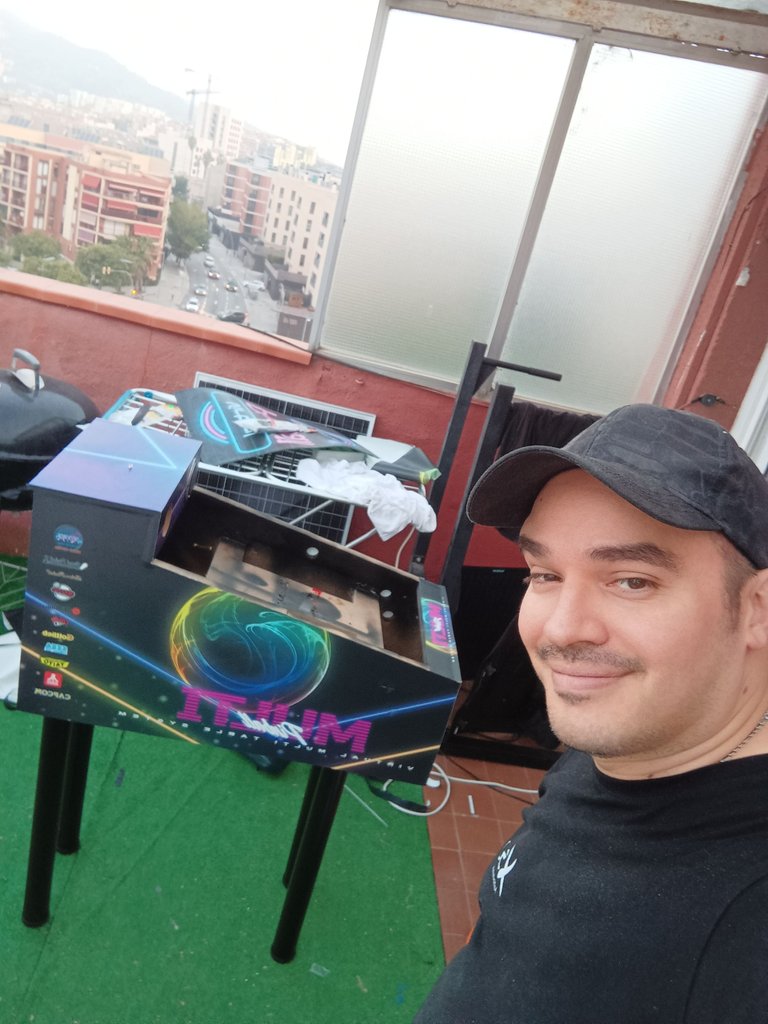
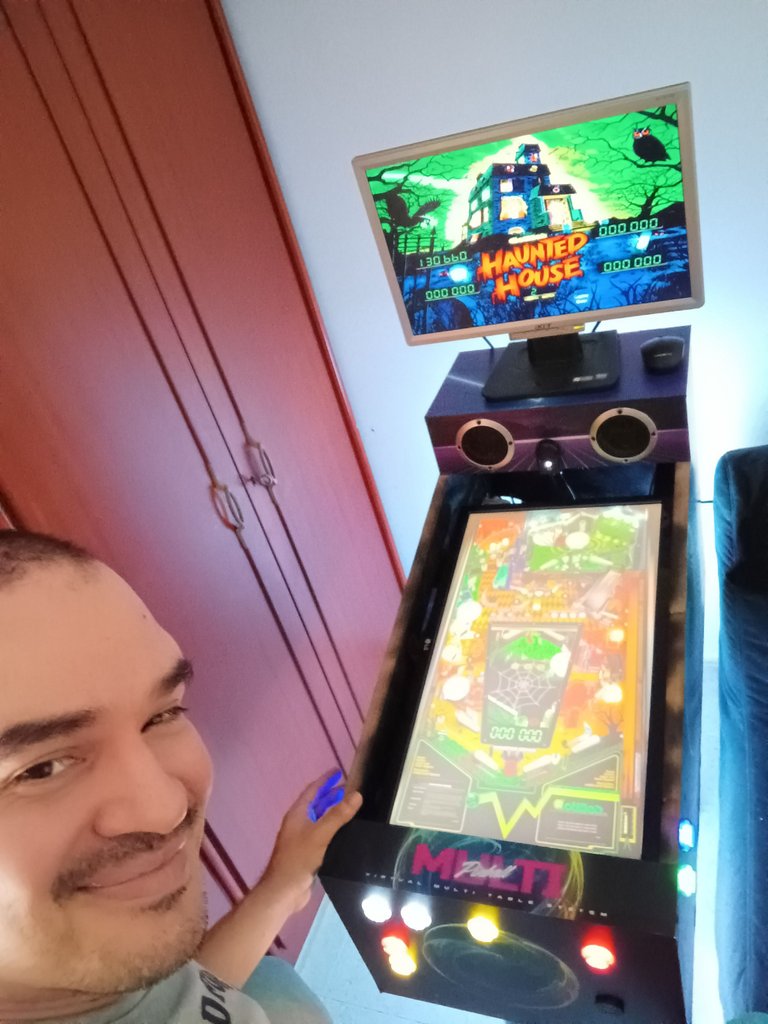
Una vez terminado en casa tengo que decir que me da mucha alegría cada vez que enciendo esta máquina.
Es espectacular, y no solo se trata de las emulaciones y las mesas que son super divertidas porque además instalé un jukebox ó rockola en la cual puedo reproducir canciones de muchos tipos de clásicos de los 70s, 80s, 90s, y además de reproducir el vídeo en la pantalla de arriba en la pantalla de abajo tiene un vídeo muy vistoso, que es el disco de vinilo corriendo mientras la canción está sonando.
Es para mí un lujo completo escuchar música en esa rockola mientras me estoy tomando una cervecita, y cuando juego con la máquina lo que más me emociona no es solo los juegos de pinball, sino que también recuerdo vivamente la experiencia de cómo realizar un sueño desde cero llevándolo a digital en el diseño 3D y de luego materializarlo en físico para tenerlo en mi casa.
Detalles finales
Debo mencionar los detalles finales que fueron los ángulos de PVC para evitar que se vea los bordes de la madera, instalé un metacrilato sobre la pantalla del playfield, cosa que va muy bien porque mi hijo de dos años a veces cree que la pantalla es táctil y le mete la mano, pero gracias al metacrilato tengo el monitor protegido. también puse esquineros de acero inoxidable en todo el gabinete y se ve muy bien el acabado.
Puse unos protectores de goma en las esquinas donde uno pone las manos para jugar cosas que hace que el tacto sea más suave para la mano.

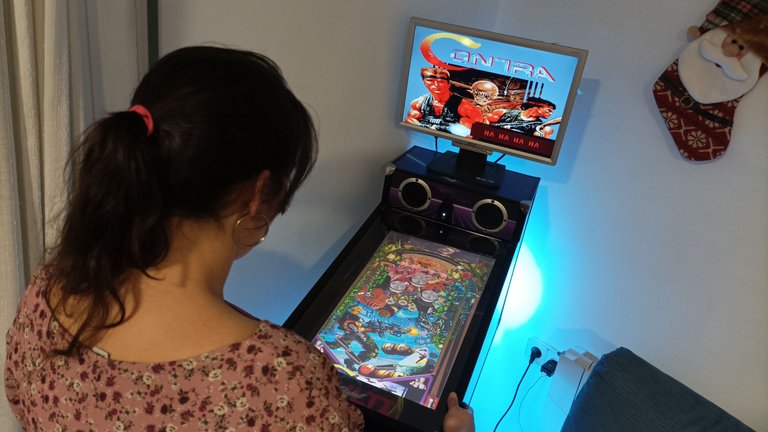
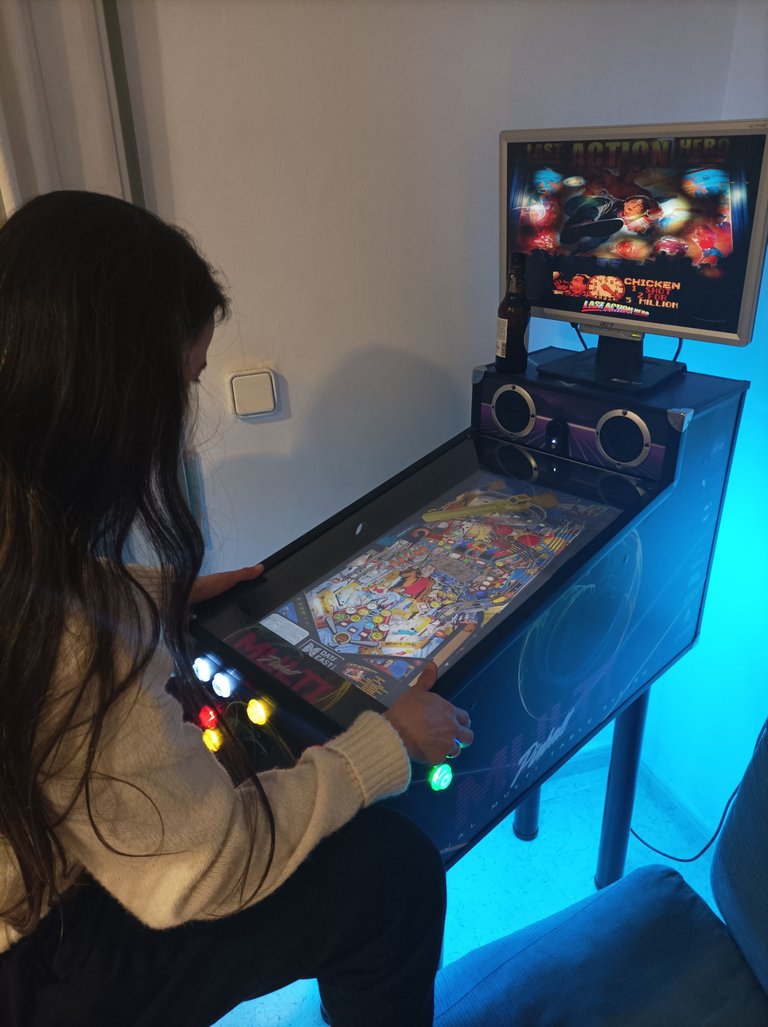
Las mesas de pinball en total, instale un aproximado de 130, son muchas mesas y como complemento está el jukebox qué es la rockola dónde puede escuchar música con los vídeos que se reproducen en la pantalla de arriba pero además de todo esto tengo mesas vintage que no tienen música, solo tienen los efectos de sonido y entrando en los foros de pinball descubrí que existe un código que le puedes agregar a las mesas de forma individual para agregar una carpeta de MP3 y reproducir las canciones de forma aleatoria mientras juegas, por lo cual escogí varias mesas vintage que no tienen música y decidí utilizarlas como mesas específicas de algún género musical por ejemplo, la mesa “Abracadabra” la utilizo para escuchar canciones exclusivamente navideñas, hay otra mesa vintage qué es de bowling y exclusivamente reproduce gaitas Venezolanas para Navidad, hay otra mesa que utilicé y agregué puras canciones de heavy metal y en otra mesa puse puros éxitos de chatarritas de los 60 y 70 de esta forma bien sea para escuchar música, pasarla bien con unos amigos o ponerme a jugar la mesa de mi preferencia pues esta máquina cumple con creces su objetivo de entretener.
Espero muy pronto hacer un vídeo con todas las mesas que tiene el frontend, mis mesas preferidas y hacer un gameplay de algunas de las mesas que más me gustan y también mostrándoles cómo funciona el Jukebox.
También debo decir que las cornetas 2.1 HP que en teoría son pequeñas y no tienen mucha potencia, al estar encajonadas dentro de gabinete el sonido que sale es muy pero muy agradable y tiene un volumen excelente, cumplen su función más allá de lo esperado.
Esta máquina ha superado mis expectativas y cada vez que la enciendo y me pongo a jugar con ella no dejo de felicitarme a mí mismo, espero que hayan disfrutado el post y muchas gracias por leer hasta aquí.
Si tienen ganas de cumplir un sueño poco a poco con herramientas necesarias y materiales de segunda mano que se pueden encontrar a muy buen precio se puede ir fabricando y realizando. Lo importante es informarse correctamente e investigar lo más posible, preguntar en comunidades pues hay muchas personas que están dispuestas a dar información y ayudar para la realización de proyectos DIY porque son comunidades de personas muy entusiastas a realizar sus sueños.
Saludos a todos.
This is a publication that I want to share with a lot of pride and joy as it is the final product of my second DIY project. My own Virtual Pinball table
In this project I not only did carpentry but I also worked very hard on the programming and installation of the emulation software, and I must say that I installed table by table testing one by one making sure that all of them worked correctly.
This project took me about 4 to 5 months since I was working only on Saturdays every weekend and it all started with seeing on the internet many reference pictures of people building their own virtual pinball table.
During the research process it was very interesting to find and discover an underworld of people who love the pinball hobby. I found groups and forums with a lot of information about it. In these forums are posted daily photos of people who are building their project and that generated me many ideas, so I decided to buy the computer, a second hand monitor that I got at a very good price, download the pinball emulation software and the tables.
But it is not only about installing software and tables to play, there must also be a program called front end. The front end is a program that starts as interface and in this one you can choose all the tables that you have installed besides being visually very attractive.This front end is called Pinup Popper Baller Installer. You can look for it on Facebook.
This installation and configuration process took me about a month to do it because it is not as simple as installing a video game and play it all at once, on the contrary, it is very customized and somewhat robust, so you have to know step by step what you are installing, if the configuration of your pinball is a two screen or even three screens and any change that may happen modifies the configuration and you have to start from scratch in some cases.
After programming and having everything configured with the software comes the part of the graphic design where it takes as a primary measure the playfield monitor, where the game table itself is.
It is a second hand monitor that I bought for about 20 € and is 24 inches, to define the measures of the cabinet I took as a reference that monitor, in addition to see the reference photos that I downloaded from the internet, I also had to take measurements of the computer to know its exact size and depth.
All the elements that could go inside the cabinet were measured and modeled inside the 3D program called Sketchup, thanks to this program I could make the 3D design and analyze the construction method when I had the finished wood.
With the 3D model ready and the measurements clearly visible I decided to order the cut timbers, many people start by buying the whole plank of wood and then cut it to size. This method doesn't work for me because the place where I was making the pinball table is an apartment and it was the top floor at the top so transporting a 4 m x 2 m board was an impossible task. But I found a company that makes custom cuts as requested and is completely online.
I took the measurements from the SketchUp I did a process of disassembling the model in 3D and with this process I could get all the measures board by board, the service they gave me in the company cortemaderas was excellent because from the smallest wood of 2 cm by 15 cm to the largest they cut them and met all the requirements of the cuts I requested.
In 2 weeks I received all the wood perfectly measured to begin the assembly process, however there were a couple of cuts that I had to make manually because they are diagonal cuts or some irregular shape. Cortemaderas can also make irregular cuts but they charge much more expensive for the type of machine they use and as I was going for the most economical service I decided to use only straight cuts, ie square or rectangular wood, so I had to use a jigsaw and draw as accurately as possible and with the utmost care because an error of one centimeter can ruin the entire assembly process in this type of project.
The vinyls I can proudly say that they were also made from scratch by myself, the experience I got making the arcade machine allowed me to have more clear the process of the design and printing and fixing of the vinyls.
At first I thought of making a themed vinyl, probably Batman or the movie Tron for having a retro futuristic feel but considering that it was going to be a multi-table machine and it is obvious that it is an emulation of the electromechanical machines I decided to go for something more generic that would allow you to understand what a multi-table machine is and that it does many things at the same time.
As I had already made the arcade design with a futuristic 80's retro style, I went more or less along the same line, I simply found an abstract black background with intense colors and added some neon orange and blue lines, then I worked the font to give it that 80's retro touch with plenty of neon lighting and vivid colors and ended up naming the cabinet as the "multi pinball", which perfectly describes what the machine is capable of doing.
Gluing the vinyl to the wood tends to be a little tricky or even cumbersome at first, but when you have a little practice, and since I did the arcade project I already have some level of experience with this vinyl gluing thing so it was pretty easy and fast.
After gluing it, remove the excess on the edges with a cutter and cut in cross the parts that cover the holes where the buttons go, once the vinyl is glued you have to be very careful not to damage it, you have to carefully manipulate the cabinet to change its position and continue working on other things that are pending, such as turning it upside down to fix the legs.
The legs are removable and have a base that is bolted to the bottom of the cabinet but the legs themselves have a screw in the middle that screws into the base.
These legs are regular table legs, since the original pinball legs go on the outside of the cabinet as if they were angles, but I did not find any such legs and although they are simpler in structure they tend to be quite expensive because they are pinball specific.
To fix the computer on the inside use T-Racks or flanges so that when transporting the cabinet nothing moves inside, it is important that nothing is left dancing inside or making weird sounds.
The speakers are 2.1 HP speakers that I bought second hand for about 15 € if I remember, the idea of this project was always to buy second hand things as cheap as possible since I am not doing the project to the top of the capabilities of a virtual pinball, for example I am not adding solenoids to simulate impacts of electromechanical parts nor am I adding a plunger puller. With the buttons I have to do all the functions.The electrical part of which turns on the whole machine is nothing more than a strip of 6 sockets, I cut the cable to this strip and I put to the cabinet a recessed IEC socket with its external cable, this recessed socket has a switch and a fuse.
As an air extractor I used a normal USB computer fan, the kind you put on your desk to cool off in summer, I simply took it out of its protective grill and screwed it directly to the back door of the cabinet and the USB that feeds the fan I connected it to the computer, this way when I turn on the computer the fan turns on.
I used an external switch to turn on the computer, that is, we all know that the computer has its power button on the case, I went to the motherboard and removed the power switch that goes in the case, I bought an external switch on Amazon that has a cable of about 1 m, this switch I embedded it in the cabinet and the cable reaches the motherboard and so I turn on and off the computer without accessing the inside of the cabinet.I installed a 5m strip of LED lights, this is decorative, it is not necessary but I really like it when you turn on the cabinet and it illuminates the floor and the back. I also did this with the arcade project and I really like the way it looks.
Once finished at home I have to say that I get a lot of joy every time I turn this machine on.
It is spectacular, and it is not only about the emulations and the tables that are super fun because I also installed a jukebox or jukebox in which I can play songs of many types of classics of the 70s, 80s, 90s, and in addition to playing the video on the top screen on the bottom screen has a very colorful video, which is the vinyl record running while the song is playing.It is for me a complete luxury to listen to music on that jukebox while I'm having a beer, and when I play with the machine what excites me most is not only the pinball games, but I also vividly remember the experience of how to realize a dream from scratch taking it to digital in 3D design and then materialize it in physical to have it in my house.
Final details
I must mention the final details that were the PVC angles to avoid seeing the edges of the wood, I installed a methacrylate over the screen of the playfield, which goes very well because my two year old son sometimes thinks that the screen is tactile and gets his hand, but thanks to the methacrylate I have the monitor protected.
I also put stainless steel corner pieces all over the cabinet and it looks very nice finished.
I put some rubber protectors on the corners where you put your hands to play things that makes the touch softer for your hand.The pinball tables in total, I installed approximately 130, there are many tables and as a complement is the jukebox which is the jukebox where you can listen to music with the videos that are played on the screen above but in addition to all this I have vintage tables that have no music, only have the sound effects and entering the pinball forums I discovered that there is a code that you can add to the tables individually to add an MP3 folder and play the songs randomly while you play, so I chose several vintage tables that do not have music and decided to use them as specific tables of some musical genre for example, the table "Abracadabra" I use it to listen exclusively to Christmas songs, there is another vintage table which is bowling and exclusively plays Venezuelan bagpipes for Christmas, there is another table that I used and added pure heavy metal songs and in another table I put pure hits from the 60's and 70's. This way I can listen to music, have a good time with friends or play the table of my preference because this machine more than fulfills its objective to entertain.
I hope very soon to make a video with all the tables that has the frontend, my favorite tables and make a gameplay of some of the tables that I like the most and also showing how the Jukebox works.
I must also say that the 2.1 HP horns that in theory are small and do not have much power, being encased inside the cabinet the sound that comes out is very but very nice and has an excellent volume, they fulfill their function beyond expectations.
This machine has exceeded my expectations and every time I turn it on and start playing with it I keep congratulating myself, I hope you enjoyed the post and thank you very much for reading this far.
If you have the desire to fulfill a dream little by little with the necessary tools and second hand materials that can be found at a very good price you can go making and realizing it. The important thing is to be properly informed and research as much as possible, ask in communities because there are many people who are willing to give information and help for the realization of DIY projects because they are communities of very enthusiastic people to realize their dreams.
Greetings to all
https://twitter.com/1635402660248444929/status/1642072294980714498
https://twitter.com/80429371/status/1642609307136020481
https://twitter.com/1496283082340589571/status/1642974706964766731
The rewards earned on this comment will go directly to the people( @augusto-cordova, @chechostreet ) sharing the post on Twitter as long as they are registered with @poshtoken. Sign up at https://hiveposh.com.
Hey @diegoaudio, just letting you know that looks like you aren't registered in @poshtoken :) If you want to earn some posh you have to register using the webpage https://hiveposh.com :D
Hi, didn't know about the registration, I'll check it out and do that, thanks
Congratulations @diegoaudio! You have completed the following achievement on the Hive blockchain And have been rewarded with New badge(s)
Your next target is to reach 3750 upvotes.
You can view your badges on your board and compare yourself to others in the Ranking
If you no longer want to receive notifications, reply to this comment with the word
STOPCheck out our last posts:
Support the HiveBuzz project. Vote for our proposal!
Hola! Jo menudo trabajazo para hacer la máquina de pinball. Quedó perfecta! Se ven sencillos los pasos que hiciste pero yo seguro que con el tema del cableado me acabaría liando jajaja.
Te iba a comentar que se está hablando de hacer un encuentro entre hivers que estamos en España. Si quieres unirte al grupo de Telegram es https://t.me/+XMSvX0CtC0wyYTU0 sino cualquier cosa te avisaría por aquí en un comentario. 😁 Un saludo !
Genial, síii, fue un trabajo pero el proceso fue muy entretenido y emocionante y gracias a las empresas que encontré aquí en España el trabajo me fue más fácil y pulido. Aún flipo cuando la enciendo o la veo en casa, no me lo creo.
Ya me uno al grupo de Telegram, me parece brutal poder encontrar otros hiciera en España pues no conozco a nadie hehehe gracias por la invitación un placer.
Esa maquina me encantó hermanito, te quedo brutal!! Mi hermano César construyó hace ya muchos años un Arcade/Jukebox que aun esta en casa de mis padres. Actualmente no esta en funcionamiento por un error en el disco duro, pero este post me ha inspirado en recuperarlo ya que estos proyectos tienen la magia de lo hecho en casa y son garantía de diversión en casa 😄.
Querer?.... Ese proyecto hay que rescatarlo. Eso es un bien familiar y como entretenimiento lo puedes usar en casa o en una sala de espera de un negocio o un bar... Manos a la obra con eso y espero ver fotos y vídeos. Un abrazo. Que fino que te inspire el post.
Diossss te quedo PRECIOSO! menuda hazaña el haber hecho eso hermano, te felicito!
Muchas gracias, para mí es un orgullo, veo la máquina en mi casa y solo verla me da mucha satisfacción porque todo fue hecho por mi. Fue un trabajo muy emocionante en cada paso.
Una mesa de pinball en casa, el sueño de muchos. Al menos fue mi sueño varias lunas atrás, y hoy en día lo disfrutaría mucho más. Te quedó genial.
Muchas gracias, y si, el juego es super divertido, pero la experiencia de sentarse frente a la maquina y pisar los botones es muy satisfactoria, y el proiceso de diseñar y materializar todo es muy satisfactorio, es mi segundo proyecto de este tipo y hay que cuidarse porque es adictivo jajaja, Saludos.
Hermano, usted es un loco, como se le ocurre hacer tremenda máquina, pensé que iba a ser un post mostrando una mesa de pinball virtual que habías comprado, no me esperaba que la hubieras hecho usted mismo, se ve muy hermosa, además que si se siente muy retro, muy buen trabajo.
Muchas gracias, pues si, si no la tengo la inventó y ahí está jajaja. Saludos.
Usted no compra nada hecho, usted lo hace jajaja.
Me divierte hacer el manitas como dicen en España pero por ahí hay un conocido no voy a decir quién @augusto-cordova que ese no hace arcade, es que le saca componentes a una impresora de punto y hace un joystick jajaja mcgiver, augusto y su hermano cesar.
Jajajajajajaja chachoooooo y tengo cuentos de inventos como para dos cajas de cerveza 🍺 😂😂😂😂
🤣🤣🤣🤣
Hermano, que increíble trabajo. No es solamente tener una mesa de Pinball, sino el hecho de haberla construido desde los cimientos habla demasiado del esfuerzo que le pusiste, esos 4-5 meses de trabajo valieron totalmente la pena, y es impresionante ver las cosas que son capaces de crear las personas.
Increíble trabajo hermano.
Muchas gracias, su, gran parte del disfrute, más que el juego fue la experiencia de construcción, siempre que veo la máquina recuerdo cada paso y juego un poco jeje. Saludos.
Wow!! Te quedó genial! Felicitaciones muy buen post con ese paso a paso. El sueño de muchas personas.
!PIZZA
Muchas gracias y la pizza es lo mejor del mundo gracias
$PIZZA slices delivered:
@chechostreet(3/15) tipped @diegoaudio (x1)