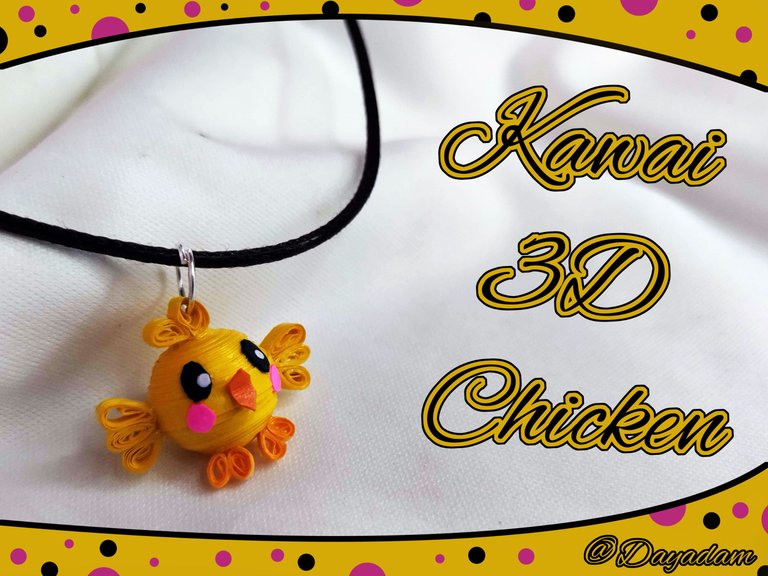
Kawai 3D Chicken Necklace Pendant Quilling Technique [Eng-Esp]
Hello everyone... ✨
Hello to my dear Hivers and the dear community of artists #HiveDIY, as always very pleased and excited to be here again, showing you my work made with love and especially for you.
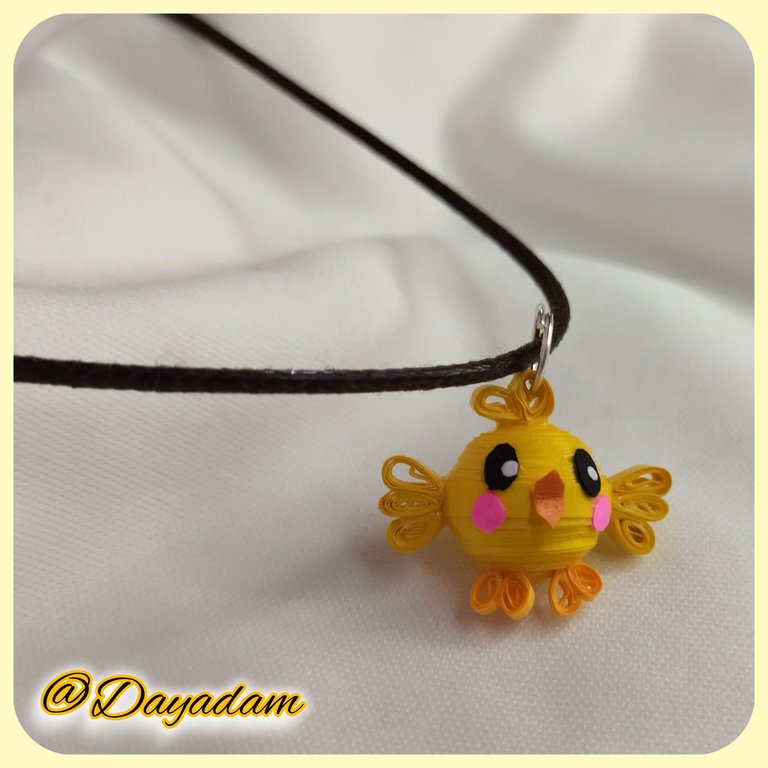
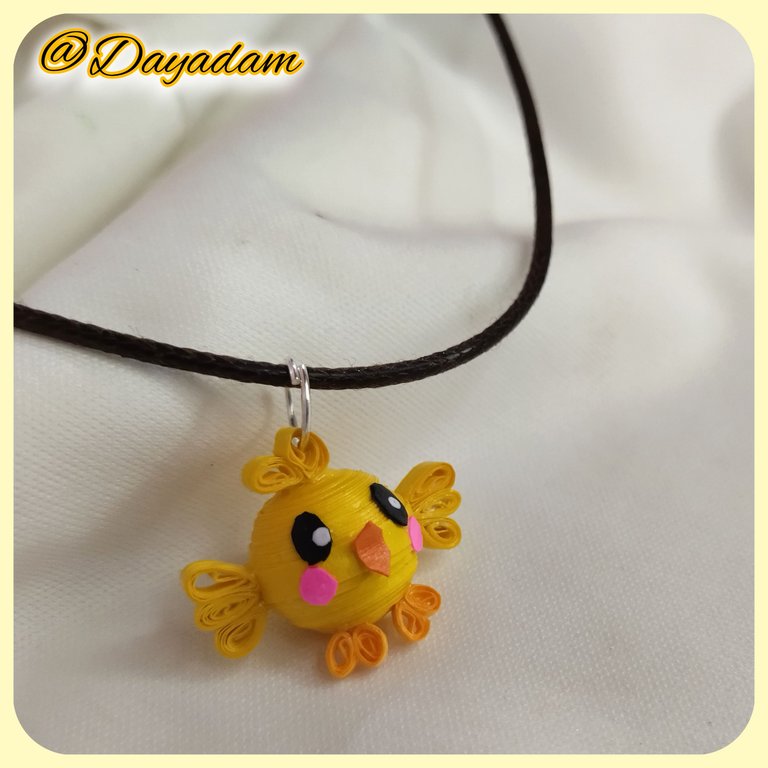
Lately I have made some figurines, pendants, keychains and other things with a Kawaii style, I love how they look, they look very cute and tender, I feel that I will continue with the theme and so today I decided to make a very small pendant of A Kawaii Chicken in 3D in the Quilling Technique, although working in miniature in many cases is more difficult is another thing I like to do, because I love even more how the pieces look, there is much more tenderness in the way of looking and appreciating the work.
If someone likes something specific in this kawaii theme you can leave it here to try to carry it out, if it comes out here do not doubt that you will have the tutorial, although before asking take into account the technique and the type of material I use (strips of paper), and not everything comes out as we want hahahaha.
Hoping you like my work, without further ado, I leave you with my creative process.
Let's start:😃

Hola a Todos...✨
Hola a mis queridos Hivers y a la querida comunidad de artistas #HiveDIY, como siempre muy complacida y emocionada de encontrarme por acá nuevamente, mostrándole mi trabajo hecho con mucho amor y especialmente para ustedes.
Últimamente he realizado algunas figuritas, dijes, llaveros entre otras cosas con un estilo Kawaii, me encantan como lucen, se ven muy cute y tiernas, siento que seguiré con la temática y por ello hoy decidí hacer un muy pequeño dije de Un Pollito Kawaii en 3D en la Técnica de Quilling, aunque trabajar en miniatura en muchos casos resulta mas difícil es otra cosa que me gusta hacer, porque me encanta mas aun como lucen las piezas, hay muchisimas mas ternura en la manera de mirar y apreciar en trabajo.
Si alguien le agrada algo determinado en esta temática kawaii me lo pueden dejar por acá para intentar llevarlo a cabo, si sale por acá no duden en que tendrán el tutorial, aunque antes de pedir tomen en cuenta la tecnica y el tipo de material que utilizo (tiras de papel), y no todo sale como queremos jajajja.
Esperando les guste mi trabajo, sin más preámbulos, les dejo mi proceso creativo.
Comencemos:😃

• Cintas de quilling de diferentes medidas.
• Aguja para quilling.
• Plantilla para moldear círculos.
• Argolla de bisutería.
• Pintura blanca al frío.
• Pega blanca extra fuerte (de carpintería).
• Tijera.
• Pincel.
• Collar de tu preferencia.
- Quilling ribbons of different sizes.
- Quilling needle.
- Template to mold circles.
- Jewelry ring.
- White cold paint.
- Extra strong white glue (carpentry glue).
- Scissors.
- Brush.
- Necklace of your choice.

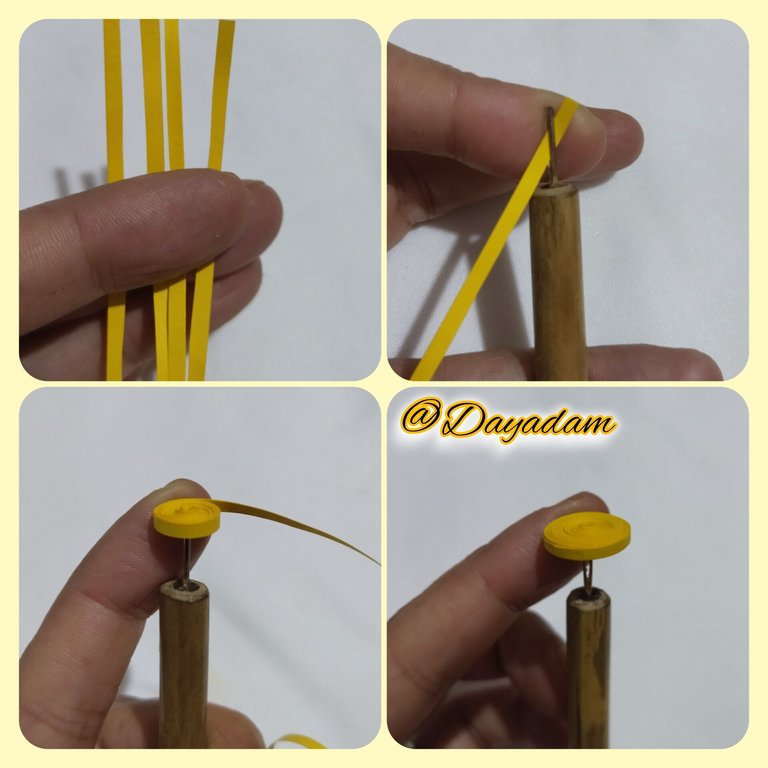
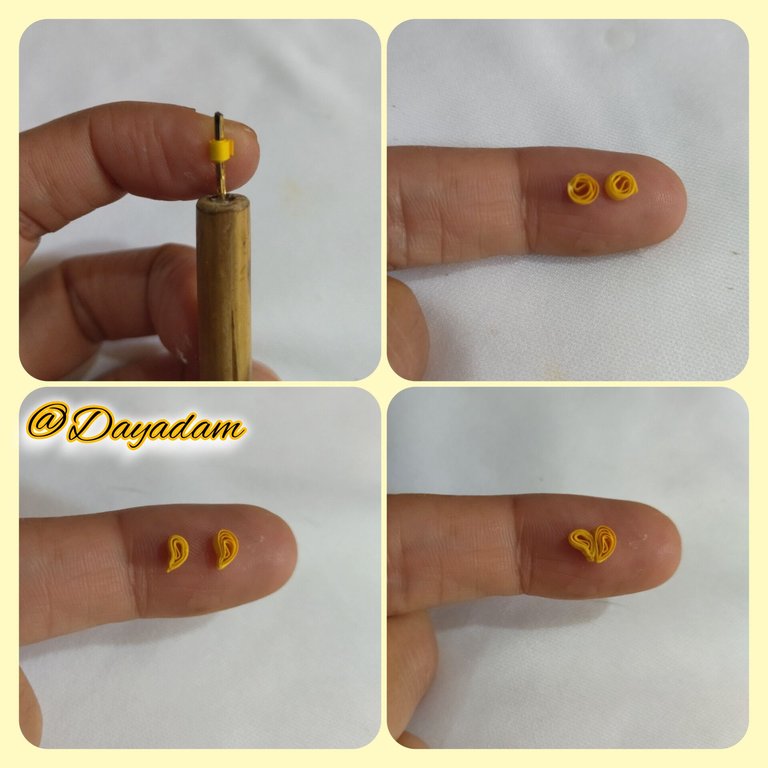
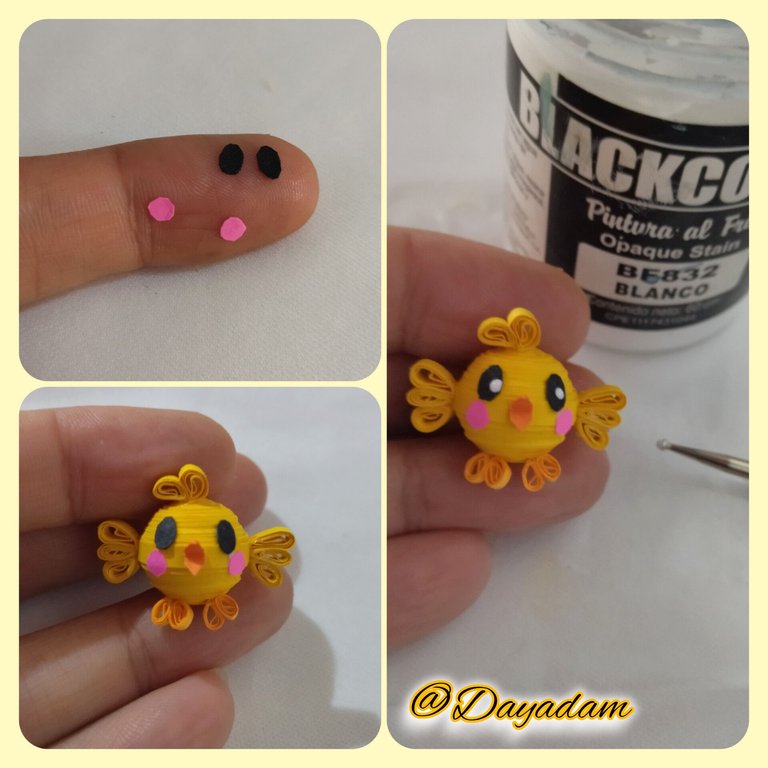
- Start by taking yellow quilling tape 3mm wide x 80cms long, with the quilling needle we are going to roll until we reach the end of the tape, take it out of the needle and seal it with extra strong white glue. We are going to obtain a closed circle, like this we will need 2 equal ones.
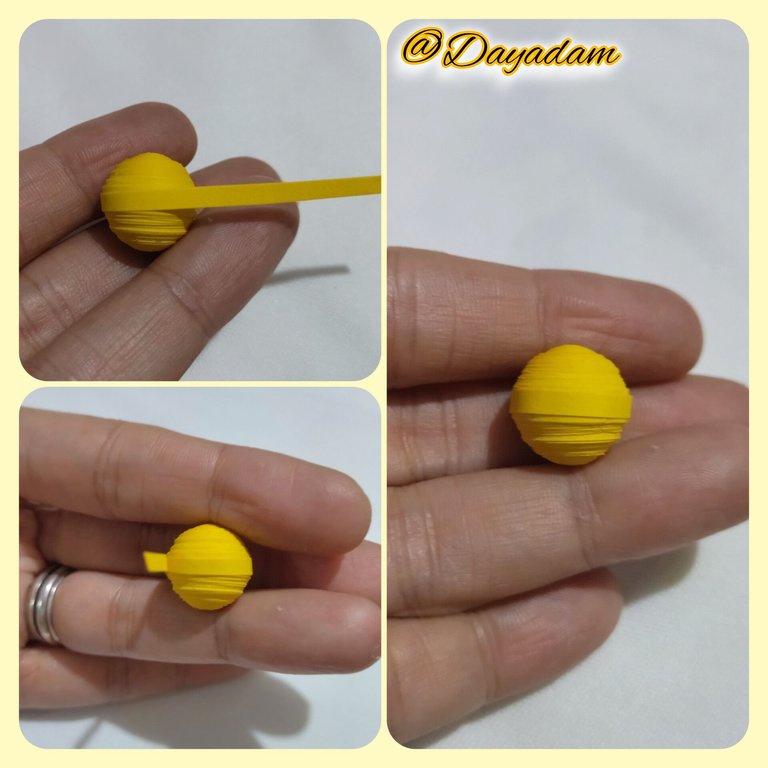
- We will mold the closed circles in a template to mold circles, in the measure number 15mm, we will do this with both circles, we take out of the mold and apply extra strong white glue on the inside, to prevent the pieces from moving or deforming, we will let them dry very well.
- Once the circles are dry, we will glue both of them with a yellow tape around them with a little extra strong glue.

• Comenzamos tomando cinta para quilling de color amarillo de 3mm de ancho x 80cms de largo, con la aguja para quilling vamos a enrollar hasta llegar al final de la cinta, sacamos de la aguja y sellamos con pega blanca extra fuerte. Vamos a obtener un círculo cerrado, como este necesitaremos 2 iguales.
• Moldearemos los círculos cerrados en una plantilla para moldear círculos, en la medida numero 15mm, esto lo haremos con ambos círculos, sacamos del molde y aplicaremos pega blanca extra fuerte en la parte interna, para evitar que se muevan o deformen las piezas, dejaremos secar muy bien.
• Secos los círculos pegaremos ambos pasando una cinta amarilla por alrededor con un poco de pega extra fuerte.

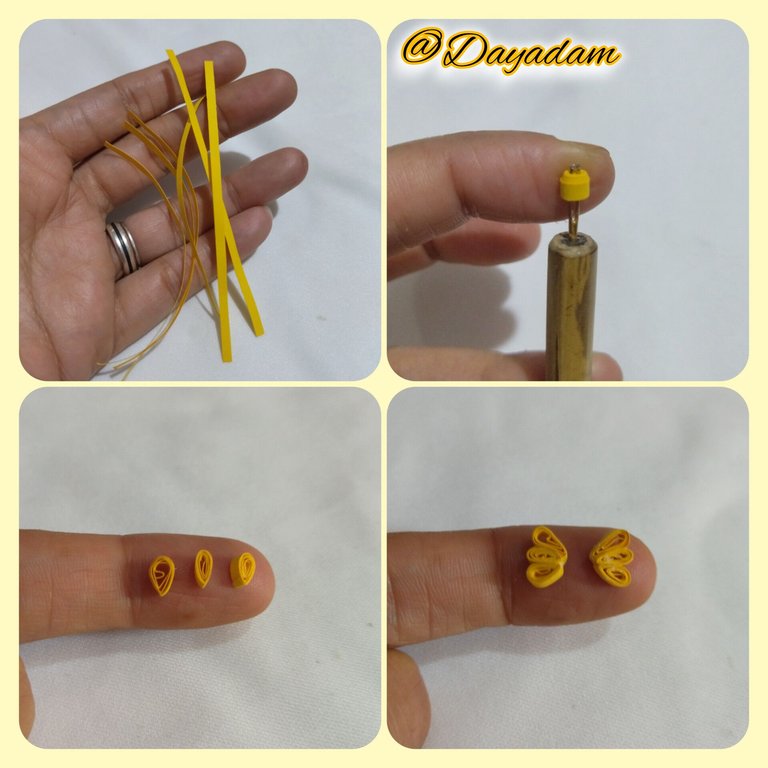
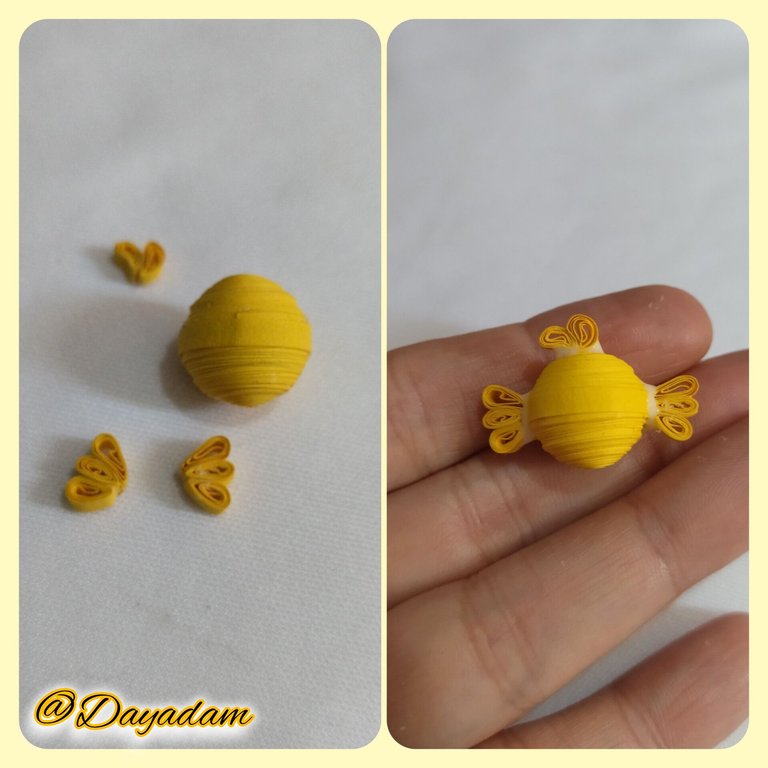
- For the wings we will take 3mm wide yellow quilling tape, with the quilling needle we will make 6 small open circles which we will mold in the shape of a drop, we will glue them in groups of 3 (we reserve).
- For the feathers of the head, under the same previous parameters we will make 2 much smaller open circles, finished we will mold them in the shape of a drop but with an inclined touch, we will glue both pieces.
- At this point we will proceed to glue the wings and the feathers of the head on the previous piece that we made, which is the body of the chick.
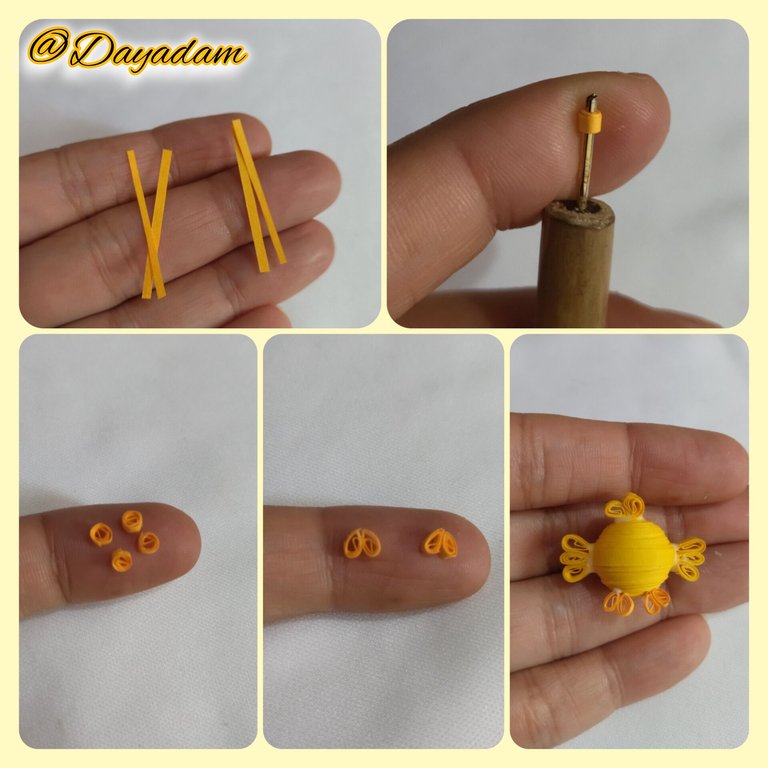
- For the legs, we will make 4 orange open circles with 2mm wide tape, mold them in the shape of a drop, join them in groups of 2 and glue them on the bottom of the chick's body.
• Para las alas vamos a tomar cinta para quilling de color amarillo de 3mm de ancho, con la aguja para quilling realizaremos 6 pequeños círculos abiertos los cuales moldearemos en forma de gota, los pegaremos en grupos de 3 (reservamos).
• Para las plumas de la cabeza, bajo los mismos parámetros anteriores realizaremos 2 círculos abiertos mucho mas pequeños, finalizados los moldearemos en forma de gota pero con un toque inclinada, pegaremos ambas piezas.
• En este punto procederemos a pegar las alas y las plumas de la cabeza en la pieza anterior que realizamos, que es el cuerpo del pollito.
• Para las patitas realizaremos 4 círculos abiertos de color naranja con cinta de 2mm de ancho, moldeamos en forma de gota, unimos en grupos de 2 y pegaremos en la parte de abajo del cuerpo del pollito.
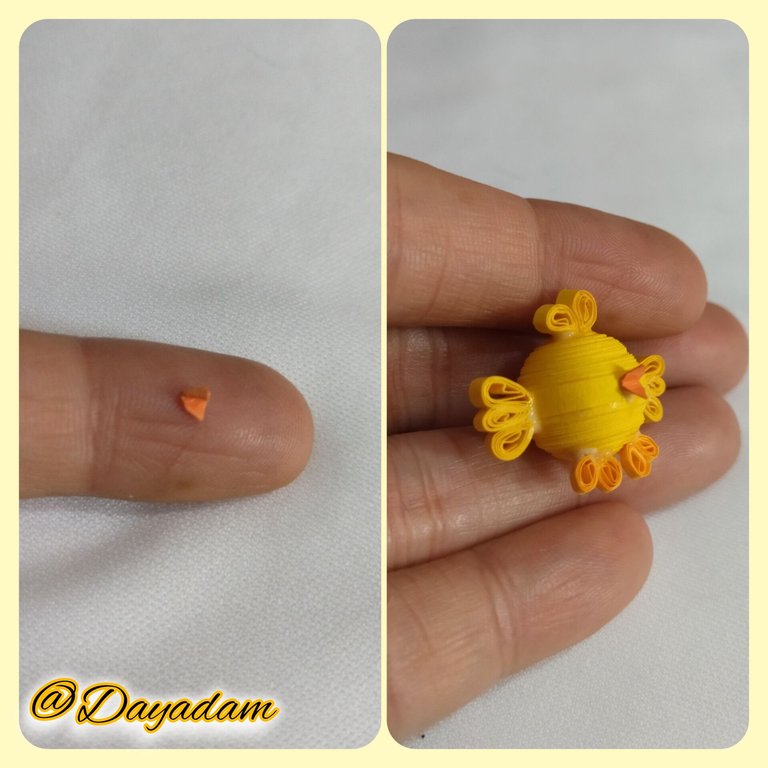
- Let's go with the chick's beak, I made it with a small piece of orange ribbon which I cut in the shape of a diamond and folded in half, glue it open on the face of the chick.
- For the eyes and cheeks cut out the corresponding figures of black and fuchsia quilling, glue to the face of the chick, with cold white paint and an embosser paint the small lights of the eyes.
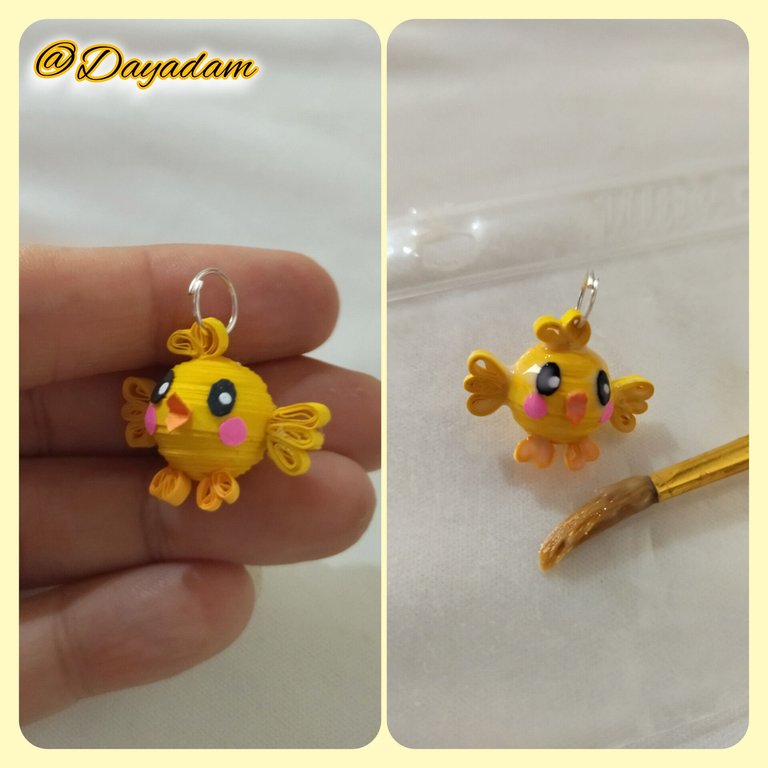
- Take a medium-sized costume jewelry ring and place it on one of the feathers of the chick's head.
- To finish, to give protection, shine and plasticity to the pendant, I proceeded to apply with a brush several layers of extra strong white carpentry paint, letting it dry between one layer and the other.
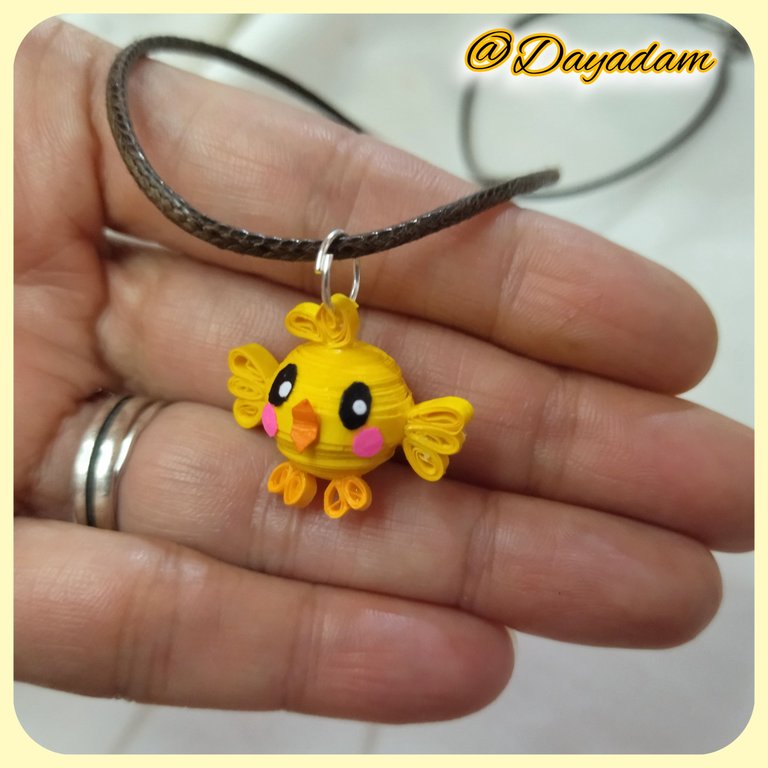
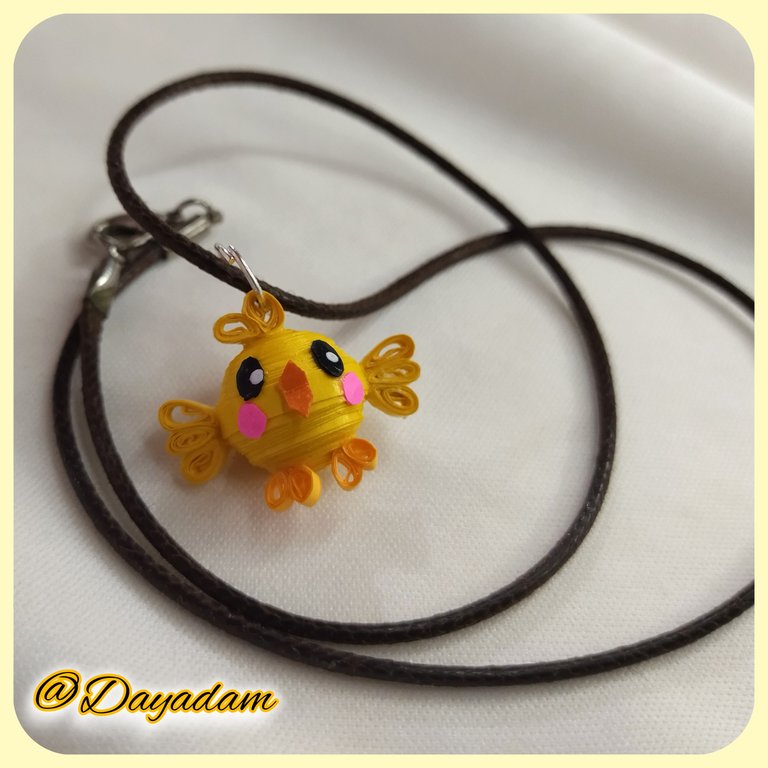
In this way we have ready this little pendant for necklace of a 3D Kawaii Chick ***.
• Vamos con el pico del pollito esto lo realice con un pequeño trozo de cinta de color naranja el cual pique en forma de rombo y doble a la mitad, pegue abierto de la carita del pollito.
• Para los ojos y las mejillas recorte las figuras correspondientes de quilling color negro y fucsia, pegue a la cara del pollito, con pintura blanca al frío y un repujador pinte las pequeñas luces de los ojos.
• Tome una argolla de bisutería mediana y coloque en una de las plumas de la cabeza del pollito.
• Para finalizar, darle protección brillo y plasticidad al dije, procedí a aplicar con un pincel varias capas de paga blanca extra fuerte de carpintería dejando secar entre una capa y otra.
De esta manera tenemos listo este pequeño dije para collar de un Pollito Kawaii en 3D.


What did you think, did you like it?
I hope you did, I hope you liked my explanation, procedure and photos, I made them with love for you.
"Let out that muse that inspires you, and let your imagination fly".
Thank you all, see you next time.
¿Qué les pareció, les gustó?
Espero que sí, que les haya gustado mi explicación, procedimiento y fotos, los hice con mucho cariño por y para ustedes.
"Deja salir esa musa que te inspira, y deja volar tu imaginación".
Gracias a todos, nos vemos en la próxima.

Posted Using InLeo Alpha
Hermoso y muy tierno amiga, un trabajo súper hermoso, siempre e admirado su trabajo.
Gracias mi bella por tus lindas palabras. Mi admiración para ti también. Abrazos...
Una belleza este proyecto y todos en realidad, tu arte siempre es excelente
Gracias hermosa, un placer para mi leer tus bellos comentarios hacia mi trabajo. Me encanta que te haya gustado.
Que tengas bella noche.
Hola @dayadam, que lindo pollito, es una cuchitura; tienes un gran talento y creatividad. 🐣🐥🐥
Saludos!
Muchisimas gracias mi corazón, un gusto que sea de tu agrado mi trabajo.
Saludos de vuelta para ti también...
Es un excelente trabajo, ciertamente tienes un gran talento en el área de quilling. Este me parece encantador por lo que hiciste, un pollito.
!discovery 45
Muchísimas gracias por tus palabras hacia mi trabajo, tu visita y por el apoyo. Me alegra que te gustará este pollito Kawaii 💙
This post was shared and voted inside the discord by the curators team of discovery-it
Join our Community and follow our Curation Trail
Discovery-it is also a Witness, vote for us here
Delegate to us for passive income. Check our 80% fee-back Program
Thanks for the support @gaboamc2393 and @discovery-it ✨
Amiga, voy a decir como tú, aiins!!💗❣️Te quedo demasiado bello y tierno, lo adoro
Ainsssss jajajaja tan bella mi corazón. Un placer que te haya gustado mi micro pollito. Gracias por tu presencia. Abrazos 💕
Sí, ese pollito es supercoqueto me encanto.
Feliz día amiga, feliz comienzo de semana.💖
<3
Lo amé!!!! Mi parte favorita fueron las patitas...eso es microscópico 🤭🤭🤭.
Me gustaría que hicieras un sándwich Kawaii, ese sería un dije muy lindo y creativo.
Gracias por compartir este paso a paso, que como dices, es difícil pero divertido lo que haces. Me encanta tu trabajo 😍.
!LUV
!PIZZA 🍕
Verdaderamente lo veo y me preguntó cómo pude hacer esto tan pequeño, me pasa cada vez que hago algo parecido, esas patitas y el piquito fueron un reto logrado.
Me alegra mucho que te gustará.
Un sándwich Kawai eso debe quedar hermoso, anotado ✍🏻📝
!PIZZA
$PIZZA slices delivered:
chacald.dcymt tipped dayadam
@dayadam(1/5) tipped @chacald.dcymt
Thanks @pizzabot
Oh que cosita más hermosa, encantador ese dije, la técnica de Quilling me parece una que de verdad se pueden hacer y crear grandes cosas. 😊
Oh what a beautiful little thing, lovely that charm, the Quilling technique seems to me to be one that you can really make and create great things. 😊
La técnica es muy versátil y si se pueden lograr grandes y variadas cosas, todo está en la creatividad.
Gracias por tus palabras hacia mi trabajo, es un placer que te guste.
Abrazos... 💕
😍 @dayadam eres toda una maestra en el arte del Quilling 😊 Dígame en las figuras en 3D 🤯
Otra creación en versión Kawaii podría ser un cupcake 🧁 Bueno digo yo jeje, no se si sea posible😅 o un Totoro 😭
Este pollito esta muy lindo 🤗 Desde que comienza a ser un círculo cerrado ya me parece muy muy bonito.
¡Feliz domingo! ✨
Ainssss que linda gracias, graciassss, honor que me haces con tus palabras 💕
Te ratifico mi agradecimiento por leer realmente la publicación y...
Ohhhh un Totoro 🤔🤩
Un cupcake 🤔😍
A ver qué saleeeeee. Anotadossss ✍🏻📝
Bendiciones en este día ✨
A cute little Chicken pendant. Fine quilling work as always
Thank you very much for the support and words towards my work. A pleasure that you like it @diyhub ✨
Nice chick, and good step by step, well explained. greetings @dayadam
Thank you for stopping by and for your words. I'm glad you'll like it. Greetings @enraizar
Saludos @dayadam
From Venezuela, our witness drives decentralization and the adoption of Web3 technology, creating opportunities for the local community and contributing to the global ecosystem. // Desde Venezuela, nuestro testigo impulsa la descentralización y la adopción de la tecnología Web3, generando oportunidades para la comunidad local y contribuyendo al ecosistema global.
Sigue, contacta y se parte del testigo en: // Follow, contact and be part of the witness in:
Gracias por el apoyo @hispapro
Congratulations, your post has been curated by @dsc-r2cornell. You can use the tag #R2cornell. Also, find us on Discord
Felicitaciones, su publicación ha sido votada por @ dsc-r2cornell. Puedes usar el tag #R2cornell. También, nos puedes encontrar en Discord
Thanks for the support @dsc-r2cornell ✨
Muy genial como manejas esta técnica, tiene un buen acabado, felicidades!! ¿Has usado barniz sintético en la etapa final?
Muchísimas gracias amigo @torre-alba. Me complace mucho que te guste.
Cuando inicie con esta técnica para emprender y vender, estuve años utilizando brillo espejo, y resina artística para plastificar y proteger la pieza, lamentablemente luego que enferme de covit no pude utilizar más el químico.
Probé opciones e hice pruebas ,y algunos barnices hacían que las piezas se tornaran amarillas luego de un tiempo, temi no poder volver a trabajar con mi quilling por lo menos para vender y casi que enloquecí jajajaja, probé con esta pega blanca extra fuerte de carpinteria y vi que protegía, plastificaba, endurecía y me daba el acabado deseado dependiendo de la que usará, bien sea mate de secado rápido, o la brillante con la cual debo esperar mas para que seque, pero endurece muchísimo a tal punto que muchos no creen que es papel.
Hasta ahora me ha ido bien, igual debo hacer más pruebas. Todo está en que la gente sepa que se trata de una pieza artesanal, que es solo para lucir y no debe ser mojada, aún usando resina tampoco de debe mojar.
En fin la técnica es versátil, y según para que se haga la pieza uno piensa la protección que debe darle. Pero sigo con pruebas.
Espero te satisfaga la respuesta, jajaja.
Saludos amigo.
Ah ya comprendo!! Claro el olor de los sintético es invasivo, bueno sabes que las laca son un poco ámbar, por eso da un brillo amarillento, supongo que son nitrocelulosa, acá en el taller tengo lustre a base de agua que lo tengo para cuando trabajo con cuero, mi compañera y yo lo hemos usado en muchas cosas, en papel no lo hemos usado es muy líquida, también venden una barniz a base gua para uso de carpintería, pero el que haces con cola, es el clásico!! Da un buen resultado.
Éxitos!